tasty tales kitchen

  • Home
  • Dinner
  • Desserts
  • Drinks
  • Appetizers
  • Contact
  • About
  • Privacy Policy
menu icon
go to homepage
  • Home
  • Dinner
  • Desserts
  • Drinks
  • Appetizers
  • Contact
  • About
  • Privacy Policy
search icon
Homepage link
  • Home
  • Dinner
  • Desserts
  • Drinks
  • Appetizers
  • Contact
  • About
  • Privacy Policy
×

BBQ Ranch Chicken Salad Flavorful and Easy Recipe

Aug 19, 2025 · by Natalie ·

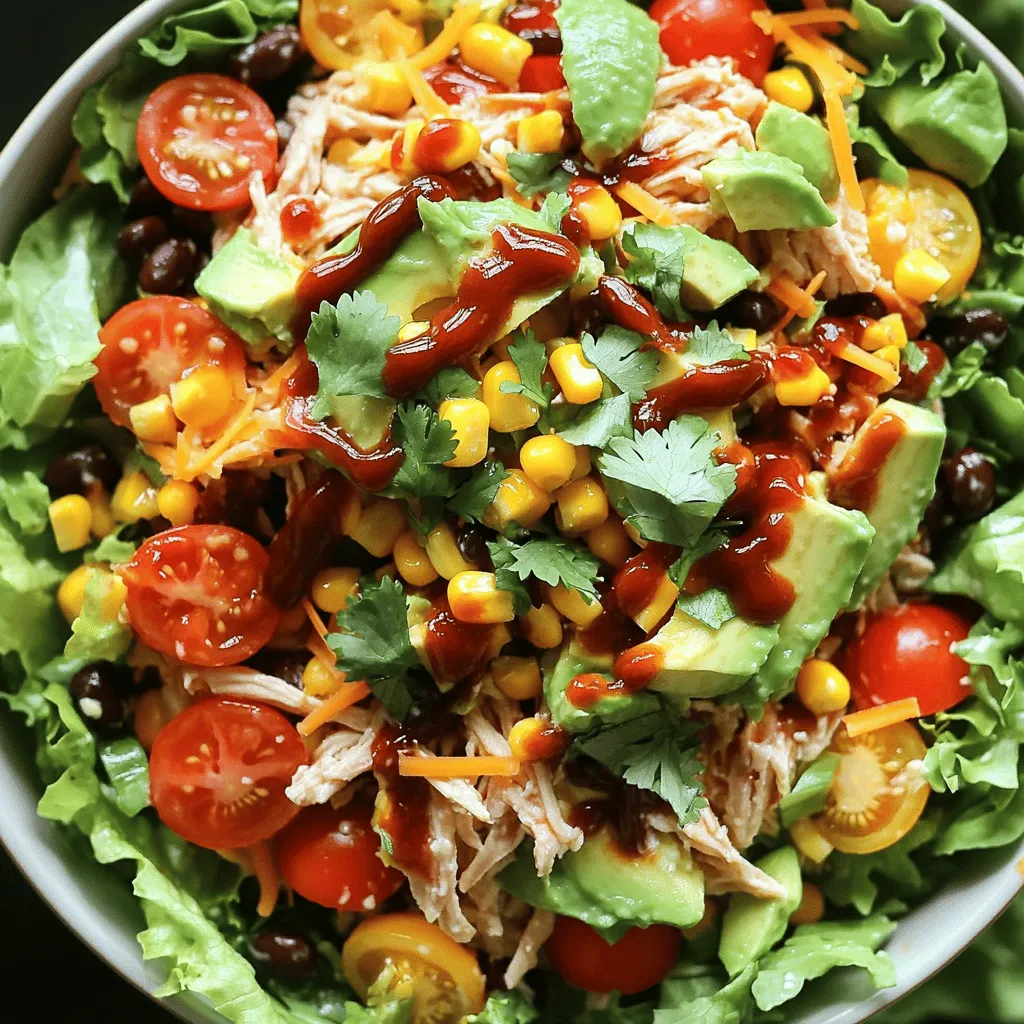
Are you ready to level up your lunch game? My BBQ Ranch Chicken Salad is not just delicious; it's also quick and easy to make. With crispy greens, tender chicken, and that smoky BBQ flavor, this salad brings excitement to your plate. Whether you're hosting a picnic or just need a tasty meal at home, I’ll guide you step-by-step to create this crowd-pleaser. Let's dive in and whip up something special!

Ingredients

Essential Ingredients for BBQ Ranch Chicken Salad

This salad needs a few key items to shine. You will need:

  1. 2 cups shredded cooked chicken (rotisserie chicken works well)
  2. 1 cup BBQ sauce (choose your favorite brand or make your own)
  3. 4 cups mixed greens (a blend of romaine, arugula, and spinach)
  4. 1 cup cherry tomatoes, halved for sweetness
  5. 1 cup corn, cooked (fresh or canned)
  6. ½ cup black beans, drained and rinsed
  7. ½ red onion, thinly sliced
  8. 1 ripe avocado, diced
  9. 1 cup shredded cheese (sharp cheddar or Mexican blend)
  10. ½ cup ranch dressing (homemade or store-bought)
  11. Salt and pepper to taste
  12. Fresh cilantro, chopped (optional but recommended)

These ingredients combine to create a colorful and tasty salad that everyone will love.

Optional Ingredients to Enhance Flavor

You can add extra touches to your salad to make it even better. Consider these options:

  1. Jalapeños for heat
  2. Sliced bell peppers for crunch
  3. Fresh lime juice for a zesty kick
  4. Croutons for extra texture

These extras can elevate your salad and suit your taste.

Recommended Brands for BBQ Sauce and Ranch Dressing

Choosing the right sauces can make a big difference in flavor. I recommend these brands:

  1. BBQ Sauce: Sweet Baby Ray's, Stubb's, or homemade
  2. Ranch Dressing: Hidden Valley, Ken's, or your own recipe

These brands are popular for their great taste and quality.

Step-by-Step Instructions

Preparing the BBQ Chicken Mixture

Start by taking a medium bowl. Add 2 cups of shredded cooked chicken. I often use rotisserie chicken because it saves time. Pour in 1 cup of your favorite BBQ sauce. Mix with a fork until each piece of chicken is coated. This ensures every bite is packed with flavor.

Building the Salad Base

Next, grab a large salad bowl. Layer in 4 cups of mixed greens. I like a mix of romaine, arugula, and spinach. This gives the salad great texture and color. Make sure the greens cover the bottom well. This will support all the yummy toppings.

Layering the Ingredients for Best Taste

Now, spread the BBQ chicken mixture evenly over the greens. It should cover them completely. Then, add 1 cup of halved cherry tomatoes for sweetness. Next, sprinkle 1 cup of cooked corn over the top. Then, add ½ cup of drained black beans for protein. Don’t forget ½ of a thinly sliced red onion for a sharp kick.

Next, dice 1 ripe avocado and add it gently on top. This adds creaminess. Now, take 1 cup of shredded cheese and sprinkle it over all the ingredients. I recommend sharp cheddar or a Mexican blend. Finally, drizzle ½ cup of ranch dressing over the salad. Use salt and pepper to taste. Toss gently but don’t mash the avocado.

If you want, chop some fresh cilantro to sprinkle on top. This adds a burst of color and freshness. Your BBQ Ranch Chicken Salad is now ready to serve!

Tips & Tricks

How to Choose the Best Chicken

When selecting chicken for your BBQ Ranch Chicken Salad, I recommend rotisserie chicken. It saves time and adds great flavor. Look for chicken that is moist and tender. If using fresh chicken, choose boneless, skinless breasts or thighs. Cook the chicken until it reaches 165°F. Let it rest before shredding to keep it juicy.

Perfecting the Flavor Balance

Balancing flavors is key. Use your favorite BBQ sauce, but don’t go overboard. The sauce should enhance, not overpower. Mix in ranch dressing for creaminess. Adjust the amount based on your taste. Salt and pepper are also vital. They bring all the flavors together. Taste as you go for the best results.

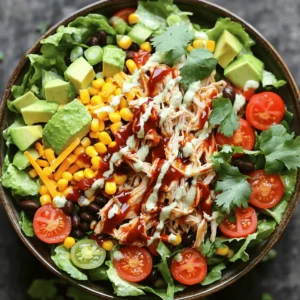
Presentation Tips for Serving

A well-presented salad grabs attention. Use large bowls or plates for serving. Start with a colorful layer of greens. Spread the BBQ chicken evenly on top. Arrange the other toppings artfully. This creates a feast for the eyes. Drizzle extra BBQ sauce and ranch dressing on top. Sprinkle fresh cilantro for a vibrant finish. Your guests will love the look and taste!

Variations

Customizing with Different Greens

You can change the greens in your BBQ Ranch Chicken Salad. Try using kale, spinach, or even mixed baby greens. Each green adds its own flavor and texture. For a crunchy base, use romaine. If you want something tender, choose baby spinach. Mix different greens for a fun twist!

Adding Extra Proteins or Vegetables

Want more protein? Try adding chickpeas or chopped hard-boiled eggs. You can also include grilled shrimp or diced turkey for extra flavor. For veggies, think about bell peppers or cucumbers. They add nice crunch and color. Feel free to get creative with your choices!

Making it Vegan or Vegetarian-Friendly

To make this salad vegan or vegetarian, swap the chicken for chickpeas or tofu. Use a vegan BBQ sauce and ranch dressing. You can also add more veggies like roasted sweet potatoes or zucchini. These changes make the salad just as tasty and filling. Enjoy your plant-based twist!

Storage Info

How to Store Leftover Salad

Store any leftover BBQ Ranch Chicken Salad in an airtight container. Place it in the fridge right after serving. This keeps it fresh and safe to eat. Try to eat it within two days for the best taste. If the salad has dressing, store it separately. This helps keep the greens crisp.

Best Practices for Reheating Chicken

Reheat the BBQ chicken only if you have leftovers. Use a microwave or stovetop for this. Heat it gently to avoid drying it out. For the microwave, place the chicken in a bowl and cover it with a damp paper towel. Heat in short bursts until warm. On the stovetop, use a nonstick pan over medium heat. Stir it often to ensure even heating.

Shelf Life of Ingredients

  1. Shredded chicken: Use within 3-4 days if stored properly in the fridge.
  2. BBQ sauce: Check the label for best before dates, but it can last months if unopened.
  3. Mixed greens: Consume within 3-5 days for the best texture and flavor.
  4. Cherry tomatoes: They stay fresh for about a week when stored in a cool place.
  5. Corn: Use cooked corn within 3-4 days. Canned corn lasts longer if unopened.
  6. Black beans: Use within 3-4 days after opening. Canned beans last a long time if unopened.
  7. Red onion: Store sliced onion in a sealed container for about a week.
  8. Avocado: Once cut, use within 1-2 days to prevent browning.
  9. Shredded cheese: Keep it sealed for up to a week in the fridge.
  10. Ranch dressing: Check the label, but homemade usually lasts about a week.

Store your ingredients well to ensure they taste great when you make the salad again!

FAQs

Can I use grilled chicken instead of rotisserie?

Yes, you can use grilled chicken. Grilled chicken adds a smoky flavor. Just make sure it is cooked and shredded. You can season it with some BBQ sauce for extra taste. Both options work well in this salad.

Is it possible to make this salad in advance?

You can make this salad in advance, but be careful. If you mix the dressing in early, the greens may get soggy. I recommend keeping the dressing separate until you serve. You can prepare other ingredients ahead to save time.

What can I substitute for ranch dressing?

If you want a substitute for ranch dressing, try these options:

  1. Greek yogurt mixed with herbs
  2. Blue cheese dressing for a bolder flavor
  3. A simple vinaigrette for a lighter touch

These choices will still keep your salad tasty.

In this blog post, we explored BBQ ranch chicken salad step-by-step. We started with essential ingredients, followed instructions for preparation, and shared tips for perfecting flavor. I highlighted ways to customize the salad and storage tips to keep it fresh.

This salad is not just easy to make; it’s fun to customize. By applying these tips, you can create a tasty meal that suits your flavor. Enjoy building your own version of this dish!

This salad needs a few key items to shine. You will need: - 2 cups shredded cooked chicken (rotisserie chicken works well) - 1 cup BBQ sauce (choose your favorite brand or make your own) - 4 cups mixed greens (a blend of romaine, arugula, and spinach) - 1 cup cherry tomatoes, halved for sweetness - 1 cup corn, cooked (fresh or canned) - ½ cup black beans, drained and rinsed - ½ red onion, thinly sliced - 1 ripe avocado, diced - 1 cup shredded cheese (sharp cheddar or Mexican blend) - ½ cup ranch dressing (homemade or store-bought) - Salt and pepper to taste - Fresh cilantro, chopped (optional but recommended) These ingredients combine to create a colorful and tasty salad that everyone will love. You can add extra touches to your salad to make it even better. Consider these options: - Jalapeños for heat - Sliced bell peppers for crunch - Fresh lime juice for a zesty kick - Croutons for extra texture These extras can elevate your salad and suit your taste. Choosing the right sauces can make a big difference in flavor. I recommend these brands: - BBQ Sauce: Sweet Baby Ray's, Stubb's, or homemade - Ranch Dressing: Hidden Valley, Ken's, or your own recipe These brands are popular for their great taste and quality. Start by taking a medium bowl. Add 2 cups of shredded cooked chicken. I often use rotisserie chicken because it saves time. Pour in 1 cup of your favorite BBQ sauce. Mix with a fork until each piece of chicken is coated. This ensures every bite is packed with flavor. Next, grab a large salad bowl. Layer in 4 cups of mixed greens. I like a mix of romaine, arugula, and spinach. This gives the salad great texture and color. Make sure the greens cover the bottom well. This will support all the yummy toppings. Now, spread the BBQ chicken mixture evenly over the greens. It should cover them completely. Then, add 1 cup of halved cherry tomatoes for sweetness. Next, sprinkle 1 cup of cooked corn over the top. Then, add ½ cup of drained black beans for protein. Don’t forget ½ of a thinly sliced red onion for a sharp kick. Next, dice 1 ripe avocado and add it gently on top. This adds creaminess. Now, take 1 cup of shredded cheese and sprinkle it over all the ingredients. I recommend sharp cheddar or a Mexican blend. Finally, drizzle ½ cup of ranch dressing over the salad. Use salt and pepper to taste. Toss gently but don’t mash the avocado. If you want, chop some fresh cilantro to sprinkle on top. This adds a burst of color and freshness. Your BBQ Ranch Chicken Salad is now ready to serve! When selecting chicken for your BBQ Ranch Chicken Salad, I recommend rotisserie chicken. It saves time and adds great flavor. Look for chicken that is moist and tender. If using fresh chicken, choose boneless, skinless breasts or thighs. Cook the chicken until it reaches 165°F. Let it rest before shredding to keep it juicy. Balancing flavors is key. Use your favorite BBQ sauce, but don’t go overboard. The sauce should enhance, not overpower. Mix in ranch dressing for creaminess. Adjust the amount based on your taste. Salt and pepper are also vital. They bring all the flavors together. Taste as you go for the best results. A well-presented salad grabs attention. Use large bowls or plates for serving. Start with a colorful layer of greens. Spread the BBQ chicken evenly on top. Arrange the other toppings artfully. This creates a feast for the eyes. Drizzle extra BBQ sauce and ranch dressing on top. Sprinkle fresh cilantro for a vibrant finish. Your guests will love the look and taste! {{image_4}} You can change the greens in your BBQ Ranch Chicken Salad. Try using kale, spinach, or even mixed baby greens. Each green adds its own flavor and texture. For a crunchy base, use romaine. If you want something tender, choose baby spinach. Mix different greens for a fun twist! Want more protein? Try adding chickpeas or chopped hard-boiled eggs. You can also include grilled shrimp or diced turkey for extra flavor. For veggies, think about bell peppers or cucumbers. They add nice crunch and color. Feel free to get creative with your choices! To make this salad vegan or vegetarian, swap the chicken for chickpeas or tofu. Use a vegan BBQ sauce and ranch dressing. You can also add more veggies like roasted sweet potatoes or zucchini. These changes make the salad just as tasty and filling. Enjoy your plant-based twist! Store any leftover BBQ Ranch Chicken Salad in an airtight container. Place it in the fridge right after serving. This keeps it fresh and safe to eat. Try to eat it within two days for the best taste. If the salad has dressing, store it separately. This helps keep the greens crisp. Reheat the BBQ chicken only if you have leftovers. Use a microwave or stovetop for this. Heat it gently to avoid drying it out. For the microwave, place the chicken in a bowl and cover it with a damp paper towel. Heat in short bursts until warm. On the stovetop, use a nonstick pan over medium heat. Stir it often to ensure even heating. - Shredded chicken: Use within 3-4 days if stored properly in the fridge. - BBQ sauce: Check the label for best before dates, but it can last months if unopened. - Mixed greens: Consume within 3-5 days for the best texture and flavor. - Cherry tomatoes: They stay fresh for about a week when stored in a cool place. - Corn: Use cooked corn within 3-4 days. Canned corn lasts longer if unopened. - Black beans: Use within 3-4 days after opening. Canned beans last a long time if unopened. - Red onion: Store sliced onion in a sealed container for about a week. - Avocado: Once cut, use within 1-2 days to prevent browning. - Shredded cheese: Keep it sealed for up to a week in the fridge. - Ranch dressing: Check the label, but homemade usually lasts about a week. Store your ingredients well to ensure they taste great when you make the salad again! Yes, you can use grilled chicken. Grilled chicken adds a smoky flavor. Just make sure it is cooked and shredded. You can season it with some BBQ sauce for extra taste. Both options work well in this salad. You can make this salad in advance, but be careful. If you mix the dressing in early, the greens may get soggy. I recommend keeping the dressing separate until you serve. You can prepare other ingredients ahead to save time. If you want a substitute for ranch dressing, try these options: - Greek yogurt mixed with herbs - Blue cheese dressing for a bolder flavor - A simple vinaigrette for a lighter touch These choices will still keep your salad tasty. In this blog post, we explored BBQ ranch chicken salad step-by-step. We started with essential ingredients, followed instructions for preparation, and shared tips for perfecting flavor. I highlighted ways to customize the salad and storage tips to keep it fresh. This salad is not just easy to make; it’s fun to customize. By applying these tips, you can create a tasty meal that suits your flavor. Enjoy building your own version of this dish!

BBQ Ranch Chicken Salad

Looking for a delicious and satisfying meal? Try this BBQ Ranch Chicken Salad that combines tender chicken, vibrant greens, and zesty flavors for a perfect summer dish. With a simple 15-minute prep time, you can enjoy a colorful mix of ingredients like cherry tomatoes, corn, and avocado all tossed in ranch dressing. Don't miss out on this easy recipe that delights the taste buds! Click to explore the full recipe and impress your friends!
Print Recipe Pin Recipe

Ingredients
  

2 cups shredded cooked chicken (rotisserie chicken works well)

1 cup BBQ sauce (choose your favorite brand or make your own for a personal touch)

4 cups mixed greens (a blend of romaine, arugula, and spinach for a variety of textures)

1 cup cherry tomatoes, halved for sweetness

1 cup corn, cooked (can be fresh or from a can, drained)

½ cup black beans, drained and rinsed to add protein and fiber

½ red onion, thinly sliced for a sharp contrast

1 ripe avocado, diced for creaminess

1 cup shredded cheese (sharp cheddar or a Mexican blend for a flavorful kick)

½ cup ranch dressing (homemade or store-bought)

Salt and pepper to taste

Fresh cilantro, chopped for garnish (optional but recommended)

Instructions
 

In a medium mixing bowl, combine the shredded chicken with the BBQ sauce. Use a fork or spatula to mix thoroughly, ensuring every piece of chicken is well coated in the sauce for maximum flavor.

    Take a large salad bowl and create a foundation by layering the mixed greens as the base. This will give your salad structure and a vibrant color.

      Spread the BBQ chicken mixture evenly over the sturdy layer of greens, making sure to cover it completely for an even distribution of flavor.

        Add the halved cherry tomatoes, sweet corn, rinsed black beans, sliced red onion, and diced avocado on top of the chicken layer. Arrange them artfully for both taste and aesthetics.

          Generously sprinkle the shredded cheese over the entire salad, allowing it to melt into the warm chicken and complement the other ingredients.

            Drizzle ranch dressing over the salad to your preference, ensuring you have just the right amount of creaminess.

              Season the salad with salt and pepper to enhance all the flavors, then gently toss the ingredients together, ensuring everything is combined without mashing the avocado.

                If desired, garnish with freshly chopped cilantro for a burst of color and added freshness before serving.

                  Prep Time: 15 minutes | Total Time: 15 minutes | Servings: 4

                    - Presentation Tips: For an appealing display, serve the salad in large bowls or plates. Drizzle additional BBQ sauce and ranch dressing on top for a beautiful finish. Add a few sprigs of cilantro on top to create a vivid pop of color that will entice your guests!

                      Related Recipes

                      • - 1 pound large shrimp, peeled and deveined - 2 cups fresh corn kernels (or frozen corn) - 1 medium onion, finely chopped - 2 cloves garlic, minced - 2 medium potatoes, peeled and diced - 4 cups vegetable broth - 1 cup heavy cream - 1 teaspoon smoked paprika - 1 teaspoon Old Bay seasoning - Salt and black pepper to taste - 2 tablespoons olive oil - Fresh parsley for garnish - Alternatives for shrimp: You can use crab, chicken, or tofu if you want a different protein. Each adds a unique taste. - Dairy-free options for heavy cream: Use coconut milk or cashew cream. These will keep your chowder creamy without dairy. - Fresh vs. frozen ingredients: Fresh corn brings sweetness and crunch. Frozen corn is just as good and saves time. Use what you have! Sautéing the onion Start by heating the olive oil in a large pot over medium heat. Add the finely chopped onion and cook it for about 5 minutes. You want it to be soft and clear. This step builds the base of flavor. Incorporating the garlic Next, add the minced garlic to the pot. Stir it in and let it cook for about a minute. The smell of garlic will fill your kitchen, and this is when the dish starts to shine. Boiling and simmering Now, toss in the diced potatoes. Pour in the vegetable broth, and turn up the heat to bring it to a boil. Once it boils, reduce the heat to a simmer. This simmering will take about 10 to 12 minutes. Checking potato tenderness Use a fork to check if the potatoes are soft. They should break apart easily. If they are still hard, give them a few more minutes. Adding corn and seasoning Once the potatoes are tender, add the corn kernels. Then sprinkle in the smoked paprika and Old Bay seasoning. Season with salt and pepper to your taste. Let this simmer for another 5 minutes to mix the flavors well. Incorporating shrimp and cream Gently fold in the shrimp. Cook them until they turn pink and opaque, about 3 to 4 minutes. Be careful not to overcook them. Then pour in the heavy cream and stir it in. This makes the chowder rich and creamy. Adjusting seasoning Before serving, taste your chowder. If it needs more flavor, add a little more salt and pepper. This final step ensures it’s just right. Presentation tips Ladle the chowder into bowls. Sprinkle fresh parsley on top for a pop of color. Serve it with slices of crusty bread for dipping. This makes each bite even better! To sauté well, heat olive oil in a large pot. Use medium heat to avoid burning. Add onion first, letting it soften for about five minutes. Then, add minced garlic for a fragrant boost. For shrimp, cook them until they turn pink and opaque. This takes about three to four minutes. Overcooking can make shrimp tough. Always keep an eye on them to get the perfect texture. Herbs and spices can elevate your chowder. Try adding fresh parsley or thyme for a burst of freshness. Smoked paprika and Old Bay seasoning give a warm depth to the flavors. Choosing between vegetable broth and chicken broth depends on your preference. Vegetable broth offers a lighter taste. Chicken broth adds a richer flavor. Both work well, so pick what suits your taste buds best. Prep your ingredients in advance. Chop the onion, garlic, and potatoes ahead of time. This makes cooking smoother and quicker. Using frozen corn and shrimp can save you time. They are often just as good as fresh. They also cut down on prep time, making your chowder ready in no time. {{image_4}} You can find many regional styles of shrimp and corn chowder. The Southern-style chowder shines with rich flavors. It often includes spicy sausage, enhancing the taste. The sweetness of corn pairs nicely with the heat. Adding a few dashes of hot sauce gives it an extra kick. Spicy variations can include jalapeños. These peppers add a bold flavor and nice heat. Just chop them finely and add them when you sauté the onion. The result is a chowder that warms you from head to toe. If you need gluten-free options, this chowder works well. All ingredients are naturally gluten-free. Just ensure your broth is also gluten-free. It’s a simple swap that keeps the dish safe for all. For a vegan option, you can replace shrimp with mushrooms or tofu. Use coconut milk instead of heavy cream for a creamy texture. You can also use vegetable broth to keep it plant-based. The dish still tastes great and is satisfying. Feel free to add other vegetables to the chowder. Carrots, bell peppers, or even zucchini work well. Just chop them small and add them with the potatoes. They bring more color and nutrients to the dish. You can also switch proteins. Instead of shrimp, try crab or even chicken. Just make sure to adjust cooking times. This way, every bowl of chowder can be unique and delicious. Store leftover chowder in an airtight container. This keeps the flavor fresh. It will last up to three days in the fridge. If you want to enjoy it later, make sure to cool it down before sealing. This helps prevent bacteria growth. To freeze chowder, use a freezer-safe container. Leave some space at the top for expansion. It’s best to freeze it within two hours of cooking. When you’re ready to eat, move it to the fridge to thaw overnight. For reheating, use a pot on low heat. Stir often to avoid sticking. You can also use the microwave, but do it in short bursts. If it seems too thick, add a splash of cream or broth. This helps restore its creamy texture. To make shrimp and corn chowder from scratch, gather your ingredients. Start by sautéing onion in olive oil until soft. Add minced garlic and cook for a minute. Next, add diced potatoes and vegetable broth. Bring it to a boil, then simmer until the potatoes are tender. Stir in corn, smoked paprika, and seasoning. Finally, fold in shrimp and heavy cream, cooking until the shrimp are pink. Yes, you can use frozen shrimp and corn. Frozen ingredients work well and save time. Just make sure to thaw shrimp before adding them to the chowder. The frozen corn can go straight into the pot, as it cooks quickly. Chowder can last in the fridge for about three to four days. Store it in an airtight container to keep it fresh. Always check for any odd smells or changes in texture before eating. Serve shrimp and corn chowder with crusty bread for dipping. A fresh salad or grilled vegetables also pair nicely. For a twist, add some crackers on top for crunch. Shrimp and corn chowder can be a healthy dish. It contains protein from shrimp and fiber from corn and potatoes. You can make it healthier by using less cream or opting for dairy-free alternatives. Yes, you can make chowder in advance. It tastes great after sitting for a day, allowing the flavors to blend. Just reheat it gently on the stove before serving. This blog post detailed how to create a tasty shrimp and corn chowder from start to finish. We covered ingredients, step-by-step instructions, and tips for success. You can customize it with various options to suit your taste or dietary needs. Remember, storing leftovers properly ensures you enjoy your dish longer. Cooking can be fun and easy with the right guidance. Try this chowder, and make it your own! Enjoy comforting meals made with fresh ingredients.
                        Savory Shrimp & Corn Chowder Simple and Comforting Dish
                      • The Mediterranean Quinoa Salad is fresh and full of flavor. Here are the main ingredients you will need: - 1 cup quinoa, thoroughly rinsed - 2 cups water or vegetable broth - 1 cup cherry tomatoes, halved - 1 medium cucumber, finely diced - 1 bell pepper (red or yellow), diced - 1/2 medium red onion, finely chopped - 1/2 cup kalamata olives, pitted and sliced - 1/2 cup feta cheese, crumbled - 1/4 cup fresh parsley, finely chopped - 1/4 cup extra virgin olive oil - 3 tablespoons freshly squeezed lemon juice - 1 teaspoon dried oregano - Salt and freshly ground black pepper, to taste These ingredients create a bright and tasty salad. The quinoa gives it a nice texture. Fresh vegetables add crunch and color. You can add more fun to your salad with these optional extras: - Avocado, diced - Chickpeas, canned and rinsed - Roasted red peppers, diced - Artichoke hearts, chopped - Fresh basil or mint, chopped These add-ins boost the flavor and nutrition. You can mix and match based on what you like. If you have special diet needs, here are some easy swaps: - Use brown rice or couscous instead of quinoa for a different grain. - Swap feta cheese for nutritional yeast for a vegan option. - If you are dairy-free, leave out cheese or use a plant-based cheese. - For low-sodium options, use low-sodium olives and broth. These substitutions keep the salad tasty while meeting dietary needs. Enjoy making your own version! Start by rinsing 1 cup of quinoa under cold water. This helps remove any bitter taste. Next, put the rinsed quinoa in a medium pot. Add 2 cups of water or vegetable broth for extra flavor. Bring it to a boil over high heat. When it boils, turn the heat down to low. Cover the pot and let it simmer for 15 minutes. After that, the liquid should be gone. Take the pot off the heat, but keep it covered for 5 more minutes. This steams the quinoa. Finally, fluff it with a fork and spread it on a plate to cool. While the quinoa cools, wash and chop your veggies. Halve 1 cup of cherry tomatoes. Dice 1 medium cucumber into small pieces. Chop 1 bell pepper, either red or yellow, into small bits. For some crunch and flavor, finely chop 1/2 medium red onion. Slice 1/2 cup of kalamata olives, pitted. Lastly, chop 1/4 cup of fresh parsley. Mix all these fresh veggies in a large bowl. This adds color and taste to your salad. In a small bowl, whisk together 1/4 cup of extra virgin olive oil and 3 tablespoons of freshly squeezed lemon juice. Add 1 teaspoon of dried oregano. Season with a pinch of salt and freshly ground black pepper. Mix until smooth. Pour this dressing over your bowl of cooled quinoa and veggies. Toss gently with a spatula or salad tongs. Taste your salad and add more salt or pepper if needed. Cover it and chill in the fridge for at least 30 minutes. This helps the flavors blend well. Enjoy your healthy Mediterranean quinoa salad! To cook quinoa just right, rinse it well. This step removes bitterness and helps the grains taste great. Use a pot with a lid and the right water ratio. I recommend two cups of water for one cup of quinoa. Bring it to a boil, then lower the heat. Cover the pot and let it simmer for 15 minutes. After cooking, let it sit for five minutes with the lid on. Fluff it with a fork to keep the grains separate. Want to kick up the flavor? First, use vegetable broth instead of water. This adds depth. Fresh herbs like basil or mint can also brighten the dish. Try adding some lemon zest for a zesty touch. If you love spice, consider a pinch of red pepper flakes. You can also mix in roasted garlic for a rich flavor. To make your salad look amazing, serve it in a large bowl. A colorful bowl adds to the visual appeal. Garnish with fresh parsley and some whole olives on top. This adds a nice contrast. Just before serving, drizzle a little extra olive oil for shine. It makes the salad look fresh and inviting! {{image_4}} You can add chickpeas to the salad for extra protein. Chickpeas bring a creamy texture and a nutty flavor. To do this, use one can of chickpeas, drained and rinsed. Mix them with the other ingredients after cooking the quinoa. This addition makes the salad more filling and hearty. To make a vegan version, simply omit the feta cheese. You can replace it with avocado for creaminess or use vegan feta if you prefer. The rest of the salad stays the same. This version is bright, fresh, and totally delicious without dairy. This salad is already gluten-free thanks to quinoa. However, if you want to add more crunch, try adding nuts like almonds or walnuts. These not only add texture but also healthy fats. Just chop them up and mix them in with the other ingredients. To keep your Mediterranean quinoa salad fresh, store it in an airtight container. Make sure to refrigerate it right after serving. This way, you help keep the flavors intact. If you have extra dressing, store it separately. This keeps the salad from getting soggy. This salad is best served cold or at room temperature. If you prefer, you can gently reheat the quinoa in the microwave. Do this in short bursts to avoid overcooking. Add a splash of olive oil if it feels dry. Before serving, give it a good toss to mix the flavors again. Your quinoa salad can last in the fridge for 3 to 5 days. After that, the ingredients may lose their crispness. It’s not recommended to freeze this salad. Freezing changes the texture of the veggies and feta cheese. For the best taste, enjoy your leftovers within a week. Yes, you can make this salad ahead of time. I often prepare it a day before. The flavors mix better when they sit together. Just keep it in the fridge. Cover it well with plastic wrap or a lid. This salad stays fresh for up to three days. If you need a feta substitute, try goat cheese or ricotta. Both add creaminess. You can also skip cheese for a dairy-free option. A sprinkle of nutritional yeast gives a cheesy taste. To add heat, include diced jalapeños or red pepper flakes. You can mix in a splash of hot sauce too. If you like a kick, try adding black pepper or cayenne. Adjust the spice to fit your taste. This blog post covered how to make a Mediterranean quinoa salad. We explored key ingredients, optional add-ins, and substitutions for different diets. I provided clear steps for cooking and assembling the salad. Tips helped ensure the quinoa was perfect and the presentation was appealing. I discussed tasty variations and how to store leftovers. In closing, this salad is flexible and easy to make. Try out different flavors and enjoy!
                        Mediterranean Quinoa Salad Fresh and Healthy Choice
                      • - 1 lb sirloin steak, trimmed and cut into bite-sized pieces - 4 tablespoons unsalted butter - 4 cloves garlic, finely minced - 1 tablespoon fresh rosemary, finely chopped - 1 tablespoon fresh thyme, finely chopped - Salt and freshly ground black pepper to taste - 1 teaspoon smoked paprika - 1 tablespoon olive oil - Fresh parsley, finely chopped (for garnish) In this recipe, the main star is the sirloin steak. You want it to be tender and juicy. Cutting it into bite-sized pieces helps with cooking and serving. The unsalted butter gives richness. Garlic adds a punch of flavor that pairs perfectly with steak. For seasoning, fresh herbs like rosemary and thyme bring bright notes. Smoked paprika adds warmth, while salt and pepper enhance all the flavors. Olive oil is key for high heat cooking. Finally, the fresh parsley garnish adds a pop of color. It also brings a touch of freshness to the rich steak bites. Start by patting the steak pieces dry with paper towels. This step is key for a good sear. If the steak is wet, it will steam instead of brown. Next, season each piece with salt, black pepper, and smoked paprika. Make sure every side is covered evenly. This adds flavor and a nice crust. Heat a large skillet over medium-high heat and add olive oil. Wait until the oil shimmers slightly; this means it is hot enough. Carefully place the seasoned steak bites in a single layer in the pan. Avoid overcrowding, as that can cause steaming. Sear the steak bites for about 2-3 minutes without moving them. Then flip each piece and sear for another 2-3 minutes. If you like it more or less cooked, adjust the time. Once done, move the steak bites to a plate. In the same skillet, reduce the heat to medium. Add the butter and minced garlic. Also, throw in the chopped rosemary and thyme. Stir gently to mix. Let the butter melt and the garlic become fragrant; this should take 1-2 minutes. Keep an eye on it to prevent burning. Burnt garlic can ruin the taste. After that, return the seared steak bites to the skillet. Toss them in the garlic butter mixture for about 1 minute. This lets all the flavors blend perfectly. To get that great sear, start by drying your steak pieces. Use paper towels to remove moisture. This step is key. If the steak is wet, it will not brown well. Next, do not overcrowd the pan when you cook. If you add too many pieces at once, the heat drops. This causes steaming instead of searing. Always cook in batches if needed. Aim for a rich, golden-brown crust on each side. You can make the garlic butter even more tasty. Try adding fresh herbs like basil or oregano. These herbs bring a nice flavor twist. You can also use a pinch of red pepper flakes for some heat. Lemon zest can brighten the dish, too. Experiment to find your favorite mix. Each addition can change the dish in exciting ways. Garlic butter steak bites pair well with many sides. A fresh salad with greens adds lightness. You can also serve them with warm, crusty bread for dipping. Roasted veggies or mashed potatoes make great accompaniments, too. For drinks, a nice red wine complements the steak well. Get creative and enjoy your meal! {{image_4}} You can use different cuts of steak for this dish. Sirloin is great, but you might try ribeye or flank steak. Ribeye gives a nice marbled flavor. Flank steak cooks fast and is tasty too. Just cut them into bite-sized pieces, just like sirloin. Each cut brings its own unique taste and texture. Want to spice things up? Add chili flakes for heat. A squeeze of lemon juice can brighten the dish. You could even toss in some Worcestershire sauce for depth. Feel free to experiment with herbs like oregano or basil. Mix and match to find your favorite flavor profile. The key is to balance the rich garlic butter with bright notes. While pan-searing is quick, you can bake or grill the steak bites too. For baking, preheat your oven to 400°F. Spread the bites on a baking sheet and cook for about 10-12 minutes. If you choose to grill, make sure the grill is hot. Cook the steak bites for about 2-3 minutes on each side. Each method gives a different taste and texture, so try them all! To store your garlic butter steak bites, first let them cool. Place the cooled steak bites in an airtight container. You can keep them in the fridge for up to three days. This keeps them fresh and tasty for later meals. When you want to enjoy your leftovers, reheat them on the stove. Use a skillet over low heat to keep the steak bites moist. Add a splash of water or broth to prevent dryness. Heat them for about five minutes until warm, stirring gently. This helps keep the flavors intact. If you want to save steak bites for longer, freezing works well. Place them in a freezer-safe bag or container after cooling. Make sure to remove as much air as possible. They can last for up to three months in the freezer. To thaw, move them to the fridge overnight. For quicker thawing, place the bag in cold water. Once thawed, reheat as mentioned above to enjoy! Garlic butter steak bites take about 20 minutes to cook. This includes 10 minutes for prep and 10 minutes for cooking. The cooking time can change based on the size of your steak pieces and how well you like your steak done. For medium-rare, aim for around 4-6 minutes total cooking time in the skillet. Yes, you can use frozen steak. However, you need to thaw it first. The best way is to place it in the fridge overnight. If you're short on time, you can use cold water to speed up the thawing. Just place the sealed steak in water for about an hour. Make sure to pat it dry before cooking for the best sear. You can serve garlic butter steak bites with many tasty sides. Here are some ideas: - Crispy French fries - Creamy mashed potatoes - Grilled vegetables - A fresh green salad - Warm crusty bread for dipping Absolutely! To add spice, try these tips: - Add red pepper flakes to the seasoning. - Mix in some hot sauce with the garlic butter. - Use spicy paprika instead of smoked paprika. These will give your steak bites a nice kick that enhances the flavor! This article covered how to make garlic butter steak bites. We went over the main ingredients, step-by-step instructions, and tips. You learned how to achieve the perfect sear and enhance flavor with garlic butter. Variations let you change cuts or cooking methods, while storage tips help keep leftovers fresh. With these ideas, your steak bites can impress anyone. Enjoy the cooking process and the meal you create!
                        Garlic Butter Steak Bites Rich and Flavorful Delight
                      • - 2 boneless, skinless chicken breasts, cut into bite-sized cubes - 1 cup mandarin orange segments, drained (juice reserved for sauce) - 1 cup jasmine rice - 2 cups chicken broth (low sodium preferred) - 1 tablespoon soy sauce (preferably low sodium) - 1 tablespoon honey (or maple syrup for a vegan option) - 1 teaspoon fresh ginger, finely grated - 2 cloves garlic, minced - 2 green onions, thinly sliced - Toasted sesame seeds for garnish - Salt and pepper, to taste Gather these ingredients to make your Mandarin orange chicken rice bowls. You will enjoy a fresh mix of flavors. The chicken gives protein, while the rice adds heartiness. The mandarin oranges bring a sweet touch. Soy sauce adds depth, and ginger and garlic provide warmth. Green onions and sesame seeds add crunch. Each ingredient plays a part in creating a tasty meal. You can change some items based on what you have on hand. That way, you'll always have a great dish ready to serve. Start by rinsing the jasmine rice under cold water. Keep rinsing until the water runs clear. This step removes excess starch and helps the rice cook evenly. In a medium saucepan, combine the rinsed rice and chicken broth. Bring it to a boil over medium-high heat. Once boiling, reduce the heat to low. Cover the pot and let it simmer for 15 minutes. This will make the rice tender. Afterward, remove it from heat and let it sit covered for 5 minutes. Fluff the rice gently with a fork to separate the grains. While the rice cooks, heat a large skillet over medium heat. Add a little cooking oil or use a non-stick spray to coat the pan. Place the cubed chicken in the skillet. Season it well with salt and pepper. Sauté the chicken for about 5 to 7 minutes. Stir occasionally. You want the pieces to turn golden brown and be fully cooked. When the chicken is cooked, add minced garlic and grated ginger to the skillet. Stir and sauté for about 1 minute until you smell the wonderful aroma. Now, pour in soy sauce, honey, and the reserved mandarin orange juice. Add the mandarin segments too. Stir everything well and let it simmer for 2 to 3 minutes. This helps the flavors combine nicely. After simmering, add the cornstarch slurry to the pan. This is just cornstarch mixed with water. Stir continuously for about 1 to 2 minutes. Watch as the sauce begins to thicken. If the sauce gets too thick, add a splash of water to loosen it up a bit. Now it's time to put everything together! Fluff the cooked jasmine rice with a fork. Divide the rice evenly among your serving bowls. Generously spoon the mandarin orange chicken mixture over the rice in each bowl. Make sure everyone gets a good mix of chicken and sauce. Finish off your bowls by garnishing with sliced green onions. Sprinkle toasted sesame seeds on top for a delightful crunch. These small touches add flavor and make the dish look even better! - Importance of rinsing: Rinsing jasmine rice is key. It washes away extra starch. This step helps keep the rice fluffy and light. Always rinse until the water runs clear. - Simmering techniques: Use chicken broth for flavor. Bring it to a boil, then lower the heat. Cover the pot and let it simmer for 15 minutes. This method makes sure the rice cooks evenly. - Avoiding overcooking: Cook the chicken just right. It should be golden brown and no longer pink inside. This takes about 5-7 minutes on medium heat. - Using non-stick cookware: A non-stick pan helps prevent sticking. You can use less oil and keep the chicken from burning. This keeps the meal healthy and easy to clean. - Adjusting sweetness and saltiness: Taste the sauce before serving. Add more honey for sweetness or soy sauce for saltiness. This helps you get the flavor just right. - Enhancing flavor with spices: Try adding a pinch of red pepper flakes or black pepper. This gives your dish a nice kick. You can also add a dash of sesame oil for extra depth. {{image_4}} If you want a vegetarian dish, you can skip the chicken. Tofu or tempeh makes great substitutes. These protein-rich options soak up flavors well. - Tofu: Use firm or extra-firm tofu for the best texture. Press it before cooking to remove excess water. Cube it and sauté until crispy. - Tempeh: Tempeh has a nutty flavor. Slice it thin and cook it in the same way. Add it to your sauce for flavor. You can change up the flavors easily. Try using different citrus fruits for a fun twist. - Citrus Options: Use oranges, lemons, or limes for a new taste. Each fruit brings a unique zing. - Extra Veggies and Nuts: Add bell peppers, broccoli, or snap peas for crunch. Toss in some cashews or peanuts for added texture. You don't have to stick with bowls. You can get creative with how you serve this dish. - Wraps or Salads: Use large lettuce leaves to make wraps. Or, serve the chicken and rice on a bed of greens for a salad. - Side Dishes: Pair the rice bowls with steamed veggies or a light soup. This adds balance to your meal. To keep your Mandarin Orange Chicken Rice Bowls fresh, store leftovers in airtight containers. Make sure to let the dish cool before sealing. You can keep it in the fridge for up to three days. For best results, separate the rice from the chicken mixture. This helps keep both parts fresh and tasty. When you're ready to enjoy leftovers, use the microwave or a skillet. If using a microwave, heat in short bursts to avoid overcooking. If you choose a skillet, add a splash of water to keep moisture. This helps maintain the dish's texture. Stir often to heat evenly. Aim for a warm and inviting meal! To freeze your bowls, pack them in airtight containers. Make sure to leave some space for expansion. You can freeze them for up to three months. When you want to eat them, move the bowls to the fridge overnight to thaw. Reheat as mentioned before, and enjoy a delicious meal again! It takes about 30 minutes to prepare these rice bowls. You spend 10 minutes prepping and 20 minutes cooking. The jasmine rice cooks in 15 minutes. Meanwhile, you can sauté the chicken and make the sauce. Yes, you can use other types of rice. Brown rice adds more fiber but takes longer to cook. You can also try basmati or even quinoa for a twist. Just remember to adjust the cooking time as needed. Store leftover rice bowls in airtight containers. Keep the rice and chicken separate if you can. This helps maintain texture. They can last in the fridge for up to three days. When ready, just reheat and enjoy. To make this recipe gluten-free, use tamari instead of soy sauce. Tamari is a great gluten-free option. Be sure the chicken broth is also gluten-free. With these swaps, you can still enjoy great flavors. Absolutely! Fresh mandarin oranges are a great choice. Just peel and segment them. Use their juice to make the sauce. This adds a fresh taste that enhances the dish. Enjoy the bright flavor they bring! You can make delicious Mandarin Orange Chicken Rice Bowls with ease. We covered key ingredients, sauces, and tips for cooking. Follow the steps for tasty rice and chicken. Don’t forget the garnishes for extra flavor. You can even adjust the recipe for different diets or preferences, making it versatile. If you store and reheat properly, these bowls remain just as good. Enjoy your cooking adventure and share it with friends!
                        Savory Mandarin Orange Chicken Rice Bowls Recipe

                      Leave a Reply Cancel reply

                      Your email address will not be published. Required fields are marked *

                      Recipe Rating


                      Welcome!

                      This is an introduction to me and my site to establish E-E-A-T. Keep this short and simple.

                      More about me

                      Popular

                      • - 1 can (15 oz) chickpeas - 1 tablespoon extra virgin olive oil - 1 teaspoon garlic powder - 1 teaspoon smoked paprika - ½ teaspoon ground cumin - ½ teaspoon sea salt - ¼ teaspoon freshly ground black pepper - ¼ teaspoon cayenne pepper (optional, for an extra kick) - Fresh parsley, finely chopped To make crispy chickpeas, start with a can of chickpeas. Look for a 15 oz can, as this size gives you enough for a snack or a side dish. Drain the chickpeas well. Rinsing them under cold water helps remove excess sodium. After rinsing, dry them thoroughly with paper towels. This step is key for crispiness. Next, you need a tablespoon of extra virgin olive oil. This oil adds flavor and helps the spices stick. Speaking of spices, grab some garlic powder, smoked paprika, ground cumin, sea salt, and black pepper. Each spice adds its own unique touch to the chickpeas. If you like heat, cayenne pepper is a great option. Finally, fresh parsley makes a lovely garnish. It adds color and a fresh taste. You can skip it, but I recommend using it for extra flair. These ingredients combine to create a crunchy flavor explosion that’s hard to resist. First, preheat your air fryer to 400°F (200°C). This step helps cook the chickpeas evenly. Next, take one can of chickpeas and drain them well. Rinsing under cold water is key to removing the canning liquid. After rinsing, use a clean towel to dry the chickpeas. Drying them is vital for that perfect crunch. In a large bowl, combine the dried chickpeas with one tablespoon of olive oil. Then, add one teaspoon of garlic powder, one teaspoon of smoked paprika, half a teaspoon of ground cumin, half a teaspoon of sea salt, and a quarter teaspoon of black pepper. If you like heat, toss in a quarter teaspoon of cayenne pepper. Mix everything well to coat the chickpeas evenly. This ensures every bite bursts with flavor. Carefully place the seasoned chickpeas in the air fryer basket. Make sure they are in a single layer to allow the hot air to circulate. Air fry them for 15 to 20 minutes. At the halfway point, shake the basket gently. This helps them cook evenly. Keep an eye on them as they get golden brown. Once done, remove the basket and let the chickpeas cool for about 3 to 5 minutes. They will get crunchier as they cool down. To get crispy chickpeas, start by drying them well. Wet chickpeas won’t get crunchy. After rinsing, use a clean kitchen towel or paper towels to soak up moisture. The drier, the better! Next, cook in small batches. If you overcrowd the air fryer, the hot air can't circulate. This means your chickpeas may not crisp up as you want. A single layer allows them to cook evenly. Get creative with spices! While the basic seasonings are great, you can try different blends. Add chili powder for heat or herbs for freshness. A dash of lemon zest can also brighten the flavors. For dipping, serve your crispy chickpeas with a tasty sauce. Hummus or yogurt dip pairs well. You can also try spicy salsa or a creamy avocado dip. These add a fun twist that elevates your snack! {{image_4}} You can switch up the flavors of your crispy chickpeas in fun ways. For a spicy kick, try adding chili powders. You can use cayenne for heat or even chili flakes for a different taste. Mix these spicy powders with your chickpeas. They will pack a punch and wake up your taste buds! If you prefer something sweet, you can add cinnamon and sugar. This mix creates a tasty contrast to the chickpeas' natural nuttiness. Just toss your chickpeas with a bit of olive oil, then add this sweet mix before air frying. You’ll enjoy a crunchy, sweet treat that’s perfect for snacking! Making crispy chickpeas fits various diets. If you are gluten-free, rest assured. All the seasonings listed are naturally gluten-free. You can use your favorite herbs and spices without worry. Fresh herbs like rosemary or thyme work great too! For a vegan option, these chickpeas are already plant-based. You can serve them with vegan dips like hummus or tahini sauce. This makes for a healthy and tasty snack. Enjoy your chickpeas, knowing they fit into your diet! To keep your crispy chickpeas fresh, store them in an airtight container. This helps them stay crunchy. If you have a lot left, divide them into small portions. This makes it easy to grab a snack. Avoid keeping them in the fridge, as moisture can make them soggy. To reheat leftover chickpeas, preheat your air fryer to 400°F (200°C). Place the chickpeas in the basket. Air fry them for about 5 minutes. This restores their crunch and flavor. You can also use a regular oven at the same temperature if you don’t have an air fryer. Crispy chickpeas can last for about 3 to 5 days when stored properly. Keep them in a cool, dry place away from sunlight. If you want to keep them longer, consider freezing. For freezing, place the cooled chickpeas in a freezer-safe bag. Remove as much air as possible before sealing. They can last for up to 3 months in the freezer. When ready to eat, thaw them overnight in the fridge. Then, reheat in your air fryer for that crunchy texture again. To make chickpeas crispy, you need to dry them well. After rinsing, use a clean towel to pat them dry. This step is key. If they are too wet, they won’t get crunchy. Next, coat them in olive oil and seasonings. Use garlic powder, smoked paprika, cumin, salt, black pepper, and cayenne if you want some heat. Mix them well so every chickpea gets flavor. Arrange them in a single layer in the air fryer. This helps the hot air flow around them. Cook at 400°F for 15-20 minutes. Shake the basket halfway through for even cooking. Yes, you can use dried chickpeas! Start by soaking them overnight. This softens them and cuts down on cooking time. After soaking, rinse and drain them. Cook them in boiling water until tender. This usually takes about 1-2 hours. Once cooked, dry them well before seasoning. Follow the same steps as with canned chickpeas. The result will be delicious, crispy snacks. Crispy chickpeas are great for snacks or meals. You can serve them in a small bowl with hummus or yogurt dip. They also pair well with salads or grain bowls for added crunch. Try mixing them into soups for texture. You can even sprinkle them on top of roasted vegetables. They add a nice crunch and flavor to any dish. Crispy chickpeas can last about 3-5 days when stored properly. Keep them in an airtight container at room temperature. If they become soft, you can re-crisp them in the air fryer for a few minutes. Just keep an eye on them! For longer storage, consider freezing them. However, they may lose some crunchiness when thawed. Enjoy them fresh for the best taste! Crispy chickpeas are a fun and tasty snack you can easily make. You learned about the key ingredients, step-by-step instructions, and tips to get them crispy. You can even try different flavors or pair them with your favorite dips. Remember to store leftovers well so they stay crunchy. With these tips, you can enjoy this healthy snack anytime. Try making them today and enjoy the crunch!
                        Air Fryer Crispy Chickpeas Crunchy Flavor Explosion
                      • To make cranberry orange scones, you need some simple ingredients. Here’s the list: - 2 cups all-purpose flour - ⅓ cup granulated sugar - 1 tablespoon baking powder - ½ teaspoon salt - ½ cup unsalted butter, cold and cubed - ½ cup dried cranberries - Zest of 1 large orange - ½ cup whole milk - 1 large egg - 1 teaspoon pure vanilla extract Each ingredient plays a key role. The flour gives the scones structure. Sugar adds sweetness and helps with browning. Baking powder makes them rise, while salt brings out the flavors. Cold butter is essential. It creates flaky layers in the scones. Dried cranberries add a sweet and tart punch, and orange zest gives a bright, fresh flavor. Whole milk adds moisture. The egg helps bind everything together. Finally, vanilla extract adds a warm, inviting aroma. Gather these ingredients before you start. It makes the process smoother and more fun! First, set your oven to 400°F (200°C). This makes sure the scones bake evenly. Line a baking sheet with parchment paper. This helps the scones not stick. In a big bowl, mix 2 cups of all-purpose flour, ⅓ cup of granulated sugar, 1 tablespoon of baking powder, and ½ teaspoon of salt. Use a whisk to blend everything well. This creates a nice dry mix. Now, add ½ cup of cold, cubed unsalted butter. You can use a pastry cutter or your fingers. Mix until it looks like coarse crumbs. Some butter pieces should still be small. This keeps your scones tender. Next, gently fold in ½ cup of dried cranberries and the zest of 1 large orange. Make sure they are spread out evenly. This step adds bursts of flavor in each bite. In another bowl, whisk together ½ cup of whole milk, 1 large egg, and 1 teaspoon of pure vanilla extract. Mix until everything is combined. This adds moisture to your scones. Pour the wet mix into the dry mix. Stir gently until just combined. Don't overmix; it’s okay to have lumps. This will make the scones light and fluffy. Transfer the dough to a lightly floured surface. Knead it gently a few times. Then, pat it into a circle about 1 inch thick. This helps shape your scones. Use a sharp knife to cut the dough into 8 equal wedges. Place each wedge on the prepared baking sheet. Leave some space between them for even baking. Put the baking sheet in your preheated oven. Bake for about 15 to 20 minutes. The scones should be lightly golden and smell great when done. Once baked, take the scones out and let them cool on a wire rack for a few minutes. This helps set them and makes serving easier. Enjoy your warm scones! Mixing is key to great scones. Start by whisking the dry ingredients well. This helps blend them evenly. When you add the cold butter, use your fingertips or a pastry cutter. You want small bits of butter in the mix. This keeps the scones tender. Don’t rush this step. The more even your mix, the better your scones will be. To make fluffy scones, use cold ingredients. Cold butter and milk help create steam during baking. This steam makes the scones rise. Mix the dough just until combined. Overmixing can lead to dense scones. Lastly, shape the dough gently. Pat it down instead of rolling it out. This keeps air in the dough, making your scones light and airy. Serve your cranberry orange scones warm for the best taste. Dust them with powdered sugar for a sweet touch. You can also pair them with orange marmalade or clotted cream. These spreads add flavor and richness. Enjoy them with tea or coffee for a delightful snack. You can even serve them at brunch for a special treat! {{image_4}} You can mix up the dried cranberries with other fruits. Here are some great options: - Chopped dried apricots - Raisins or golden raisins - Dried cherries - Blueberries or blackberries These fruits give a sweet twist. They also add new flavors and colors. You can change the zest too. Lemon zest or lime zest adds a nice zing. To boost the flavor of your scones, try these ideas: - Add spices like cinnamon or nutmeg for warmth. - Use almond extract instead of vanilla for a unique taste. - Mix in chopped nuts, like walnuts or pecans, for crunch. These small changes make your scones even more special. You can find what you like best. If you need gluten-free scones, it's easy to swap ingredients. Use gluten-free all-purpose flour instead of regular flour. Make sure it has xanthan gum for texture. You can also try almond flour or coconut flour. These options will change the taste a bit. But they can still be delicious. Just be careful with the liquid amounts. Gluten-free flours often soak up more moisture. Adjust as needed for the perfect dough. To keep your leftover scones fresh, place them in an airtight container. This helps lock in moisture. You can store the scones at room temperature for up to two days. If you want to keep them longer, refrigeration is an option, but it may change their texture. When it's time to enjoy your scones again, you can reheat them. Preheat your oven to 350°F (175°C). Place the scones on a baking sheet and warm them for about 10 minutes. You can also use a microwave. Just heat them for about 15-20 seconds. This helps restore their soft texture. If you want to save scones for later, freezing is a great choice. Wrap each scone tightly in plastic wrap and then in aluminum foil. This prevents freezer burn. You can freeze them for up to three months. When you are ready to eat, thaw them in the fridge overnight and reheat as needed. Yes, you can use fresh cranberries. They will add a tart flavor to the scones. Fresh cranberries will make your scones slightly wetter. You may want to reduce the milk a bit to balance the moisture. You can use coconut oil or vegetable shortening in place of butter. Both will give a nice texture. If you use coconut oil, make sure it is solid, not melted. You can also try a plant-based butter for a dairy-free option. Your scones are done when they turn lightly golden on top. They should feel firm to the touch. If you insert a toothpick, it should come out clean. The baking time is usually around 15 to 20 minutes. Yes, you can make the dough ahead of time. After shaping the dough, wrap it tightly in plastic wrap. Store it in the fridge for up to 24 hours. When ready to bake, just cut and bake as directed. Serve warm, dusted with powdered sugar for a sweet touch. Pair them with orange marmalade or clotted cream. This adds a rich layer of flavor that complements the scones well. Enjoy them with tea for a delightful afternoon treat! You’ve learned how to make delicious cranberry orange scones. We covered key ingredients, step-by-step instructions, and tips for the best results. I shared storage methods and FAQs to ease your baking worries. Scones can be fun and easy to make. Enjoy these treats with friends or family. They’ll love your baking skills. Simple swaps and ideas let you be creative. Don't hesitate to try new flavors. Happy baking!
                        Cranberry Orange Scones Tasty and Simple Recipe
                      • This salad needs a few key items to shine. You will need: - 2 cups shredded cooked chicken (rotisserie chicken works well) - 1 cup BBQ sauce (choose your favorite brand or make your own) - 4 cups mixed greens (a blend of romaine, arugula, and spinach) - 1 cup cherry tomatoes, halved for sweetness - 1 cup corn, cooked (fresh or canned) - ½ cup black beans, drained and rinsed - ½ red onion, thinly sliced - 1 ripe avocado, diced - 1 cup shredded cheese (sharp cheddar or Mexican blend) - ½ cup ranch dressing (homemade or store-bought) - Salt and pepper to taste - Fresh cilantro, chopped (optional but recommended) These ingredients combine to create a colorful and tasty salad that everyone will love. You can add extra touches to your salad to make it even better. Consider these options: - Jalapeños for heat - Sliced bell peppers for crunch - Fresh lime juice for a zesty kick - Croutons for extra texture These extras can elevate your salad and suit your taste. Choosing the right sauces can make a big difference in flavor. I recommend these brands: - BBQ Sauce: Sweet Baby Ray's, Stubb's, or homemade - Ranch Dressing: Hidden Valley, Ken's, or your own recipe These brands are popular for their great taste and quality. Start by taking a medium bowl. Add 2 cups of shredded cooked chicken. I often use rotisserie chicken because it saves time. Pour in 1 cup of your favorite BBQ sauce. Mix with a fork until each piece of chicken is coated. This ensures every bite is packed with flavor. Next, grab a large salad bowl. Layer in 4 cups of mixed greens. I like a mix of romaine, arugula, and spinach. This gives the salad great texture and color. Make sure the greens cover the bottom well. This will support all the yummy toppings. Now, spread the BBQ chicken mixture evenly over the greens. It should cover them completely. Then, add 1 cup of halved cherry tomatoes for sweetness. Next, sprinkle 1 cup of cooked corn over the top. Then, add ½ cup of drained black beans for protein. Don’t forget ½ of a thinly sliced red onion for a sharp kick. Next, dice 1 ripe avocado and add it gently on top. This adds creaminess. Now, take 1 cup of shredded cheese and sprinkle it over all the ingredients. I recommend sharp cheddar or a Mexican blend. Finally, drizzle ½ cup of ranch dressing over the salad. Use salt and pepper to taste. Toss gently but don’t mash the avocado. If you want, chop some fresh cilantro to sprinkle on top. This adds a burst of color and freshness. Your BBQ Ranch Chicken Salad is now ready to serve! When selecting chicken for your BBQ Ranch Chicken Salad, I recommend rotisserie chicken. It saves time and adds great flavor. Look for chicken that is moist and tender. If using fresh chicken, choose boneless, skinless breasts or thighs. Cook the chicken until it reaches 165°F. Let it rest before shredding to keep it juicy. Balancing flavors is key. Use your favorite BBQ sauce, but don’t go overboard. The sauce should enhance, not overpower. Mix in ranch dressing for creaminess. Adjust the amount based on your taste. Salt and pepper are also vital. They bring all the flavors together. Taste as you go for the best results. A well-presented salad grabs attention. Use large bowls or plates for serving. Start with a colorful layer of greens. Spread the BBQ chicken evenly on top. Arrange the other toppings artfully. This creates a feast for the eyes. Drizzle extra BBQ sauce and ranch dressing on top. Sprinkle fresh cilantro for a vibrant finish. Your guests will love the look and taste! {{image_4}} You can change the greens in your BBQ Ranch Chicken Salad. Try using kale, spinach, or even mixed baby greens. Each green adds its own flavor and texture. For a crunchy base, use romaine. If you want something tender, choose baby spinach. Mix different greens for a fun twist! Want more protein? Try adding chickpeas or chopped hard-boiled eggs. You can also include grilled shrimp or diced turkey for extra flavor. For veggies, think about bell peppers or cucumbers. They add nice crunch and color. Feel free to get creative with your choices! To make this salad vegan or vegetarian, swap the chicken for chickpeas or tofu. Use a vegan BBQ sauce and ranch dressing. You can also add more veggies like roasted sweet potatoes or zucchini. These changes make the salad just as tasty and filling. Enjoy your plant-based twist! Store any leftover BBQ Ranch Chicken Salad in an airtight container. Place it in the fridge right after serving. This keeps it fresh and safe to eat. Try to eat it within two days for the best taste. If the salad has dressing, store it separately. This helps keep the greens crisp. Reheat the BBQ chicken only if you have leftovers. Use a microwave or stovetop for this. Heat it gently to avoid drying it out. For the microwave, place the chicken in a bowl and cover it with a damp paper towel. Heat in short bursts until warm. On the stovetop, use a nonstick pan over medium heat. Stir it often to ensure even heating. - Shredded chicken: Use within 3-4 days if stored properly in the fridge. - BBQ sauce: Check the label for best before dates, but it can last months if unopened. - Mixed greens: Consume within 3-5 days for the best texture and flavor. - Cherry tomatoes: They stay fresh for about a week when stored in a cool place. - Corn: Use cooked corn within 3-4 days. Canned corn lasts longer if unopened. - Black beans: Use within 3-4 days after opening. Canned beans last a long time if unopened. - Red onion: Store sliced onion in a sealed container for about a week. - Avocado: Once cut, use within 1-2 days to prevent browning. - Shredded cheese: Keep it sealed for up to a week in the fridge. - Ranch dressing: Check the label, but homemade usually lasts about a week. Store your ingredients well to ensure they taste great when you make the salad again! Yes, you can use grilled chicken. Grilled chicken adds a smoky flavor. Just make sure it is cooked and shredded. You can season it with some BBQ sauce for extra taste. Both options work well in this salad. You can make this salad in advance, but be careful. If you mix the dressing in early, the greens may get soggy. I recommend keeping the dressing separate until you serve. You can prepare other ingredients ahead to save time. If you want a substitute for ranch dressing, try these options: - Greek yogurt mixed with herbs - Blue cheese dressing for a bolder flavor - A simple vinaigrette for a lighter touch These choices will still keep your salad tasty. In this blog post, we explored BBQ ranch chicken salad step-by-step. We started with essential ingredients, followed instructions for preparation, and shared tips for perfecting flavor. I highlighted ways to customize the salad and storage tips to keep it fresh. This salad is not just easy to make; it’s fun to customize. By applying these tips, you can create a tasty meal that suits your flavor. Enjoy building your own version of this dish!
                        BBQ Ranch Chicken Salad Flavorful and Easy Recipe
                      • - Chicken and Seasoning - 2 boneless chicken breasts, diced into bite-sized pieces - 1 tablespoon extra virgin olive oil - 1 teaspoon garlic powder - 1 teaspoon ground cumin - 1 teaspoon smoked paprika - Salt and black pepper, to taste - Cheese and Tortillas - 1 cup pepper jack cheese, finely shredded - 4 large flour tortillas (preferably whole wheat for extra flavor) - Vegetables - ½ cup assorted bell peppers, thinly sliced (use red, yellow, and green for a colorful mix) - ½ cup red onion, thinly sliced - Garnishes and Optional Sides - ¼ cup fresh cilantro, roughly chopped (for garnish) - Salsa and sour cream (for serving, optional but recommended) Gathering these simple ingredients is the first step to a tasty meal. The chicken provides protein, while the spices add flavor. Pepper jack cheese gives a nice kick. Fresh veggies add crunch and color. Don’t forget the cilantro for garnish and salsa for dipping! Each ingredient brings a special touch to your quesadillas, making them fun and delicious. Cooking the Chicken with Spices Start by heating 1 tablespoon of olive oil in a large skillet. Let it warm for about 1 minute. Next, add 2 diced chicken breasts. Season it with 1 teaspoon of garlic powder, 1 teaspoon of ground cumin, 1 teaspoon of smoked paprika, and salt and pepper to taste. Cook it for 7-10 minutes. Stir the chicken often. Make sure it is cooked all the way through, with no pink left. Sautéing the Vegetables Once the chicken is done, remove it from the skillet. Place it on a plate to keep warm. In the same skillet, add ½ cup of sliced bell peppers and ½ cup of sliced red onion. Sauté them for 3-4 minutes. You want them soft but still a bit crunchy. Combining Chicken and Vegetables Return the cooked chicken to the skillet. Mix it with the sautéed peppers and onions. Cook everything together for another 2-3 minutes. This helps all the flavors blend. Layering Ingredients on Tortillas Preheat a non-stick skillet over medium heat. Take one large tortilla and place it on the skillet. On one half, sprinkle a layer of pepper jack cheese. Use about ½ cup of cheese. Add a portion of the chicken and vegetable mix on top. Finish with another layer of cheese before folding the tortilla in half. Cooking Method for Perfect Quesadillas Cook the folded quesadilla for 3-4 minutes until the bottom is golden brown. The cheese should start melting. Carefully flip the quesadilla. Cook the other side for 2-3 minutes until it is golden brown too. Repeat this process for the rest of the tortillas. Cutting and Serving Once all the quesadillas are cooked, take them off the skillet. Cut each one into wedges. Presentation Suggestions Serve the quesadillas on a large platter. Arrange them in a fan shape for a fun look. Sprinkle extra cilantro on top for color. Add small bowls of salsa and sour cream on the side for dipping. - Importance of Seasoning Seasoning is key to great flavor. Use garlic powder, cumin, and smoked paprika. These spices add depth to your chicken. Sprinkle salt and black pepper to taste. Don’t be shy with the seasoning; it makes a big difference! - Ensuring Proper Cooking Temperature Cook your chicken over medium heat. This helps it cook evenly and stay juicy. If the heat is too high, the outside cooks too fast. You want the chicken cooked through without burning. - How to Store Leftover Quesadillas Store leftover quesadillas in an airtight container. Place parchment paper between each quesadilla to keep them from sticking. They last about 2-3 days in the fridge. - Reheating Methods To reheat, use a skillet for crispy quesadillas. Heat over medium-low heat for best results. You can also use a microwave, but this can make them soft. - Freezing for Future Meals Quesadillas freeze well! Wrap each one in plastic wrap, then place in a freezer bag. They can last up to 3 months. Thaw in the fridge before reheating. - Recommendations for Extra Spice Want more heat? Add jalapeños or a dash of hot sauce. You can mix these into the chicken while cooking. Adjust spice to your liking for a kick! - Substituting Ingredients for Dietary Needs Don't have chicken? Try black beans or tofu instead! You can also use dairy-free cheese for a vegan option. Whole wheat tortillas are a great choice for added fiber. {{image_4}} You can make cheese-only quesadillas by skipping the chicken. Just use more cheese. I like pepper jack for its nice kick. You can also add beans or other veggies. Black beans, corn, or spinach work great. They add fiber and flavor. Want to mix it up? Use different cheeses! Cheddar or mozzarella can change the taste. You can also try adding special sauces. A drizzle of chipotle sauce gives a smoky flavor. Salsa verde can add a fresh twist. If you're watching carbs, choose alternative tortillas. Look for cauliflower or almond flour tortillas. They are great for a healthier bite. Adjusting ingredients for a keto diet helps too. Use more cheese and less chicken. You can still enjoy this dish while keeping carbs low. - Calories per Serving: Each quesadilla has about 400 calories. - Protein, Fat, and Carbohydrate Content: You get around 25 grams of protein, 18 grams of fat, and 40 grams of carbs. - Benefits of Pepper Jack Cheese: This cheese adds a spicy kick. It also has calcium and protein. These help build strong bones and muscles. - Nutritional Value of Bell Peppers and Chicken: Bell peppers are rich in vitamins A and C. They support your immune system. Chicken is lean protein. It helps with muscle growth and repair. - Pairing with Salads or Sides: A fresh salad with greens and tomatoes works well. This adds fiber and nutrients. - Incorporating Healthy Salsas: Try fresh salsa with tomatoes, onions, and cilantro. It adds flavor and freshness to your meal. Can I make these quesadillas ahead of time? Yes, you can prepare the filling early. Cook the chicken and veggies, then store them in the fridge. When ready to eat, assemble and cook the quesadillas. What can I use instead of pepper jack cheese? You can use cheddar cheese for a milder taste. Monterey Jack is another great choice. Both melt well and taste delicious. How do I make quesadillas less greasy? Use less oil when cooking the chicken. Drain any excess oil after cooking. You can also use low-fat cheese for a lighter option. What's the best way to keep quesadillas crispy? Cook them on medium heat. This helps the cheese melt without burning the tortilla. Avoid overloading with fillings, as this can make them soggy. How do I know when my quesadilla is fully cooked? Check the color of the tortilla. It should be golden brown. You can also peek inside to see if the cheese has melted completely. Can I use whole wheat tortillas instead of flour? Yes, whole wheat tortillas work great. They add a nutty flavor and more fiber. Just ensure they are fresh for the best taste. What are some good chicken alternatives for this recipe? You can use cooked shredded chicken or even tofu for a vegetarian twist. Grilled shrimp or beans are also tasty options. You now know how to make tasty Pepper Jack chicken quesadillas. Start with fresh ingredients and follow simple steps for great flavor. Remember to store leftovers properly and explore fun variations. Each twist can make your meal exciting and healthy. Enjoy your cooking journey as you create delicious quesadillas suited to your taste. Let your kitchen be a place of fun and flavor!
                        Pepper Jack Chicken Quesadillas Flavorful and Easy Meal

                      Seasonal

                      • - 2 ripe avocados, halved and pitted - ¼ cup unsweetened cocoa powder - ¼ cup pure maple syrup - ¼ cup almond milk (or your favorite plant-based milk) - 1 teaspoon vanilla extract - A pinch of sea salt - ¼ cup dairy-free dark chocolate chips, for garnish - Fresh berries (such as raspberries or strawberries) for garnish If you have allergies, here are some easy swaps: - Nut-Free: Use oat milk instead of almond milk. - Sugar-Free: Swap maple syrup for a sugar-free sweetener. - Gluten-Free: This recipe is already gluten-free, so no changes needed! - Avocados: Packed with healthy fats and fiber. They help keep you full. - Cocoa Powder: Rich in antioxidants, it boosts heart health. - Maple Syrup: A natural sweetener that provides some minerals. - Almond Milk: Low in calories, it is a great dairy alternative. - Vanilla Extract: Adds flavor and may have some health benefits. - Sea Salt: Enhances taste and balances sweetness. - Dark Chocolate Chips: Provide antioxidants and satisfy your sweet tooth. - Berries: Full of vitamins and antioxidants, they add color and flavor. This vegan chocolate avocado mousse is not just tasty, but also nourishing! Start by picking ripe avocados. They should feel soft but not mushy. Cut each avocado in half. Twist the halves to separate them. Use a spoon to scoop out the creamy flesh. Place this flesh in your blender or food processor. This base will give your mousse a rich texture. Add the unsweetened cocoa powder to the blender. Next, pour in the pure maple syrup and almond milk. Don't forget the teaspoon of vanilla extract and a pinch of sea salt. Blend everything on high speed. Stop to scrape down the sides. This helps mix all the ingredients well. Aim for a smooth and creamy texture. Taste the mousse. If it needs more sweetness, add a little maple syrup and blend again. Spoon the mousse into serving dishes or elegant glasses. Place these in the fridge for at least 30 minutes. This chilling time helps the mousse set and makes it taste even better. Just before serving, melt the dairy-free dark chocolate chips. Drizzle this melted chocolate over the mousse for a tasty touch. Garnish with fresh berries for color and flavor. Enjoy your delightful treat! To make your mousse smooth, use ripe avocados. They should be soft but not brown. Blend the avocados right away after you scoop them out. This keeps them fresh and creamy. Blend until there are no lumps. If needed, scrape the sides of the blender. A good texture is key to a great mousse. Taste is important! Start with the maple syrup as listed. After blending, try a spoonful. If you want it sweeter, add more syrup. Blend again until mixed well. Remember, everyone's taste is different. Adjusting sweetness makes this dessert just right for you. For a beautiful look, use clear glass cups. This shows off the rich chocolate color. Top each cup with fresh berries for a pop of color. A sprinkle of cocoa powder adds a nice touch, too. Drizzle melted chocolate on top for extra flair. Serve it chilled for the best experience. {{image_4}} To make your vegan chocolate avocado mousse even better, try adding flavors. A few drops of peppermint extract give a fresh twist. You can also try almond or coconut extract for a warm touch. These little changes can make a big difference in taste. Maple syrup is great, but you have options! Agave nectar or coconut nectar work well too. If you want a lower-calorie choice, try stevia or monk fruit sweetener. Just remember to adjust the amount since these can be much sweeter than syrup. This mousse is already gluten-free, which is a plus! For a nut-free version, use oat milk instead of almond milk. Ensure your chocolate chips are also nut-free. These simple swaps let anyone enjoy this rich dessert without worry. Store leftover mousse in the fridge. Use an airtight container. This keeps it fresh for up to three days. If you leave it uncovered, it may dry out or absorb odors. Make sure to cover it tightly. You can freeze the mousse, but it changes texture. Freeze it in an airtight container. It can last up to one month in the freezer. When ready to eat, thaw it overnight in the fridge. After thawing, stir it well to restore creaminess. Use glass or BPA-free plastic containers for storage. Glass is great for keeping flavors intact. Ensure containers are clean and dry before adding mousse. For single servings, use small jars or cups. This makes it easy to grab and enjoy later. No, you cannot taste the avocado in the mousse. The cocoa powder and maple syrup mask its flavor. The mousse tastes rich and chocolatey. The avocado adds creaminess and healthy fats. This makes the texture smooth and light. The mousse lasts in the fridge for about three days. Store it in an airtight container. This keeps it fresh and prevents it from absorbing other odors. Before serving, give it a quick stir for a smooth texture. Yes, this recipe is great for meal prep. You can make it ahead for busy days. Just store it in individual containers. This makes it easy to grab and enjoy later. Plus, it’s a healthy dessert option to have on hand. You can make this mousse without a blender, but it will take more effort. Use a fork to mash the avocado until smooth. Then mix the other ingredients in a bowl. Make sure to blend well so there are no lumps. A hand mixer can also help achieve a creamier texture. This blog post covered how to make a delicious avocado mousse. We explored ingredients, substitutions, and the nutritional benefits. I shared step-by-step instructions for preparation and blending, plus tips for perfect texture and presentation. You learned about flavor variations and how to store leftovers properly. In summary, this mousse is easy to make and enjoyable. You can customize it to fit your taste and dietary needs. Enjoy creating this treat for yourself and others!
                        Vegan Chocolate Avocado Mousse Delightful Dessert Recipe
                      • - 2 ripe avocados, peeled and pitted - ½ cup unsweetened cocoa powder - ¼ cup maple syrup - ¼ cup almond milk (or any non-dairy milk of your choice) - 1 teaspoon pure vanilla extract - A pinch of fine sea salt - Fresh berries (such as raspberries or strawberries) and fresh mint leaves for garnish (optional) - Avocados: They are rich in healthy fats. They help keep your heart strong. They also have fiber, which aids digestion. - Cocoa powder: It is full of antioxidants. These help fight free radicals in your body. Cocoa can also boost your mood. - Maple syrup: This natural sweetener has vitamins and minerals. It provides a healthier option than refined sugar. - Almond milk: It is low in calories and dairy-free. It is good for those who are lactose intolerant. - Vanilla extract: It adds flavor and has calming effects. It can also improve your mood. - Sea salt: Just a pinch enhances the flavor. It helps balance out sweetness in the mousse. - Fresh berries and mint: They add vitamins and a pop of color. Berries are full of antioxidants, while mint adds a fresh taste. - Avocados: If you cannot find avocados, use silken tofu for a creamy texture. - Cocoa powder: You can use carob powder if you prefer a caffeine-free option. - Maple syrup: Honey or agave syrup can work as sweeteners too. - Almond milk: Use soy, oat, or coconut milk based on your preference. - Vanilla extract: You can skip it, but it adds a lovely flavor. - Sea salt: Regular table salt can be used as a substitute. - Berries and mint: Any fruit or herb can fit your taste for garnish. Start by taking two ripe avocados. Cut them open, and remove the pits. Use a spoon to scoop the green flesh into a bowl or food processor. Make sure to get all of it! The avocados give this mousse its creamy texture. Their natural fats help make it rich and smooth. Now, add the following to the food processor: - ½ cup unsweetened cocoa powder - ¼ cup maple syrup - ¼ cup almond milk (or any non-dairy milk of your choice) - 1 teaspoon pure vanilla extract - A pinch of fine sea salt Secure the lid tightly. Blend the mixture on high speed. Keep blending until everything is silky smooth. This usually takes around 2-3 minutes. Don’t forget to stop and scrape the sides of the bowl. This helps mix all the flavors well. After blending, taste the mousse. If you want it sweeter, add more maple syrup. Blend again for a few seconds to mix it in. Next, spoon the mousse into individual serving dishes. Fill them to your liking. For the best taste and texture, place the mousse in the refrigerator. Let it chill for at least 30 minutes. This step helps the mousse firm up and lets the flavors blend nicely. When you’re ready to serve, take it out and garnish with fresh berries and mint leaves for a colorful touch! To get the best texture, use ripe avocados. They should feel soft when you gently squeeze them. Cut them in half, remove the pit, and scoop the flesh into a blender. Blend the avocados with cocoa powder and almond milk until smooth. This step usually takes 2-3 minutes. If the mousse is still chunky, blend a bit longer. Scraping the sides of the blender helps mix everything evenly. After blending, taste your mousse. If it needs more sweetness, add more maple syrup. Blend again to mix in the extra syrup. You can also try adding a touch of instant coffee. This enhances the chocolate flavor and adds depth. A pinch of sea salt can also boost the flavor. Serve your mousse in small bowls or glasses. Decorate each serving with fresh berries like raspberries or strawberries. A sprig of mint adds a nice touch, too. For a fun twist, add a dollop of whipped coconut cream on top. Chill the mousse for about 30 minutes before serving for the best taste. {{image_4}} You can easily make this mousse vegan. The basic recipe is already dairy-free. Just use plant-based milk like almond, oat, or coconut milk. This gives you that creamy texture without any animal products. It tastes just as rich and delicious! Want to switch it up? Try adding nut butters like almond or peanut butter. This adds a nutty flavor that pairs well with chocolate. You can also mix in flavored extracts, like hazelnut or mint. Start with a teaspoon and taste as you go. This will enhance the mousse and make it even more special. Garnishes can really make your mousse shine. Fresh berries like raspberries or strawberries add color and freshness. Mint leaves bring a nice touch of brightness. You can also sprinkle some chopped nuts or seeds on top. This adds crunch and makes each bite fun. Get creative with what you have at home! To keep your chocolate avocado mousse fresh, store it in an airtight container. This helps avoid any unwanted odors from your fridge. If you do not have a lid, cover it tightly with plastic wrap. Press the wrap directly onto the mousse surface to limit air exposure. When stored properly in the fridge, your mousse lasts about three days. If you notice any changes in smell or texture, discard it. Avoid leaving the mousse at room temperature for more than two hours. This prevents bacteria growth and keeps the mousse safe. You can freeze chocolate avocado mousse if you want to enjoy it later. Place it in a freezer-safe container and cover it tightly. It can last up to three months in the freezer. When ready to eat, thaw it overnight in the fridge. Give it a quick stir before serving to revive its creamy texture. Yes, chocolate avocado mousse is healthy! It has good fats from avocados. These fats help your heart and keep you full. The cocoa powder adds antioxidants, which are great for your body. Maple syrup is a natural sweetener, offering some vitamins and minerals. This mousse is a tasty treat that won’t make you feel guilty. Absolutely! You can use honey, agave syrup, or even stevia. Each sweetener changes the taste a bit. If you want to try something new, use coconut sugar. It adds a nice caramel flavor. Just remember to adjust the amount to fit your taste. The mousse can last about three days in the fridge. Make sure to cover it well. This keeps it fresh and tasty. If you see any darkening on top, don’t worry. Just stir it before serving, and it will taste great! Yes, you can make this mousse a day ahead. It actually tastes better after chilling overnight. Just store it in a covered bowl in the fridge. When you’re ready to serve, add your favorite berries and mint for a fresh look. Enjoy your delicious treat! This blog post shared a simple recipe for chocolate avocado mousse. We explored ingredients and their health benefits. I provided steps to prepare and chill the mousse. You learned tips for the best texture and flavor adjustments. We covered fun variations and storage options to keep your mousse fresh. Remember, this treat is not only tasty but also good for you. Enjoy your creamy dessert without guilt!
                        Chocolate Avocado Mousse Rich and Creamy Delight
                      • To make the best creamy spinach artichoke dip, gather these key ingredients: - 2 cups fresh spinach, roughly chopped - 1 cup canned artichoke hearts, drained and coarsely chopped - 1 cup cream cheese, softened - 1 cup sour cream - ½ cup mayonnaise - 1 cup shredded mozzarella cheese - ½ cup freshly grated Parmesan cheese - 2 cloves garlic, finely minced - 1 teaspoon onion powder - ½ teaspoon red pepper flakes (optional) - Salt and freshly cracked black pepper, to taste To make your dip even better, consider adding: - A squeeze of lemon juice for brightness - Fresh herbs like parsley or chives for color and taste - A dash of Worcestershire sauce for depth If you need to adjust for dietary needs, try these swaps: - Use Greek yogurt instead of sour cream for a lighter option. - Replace cream cheese with a vegan cream cheese for a dairy-free dip. - For a gluten-free option, ensure your accompanying snacks are gluten-free. These ingredients come together to create a rich and tasty dip. Each component adds its own flavor, making this recipe a crowd-pleaser. Enjoy experimenting with flavors and textures! Start by preheating your oven to 350°F (175°C). This step is key to getting your dip bubbly and golden. Make sure to give it enough time to reach the right temperature. In a large bowl, add the softened cream cheese, sour cream, and mayonnaise. Blend these well using a hand mixer or a spatula. Aim for a smooth and creamy texture. This mix forms the dip's rich base. Now, add the chopped spinach and artichoke hearts into the creamy mix. Don’t forget the minced garlic, onion powder, and optional red pepper flakes for some heat. Stir everything together until well mixed. This ensures each bite is full of flavor. Spoon the mixture into an oven-safe dish. Spread it evenly to help it cook well. Place it in your preheated oven and bake for about 25-30 minutes. Look for a hot, bubbling dip with a golden top. After baking, let it cool for about 5 minutes before serving. Enjoy your tasty creation with pita chips or veggies! To get that creamy dip just right, start with softened cream cheese. It mixes better. Blend it with sour cream and mayonnaise until smooth. This is your base. When you add the spinach and artichokes, stir gently. You want to keep some chunks for texture. Don't overmix the cheese either. Folding it in helps maintain that creamy feel. Serve the dip warm for the best taste. Use crunchy pita chips, toasted baguette slices, or fresh veggies for dipping. These pair well with the rich flavors. For a special touch, sprinkle extra Parmesan on top. You can even add some whole artichoke hearts for a nice look. This makes your dip more inviting and fun to share. One mistake is using cold cream cheese. It won’t blend well. Always let it soften first. Another pitfall is overbaking. Keep an eye on the dip to avoid burning. If it's too hot, it can lose its creamy texture. Lastly, don’t skip the seasoning. A pinch of salt and pepper makes a big difference in flavor. These small steps help you create the best creamy spinach artichoke dip. {{image_4}} Want a kick? Add red pepper flakes. They add heat without overpowering. You can also use jalapeños for a bolder flavor. Just chop them finely and mix them in. The spicy version pairs well with tortilla chips or crusty bread. Looking for a lighter option? Replace cream cheese with low-fat cream cheese. Use Greek yogurt instead of sour cream. This keeps the dip creamy while cutting calories. The flavor remains rich, and you won’t miss the full-fat versions. For a vegan twist, use cashew cream instead of cream cheese. Soak cashews in water, blend until smooth, and add them to the mix. Use coconut yogurt for a creamy texture, and nutritional yeast for a cheesy flavor. This version is just as tasty and plant-based! To store leftover dip, first, let it cool. Place it in an airtight container. Make sure to seal it tightly. Store the container in the fridge. This keeps the dip fresh and tasty. Use leftovers within three days for the best flavor. When you are ready to enjoy the dip again, preheat your oven to 350°F (175°C). Transfer the dip to an oven-safe dish. Cover it with foil to keep moisture in. Heat for about 15-20 minutes. Check if it's warm all the way through before serving. This method helps keep the flavors rich and creamy. You can freeze this dip for later use. To freeze, place the cooled dip in a freezer-safe container. Make sure to leave some space at the top for expansion. Label the container with the date. Freeze for up to two months. When you're ready to eat it, thaw the dip in the fridge overnight. Reheat it in the oven to restore its creamy texture. Yes, you can make this dip ahead of time. Prepare the dip and place it in your baking dish. Cover it tightly with plastic wrap or foil. Store it in the fridge for up to two days. When you’re ready to bake, just remove the cover and pop it in the oven. You may need to add a few extra minutes to the baking time. This dip pairs well with many tasty snacks. Here are some great options: - Pita chips - Toasted baguette slices - Fresh vegetable sticks (like carrots, celery, and bell peppers) - Tortilla chips - Crackers You can also enjoy it with assorted bread for a fun twist. If you have leftovers, store them in an airtight container. They will stay fresh for about three to four days in the fridge. To enjoy, just reheat the dip in the oven or microwave until it’s warm. You learned how to make a delicious Spinach Artichoke Dip. We covered essential and optional ingredients, plus substitutions. The step-by-step guide made it simple to prepare this tasty dish. Remember the tips to improve texture and avoid common mistakes. Explore variations for different diets. Lastly, we discussed storage and reheating methods. Whether for a party or a cozy night in, this dip is a must-try. Now, get cooking and enjoy this creamy delight!
                        Creamy Spinach Artichoke Dip Irresistibly Tasty Recipe
                      • - 2 lbs chicken wings - 2 tablespoons baking powder - 1 teaspoon sea salt - 1 teaspoon freshly ground black pepper - 1 teaspoon garlic powder - 2 tablespoons lemon pepper seasoning - 3 tablespoons extra virgin olive oil - Zest of 1 medium lemon - 2 tablespoons fresh lemon juice - Fresh parsley for garnish When you want to make crispy lemon pepper wings, gather these simple yet key ingredients. The chicken wings are the star of the show. Baking powder is vital for that crunchy skin. Sea salt and black pepper add flavor. Garlic powder brings warmth to the dish. Lemon pepper seasoning gives the wings their bright, zesty taste. Extra virgin olive oil helps the wings crisp up in the oven. The lemon zest and fresh lemon juice enhance the flavor and freshness. Finally, fresh parsley adds a nice touch and great color. With these ingredients, you are set to create a delicious treat that everyone will love! First, set your oven to 425°F (220°C). Preheating is key for crispy wings. Line a baking sheet with foil. Place a wire rack on top. This helps air flow around the wings. In a big bowl, mix the chicken wings with baking powder, sea salt, black pepper, and garlic powder. Toss them well. Make sure each wing has a nice coat of the dry mix. This will give them that perfect crunch. Lay the wings on the wire rack in a single layer. Don’t let them touch. This space is important for even cooking. Bake the wings for 40 to 45 minutes. At halfway, turn them over. They should look golden brown and crispy when done. While the wings cook, make the glaze. In a small bowl, stir together lemon pepper seasoning, lemon zest, and fresh lemon juice. Mix until it’s well combined. This glaze adds a bright flavor to the wings. When the wings are ready, take them out of the oven. Toss the hot wings in the zesty glaze right away. Make sure they are well coated. Serve them hot, with a sprinkle of fresh parsley on top for color and taste. Enjoy! To get those wings nice and crispy, follow these steps closely. First, use baking powder. It helps the skin puff up. Make sure to coat the wings evenly. Toss them well in the dry mix. This is key for a crunchy bite. Space the wings out on the rack. This allows hot air to flow around each wing. Don't crowd them; give them room to breathe. Flip the wings halfway through cooking. This helps both sides get golden and crispy. Having the right tools makes cooking easier. Here are some tools I recommend: - Baking sheet - Aluminum foil - Wire rack - Large mixing bowl - Tongs - Small bowl for the glaze Using a wire rack is important. It keeps the wings elevated and helps them crisp up better. Once your wings are ready, serve them hot. You can toss them in the lemon pepper glaze for a burst of flavor. For a fun touch, add fresh parsley on top. This adds color and a fresh taste. Pair your wings with celery sticks and your favorite dip. Blue cheese or ranch dressing works well. You can also serve them with a side of French fries. These wings are great for game day or any gathering. Enjoy every crispy bite! {{image_4}} Want a kick? Add heat to your wings! Use 1 to 2 teaspoons of cayenne pepper or red pepper flakes. Mix these into your seasoning blend. The spice pairs well with the lemon zest and pepper. You can also toss the wings in a spicy hot sauce after baking. This gives you both crispiness and heat. Love garlic? You can boost the flavor by adding more garlic powder. Try using 2 teaspoons instead of 1. You can also add minced fresh garlic for extra punch. Toss the wings in this mix before baking. The garlic will roast nicely and give a tasty twist. Feel free to mix it up! Instead of lemon pepper seasoning, try using your favorite dry rub. You can go for BBQ spice or even a herb mix. Marinades can also change the game. Use soy sauce, honey, and lemon juice for a sweet and savory flavor. Just let the wings soak for an hour before baking. Experimenting with flavors keeps your meals fun! After enjoying your crispy lemon pepper wings, let them cool first. Place the wings in an airtight container. They will stay fresh for up to three days in the fridge. Make sure the container is sealed well to keep out air. This helps prevent sogginess. Reheating wings is simple. Preheat your oven to 375°F (190°C). Spread the wings on a baking sheet. Bake for about 10-15 minutes. This will help them regain their crispiness. You can also use an air fryer if you want them extra crispy. Just set it to 375°F and heat for about 5-8 minutes. Want to save some wings for later? You can freeze them! First, let the wings cool completely. Then, place them in a freezer-safe bag. Remove as much air as you can before sealing. They will last up to three months in the freezer. When you're ready to eat, thaw them overnight in the fridge. Reheat using the oven or air fryer for best results. Yes, you can use frozen chicken wings. Just remember to thaw them first. This helps the seasoning stick better. It also ensures even cooking. I recommend thawing overnight in the fridge. To make the wings extra crispy, use baking powder. It helps create a nice crust. Make sure to coat the wings evenly. Also, space them on the rack while baking. This allows air to flow around each wing. Lemon pepper wings go great with many sides. You can serve them with celery and carrots. A cool ranch or blue cheese dip works well too. For a fresh touch, add a simple salad or coleslaw. Yes, you can make lemon pepper wings in an air fryer. Preheat the air fryer to 400°F (200°C). Cook the wings in a single layer for about 25 to 30 minutes. Shake the basket halfway through for even cooking. Toss them in the lemon pepper glaze when done! This article covered everything you need to make tasty lemon pepper chicken wings. You learned about the key ingredients, easy steps for cooking, useful tips, and fun variations. Remember, achieving that perfect crispness is key. Store leftovers properly and reheat them for the best taste. Enjoy trying the variations to keep things exciting. With this knowledge, you can impress family and friends with your new cooking skills. Happy cooking!
                        Crispy Lemon Pepper Wings Flavorful and Simple Treat

                      Footer

                      ↑ back to top

                      About

                      • Privacy Policy
                      • Disclaimer
                      • Terms & Conditions
                      • Accessibility Policy

                      Contact

                      • Contact
                      • Services
                      • Media Kit
                      • FAQ

                      Copyright © 2024 Tastytaleskitchen