tasty tales kitchen

  • Home
  • Recipes
    • Desserts
    • Appetizers
    • Drinks
    • Dinner
  • Contact
  • About
  • Privacy Policy
menu icon
go to homepage
  • Home
  • Recipes
    • Desserts
    • Appetizers
    • Drinks
    • Dinner
  • Contact
  • About
  • Privacy Policy
search icon
Homepage link
  • Home
  • Recipes
    • Desserts
    • Appetizers
    • Drinks
    • Dinner
  • Contact
  • About
  • Privacy Policy
×

Dinner

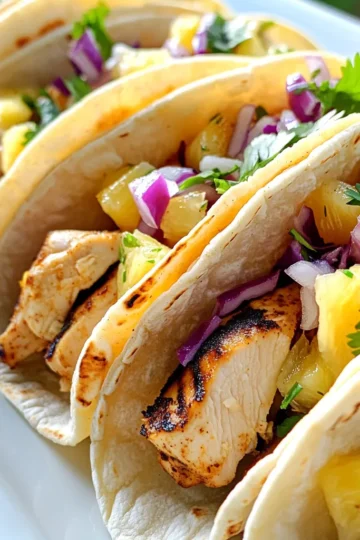
  • Caribbean Jerk Chicken Tacos Flavorful Fiesta Delight
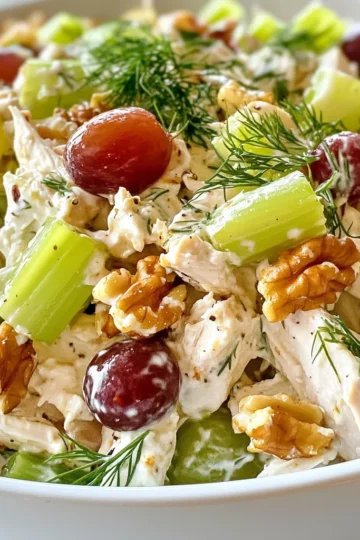
  • Greek Yogurt Chicken Salad Fresh and Simple Meal
  • Buffalo Chicken Stuffed Zucchini Boats Tasty Recipe
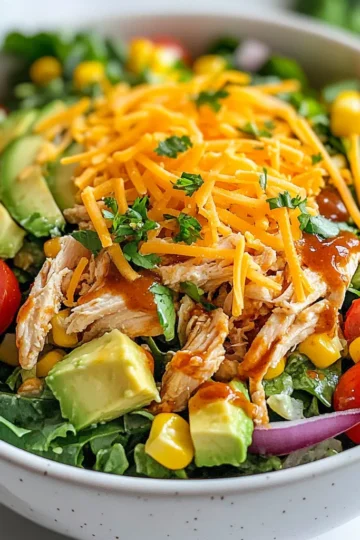
  • Savory BBQ Ranch Chicken Salad Recipe You’ll Love
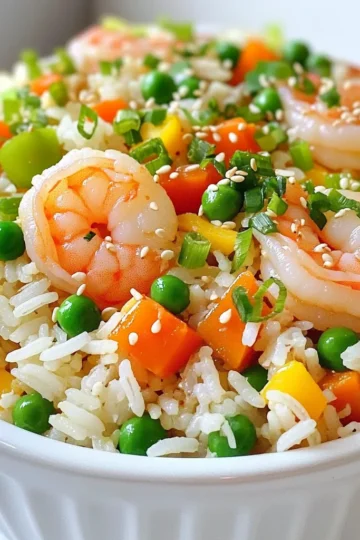
  • Minute Teriyaki Shrimp Fried Rice Easy Dinner Idea
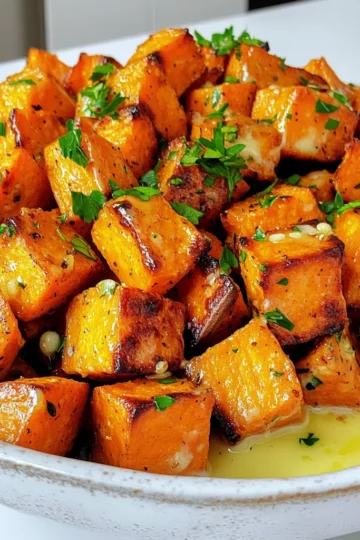
  • Garlic Butter Roasted Sweet Potatoes Flavorful Side
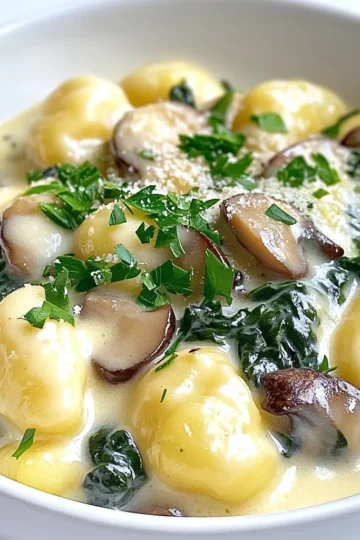
  • Creamy Spinach Mushroom Gnocchi Flavorful Dinner Idea
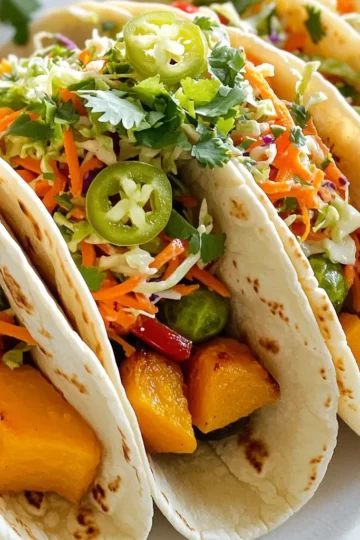
  • Fall Veggie Tacos with Chili Lime Slaw Delight
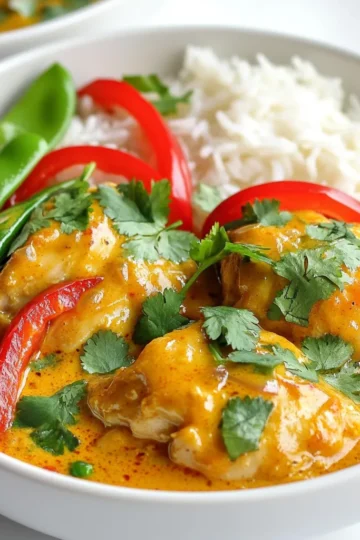
  • Slow Cooker Thai Coconut Chicken Curry Delight Recipe
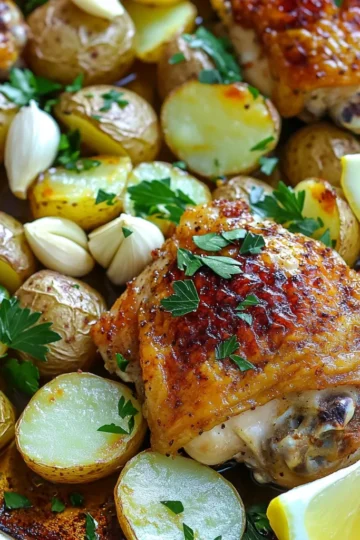
  • Sheet-Pan Roasted Garlic Chicken & Potatoes Delight
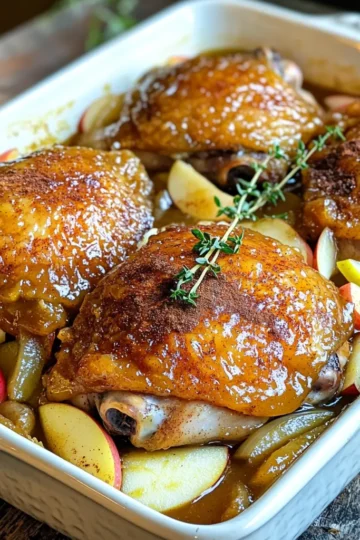
  • Slow Cooker Apple Butter Chicken Roast Delightful Meal
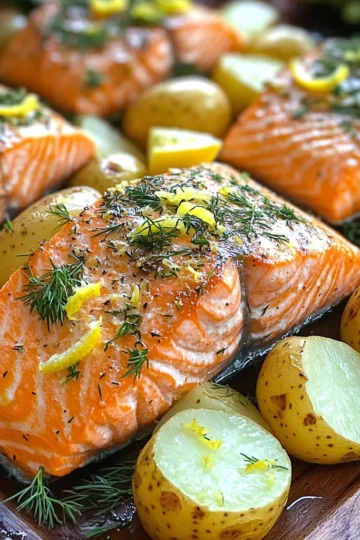
  • Savory Sheet-Pan Lemon Herb Salmon and Potatoes Recipe
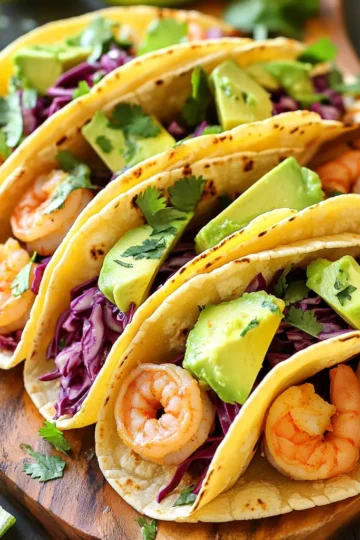
  • Garlic Butter Shrimp Tacos Ready in 15 Minutes
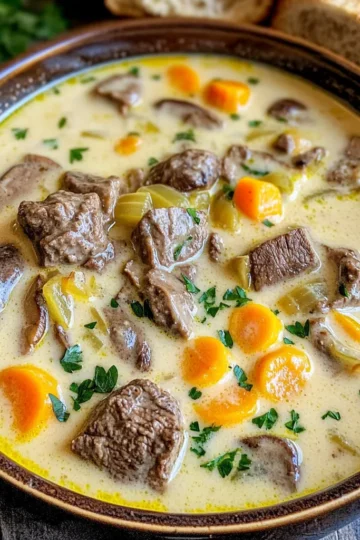
  • Creamy Beef and Mushroom Soup Slow Cooker Delight
  • Delicious Pumpkin Chili with Black Beans Slow Cooker
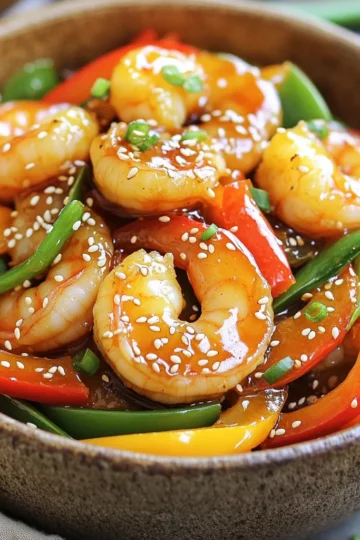
  • Minute Honey Garlic Shrimp Stir-Fry Quick and Easy Meal
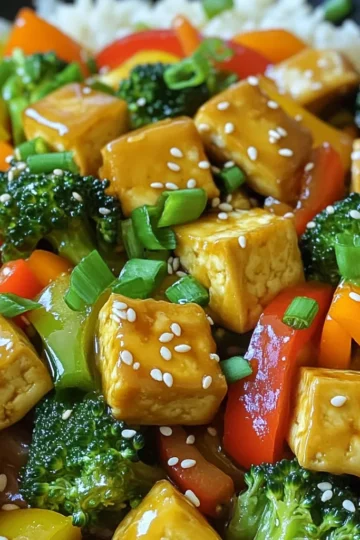
  • Minute Sesame Garlic Tofu Stir-Fry Simple Delight
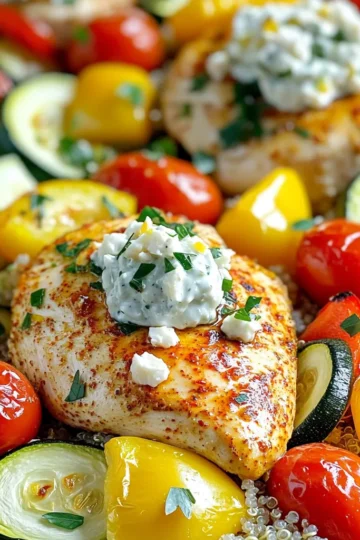
  • Sheet-Pan Mediterranean Chicken Bowls Flavorful Feast
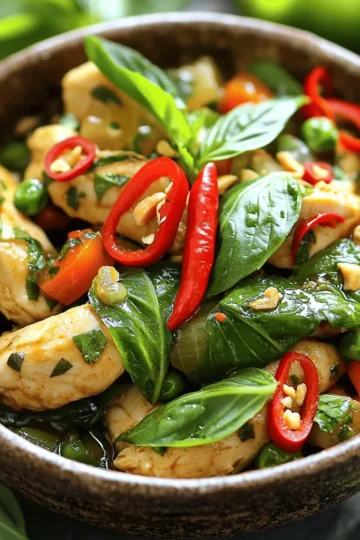
  • Thai Basil Chicken Flavorful and Easy Dinner Recipe
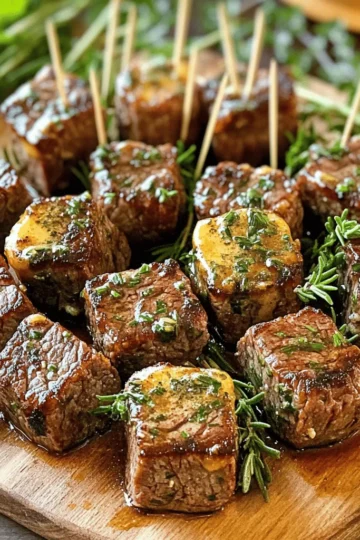
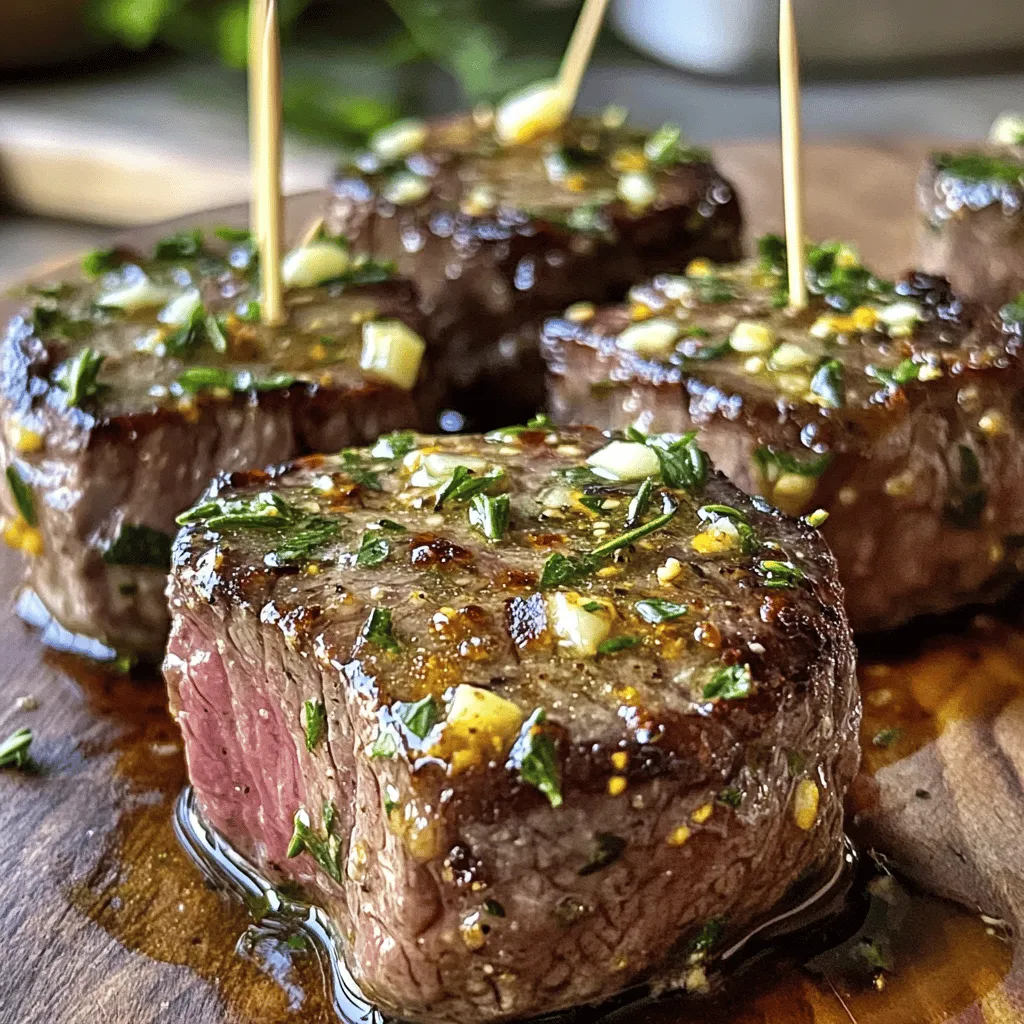
  • Garlic Herb Butter Steak Bites Flavorful and Easy Meal
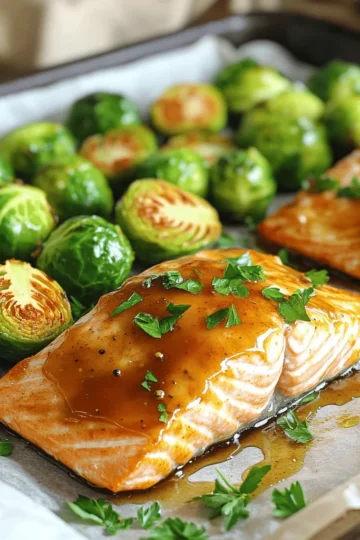
  • Maple Glazed Salmon with Brussels Sprouts Delight
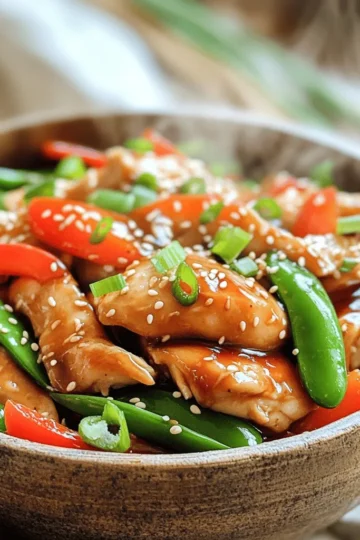
  • Minute Teriyaki Chicken Stir-Fry Quick and Tasty Meal
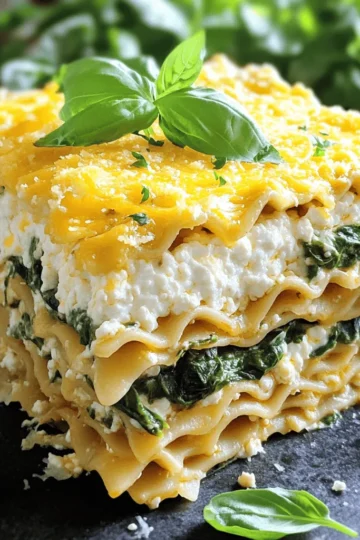
  • Protein Cottage Cheese Lasagna Hearty and Healthy Dish
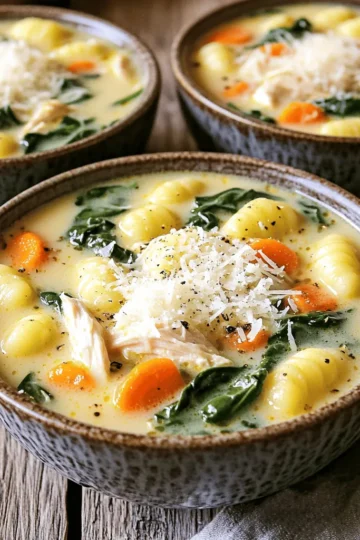
  • Creamy Chicken Gnocchi Soup Hearty and Comforting Meal
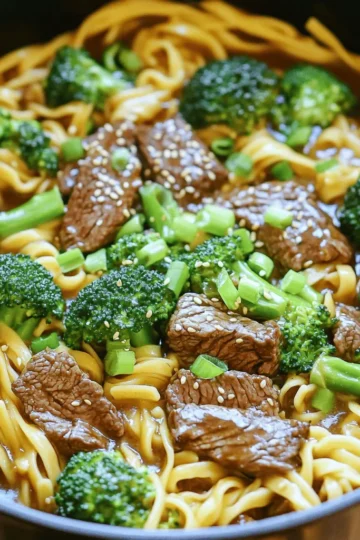
  • Savory One-Pot Beef & Broccoli Noodles Recipe
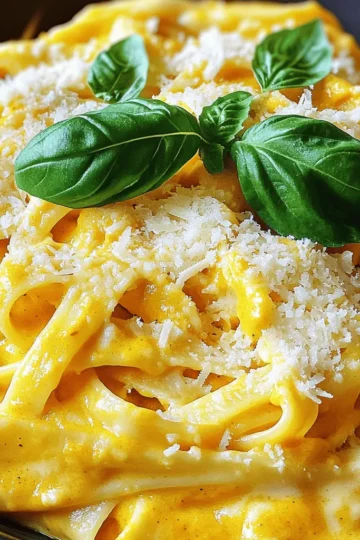
  • Slow Cooker Pumpkin Alfredo Creamy Comfort Dish
  • Slow Cooker Chicken & Wild Rice Soup Delight
  • Honey Garlic Shrimp Fried Rice Flavorful and Easy Dish
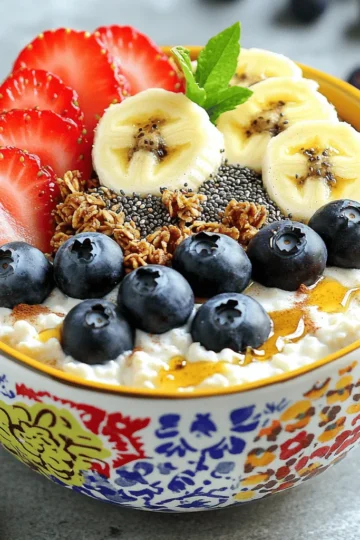
  • Cottage Cheese Breakfast Bowls High Protein Delight
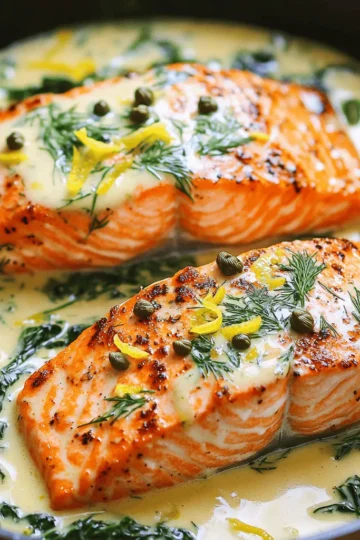
  • Creamy Lemon Dill Salmon Skillet Tasty Dinner Delight
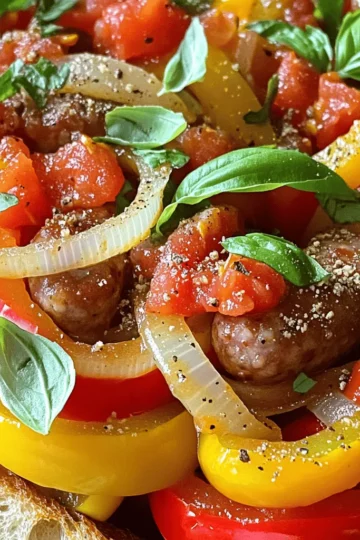
  • Slow Cooker Italian Sausage and Peppers Flavor Boost
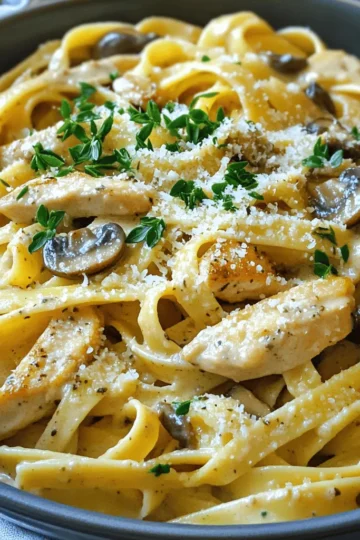
  • Creamy Chicken Marsala Pasta Flavorful Dinner Delight
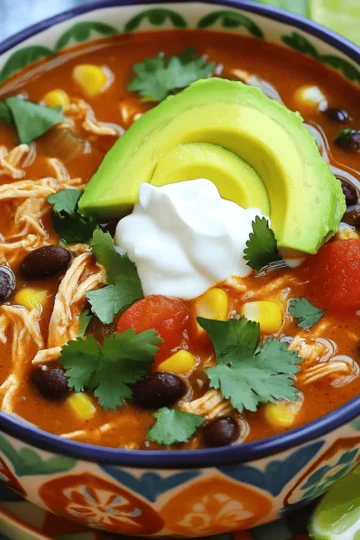
  • Flavorful Slow Cooker Chicken Enchilada Soup Recipe
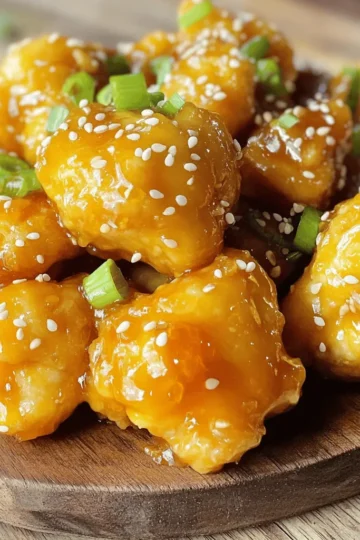
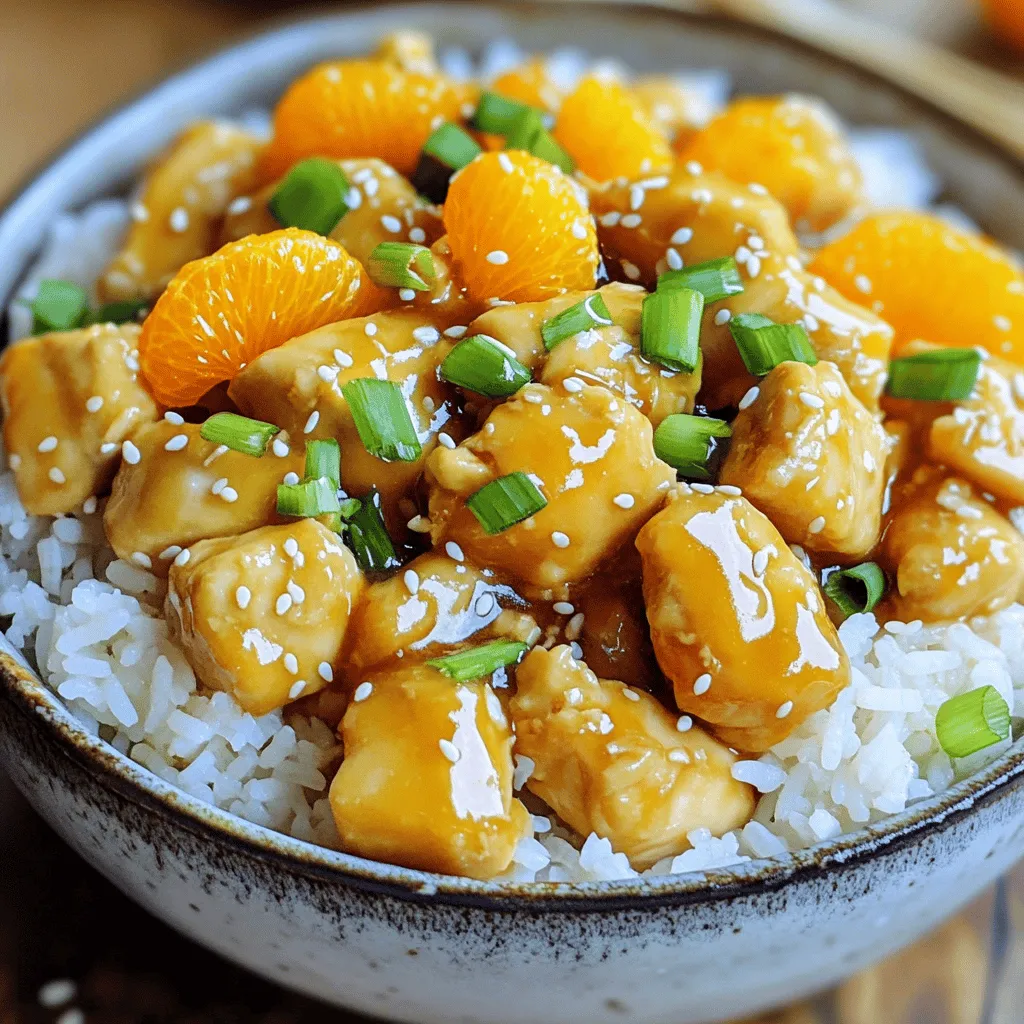
  • Orange Sesame Chicken Flavorful and Easy Recipe
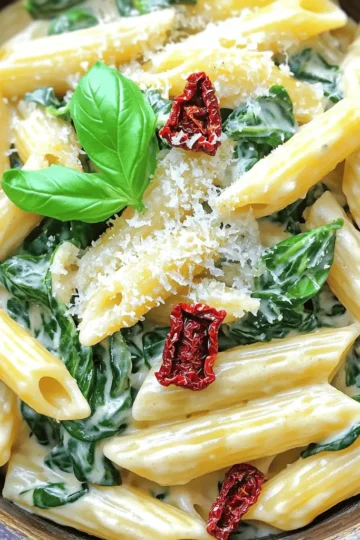
  • One Pot Creamy Spinach Sun Dried Tomato Pasta Delight
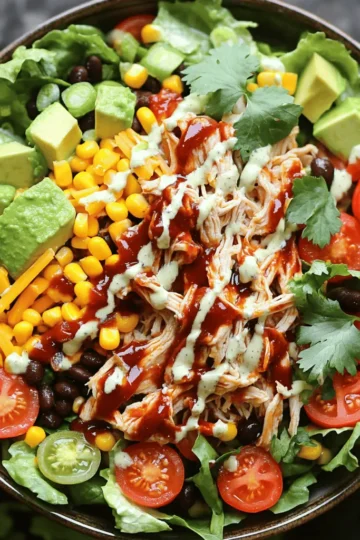
  • BBQ Ranch Chicken Salad Flavorful and Easy Recipe
  • Savory Shrimp & Corn Chowder Simple and Comforting Dish
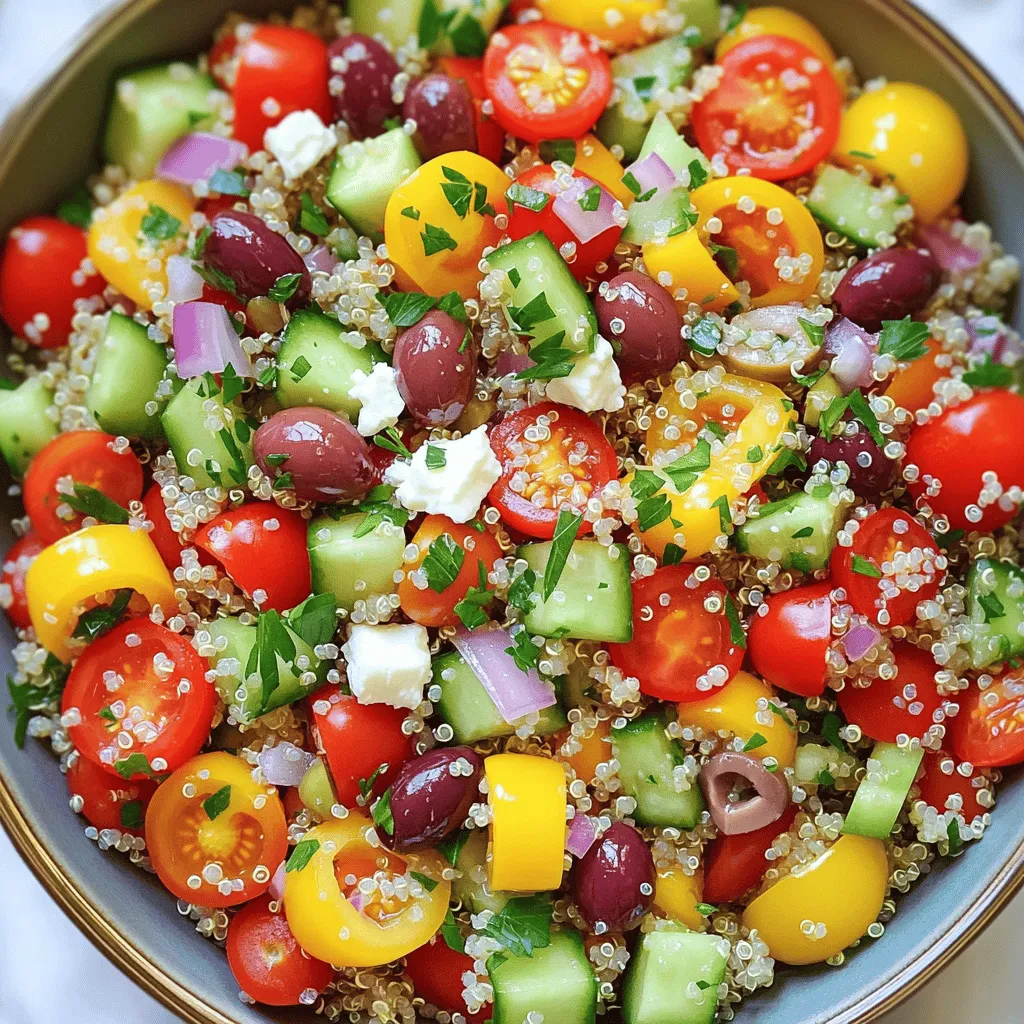
  • Mediterranean Quinoa Salad Fresh and Healthy Choice
  • Garlic Butter Steak Bites Rich and Flavorful Delight
  • Savory Mandarin Orange Chicken Rice Bowls Recipe
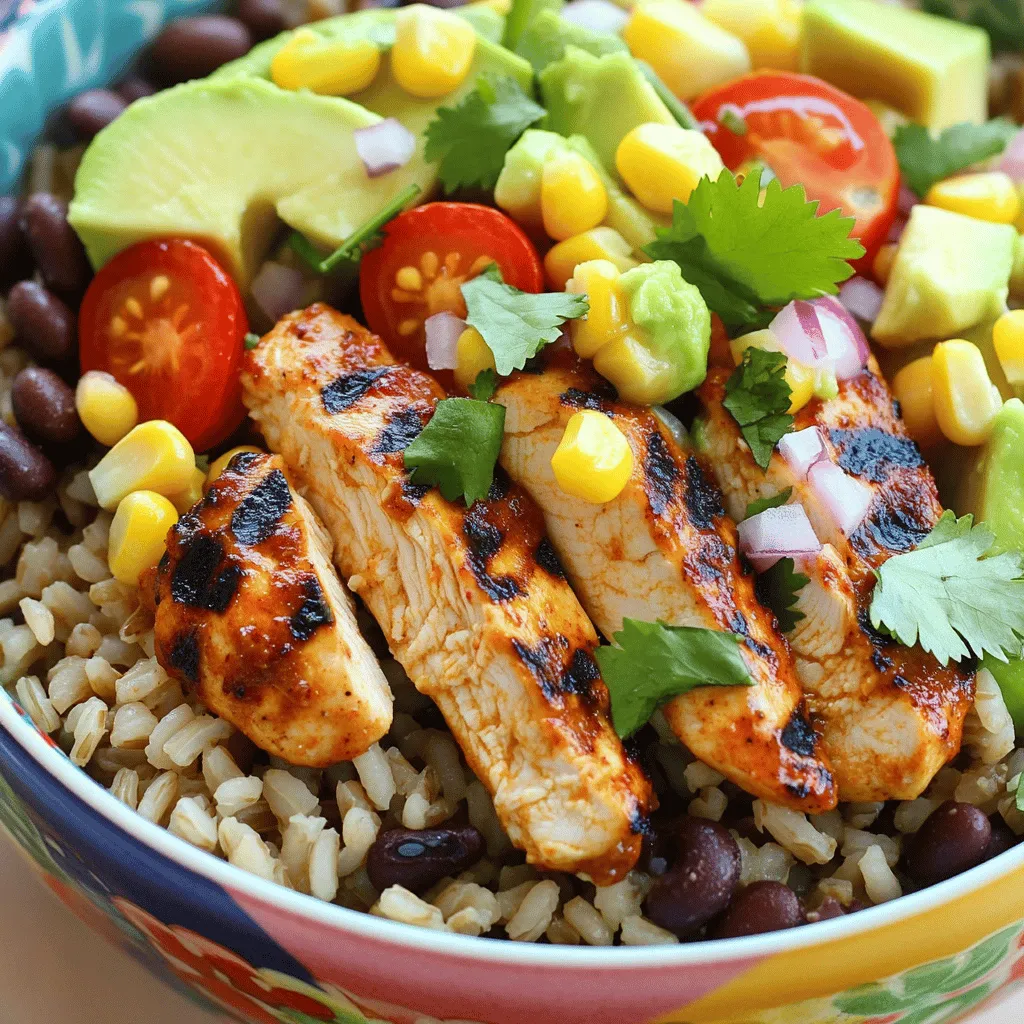
  • Chipotle Chicken Burrito Bowl Flavorful Meal Guide
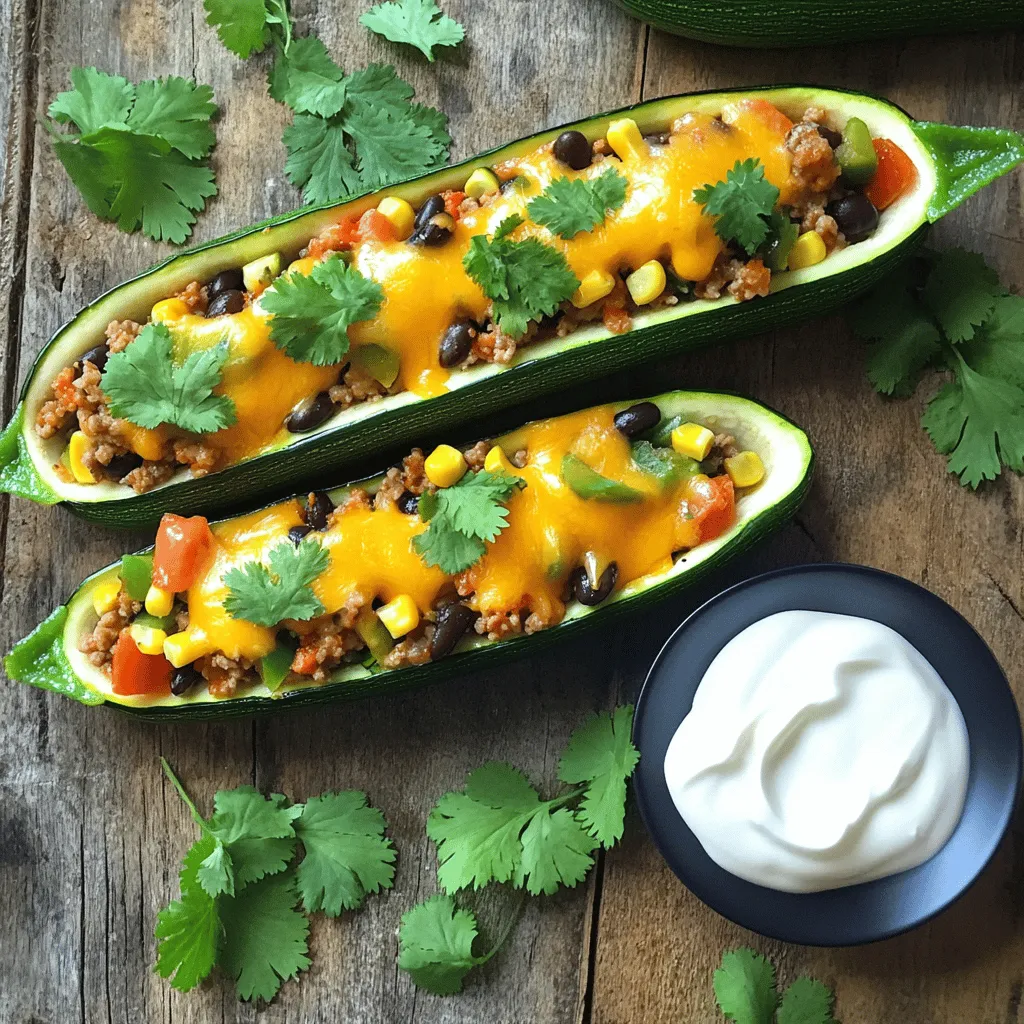
  • Taco Stuffed Zucchini Boats Satisfying Weeknight Meal

Posts pagination

Previous page 1 2 3 4 Next page

Welcome!

This is an introduction to me and my site to establish E-E-A-T. Keep this short and simple.

More about me

Popular

  • - 4 boneless, skinless chicken breasts - 2 tablespoons olive oil - 1 tablespoon unsalted butter - 4 cloves garlic, finely minced - 1 cup cherry tomatoes, halved - 1 cup fresh spinach leaves, packed - 1 cup heavy cream - ½ cup freshly grated Parmesan cheese - 1 teaspoon dried Italian herbs (oregano, basil, thyme mix) - Salt and freshly cracked black pepper to taste - Fresh basil leaves for garnish (optional) When cooking, you want to be precise with your measurements. Here are the units you'll use: - Tablespoons (tbsp) for liquids and fats - Cups for solid and liquid ingredients - Teaspoons (tsp) for smaller amounts like herbs and spices You can swap ingredients to fit your needs. Here are some ideas: - Chicken: Use turkey or even firm tofu for a plant-based option. - Olive oil: Vegetable oil or avocado oil works well too. - Heavy cream: Coconut cream or half-and-half can replace heavy cream. - Parmesan cheese: Use Pecorino Romano or nutritional yeast for a dairy-free option. - Spinach: Kale or Swiss chard can be good substitutes for spinach. These swaps maintain flavor while catering to dietary needs. Enjoy experimenting! {{ingredient_image_2}} Start by taking the chicken breasts. Season both sides with salt and pepper. This step adds flavor to the chicken. If you skip this, the chicken may taste plain. Make sure to cover all areas well. Set the chicken aside while you heat the pan. Next, heat a large skillet over medium-high heat. Add the olive oil and butter once it's hot. The butter will melt and bubble. This is your cue to add the chicken. Sear each breast for about 5 to 7 minutes. Look for a nice brown color. Check the internal temperature; it should read 165°F. Once cooked, take the chicken out and place it on a plate. In the same skillet, lower the heat a bit. Add the minced garlic next. Sauté for about 30 seconds. Stir constantly to keep it from burning. Then, toss in the cherry tomatoes. Cook these for 2 to 3 minutes until they get soft. This adds a sweet and tangy flavor. Now, add the fresh spinach. Cook until it wilts, about 1 to 2 minutes. Reduce heat to low now. Pour in the heavy cream, stirring well. The cream will mix with the tomatoes and spinach. Gradually add the Parmesan cheese and Italian herbs. Keep stirring until the sauce is smooth and creamy. Finally, return the chicken to the skillet. Make sure each piece is well coated. Let it simmer for an extra 2 to 3 minutes. This helps the flavors blend beautifully. Taste the sauce. Adjust seasoning if needed. You can add more salt, pepper, or herbs based on your liking. For juicy chicken, cook each breast for 5-7 minutes per side. Use a meat thermometer to check for doneness. The internal temperature should reach 165°F. Let the chicken rest for a few minutes after cooking. This keeps it moist and flavorful. Start by sautéing garlic until fragrant. Be careful not to brown it, as that can make it bitter. After adding the cherry tomatoes, let them soften before mixing in the cream. This step helps build rich flavors. Gradually add Parmesan cheese until the sauce is smooth. Stir constantly for the best texture. Season your chicken well with salt and freshly cracked pepper. Use dried Italian herbs in the sauce for a burst of flavor. Taste the sauce and add more salt, pepper, or herbs as needed. Fresh basil can also elevate the dish. Always adjust to your personal taste for the best result. Pro Tips Rest the Chicken: Allow the chicken to rest for a few minutes after cooking. This helps the juices redistribute, ensuring a moist and tender chicken. Customize the Herbs: Feel free to use fresh herbs instead of dried for a more vibrant flavor. Fresh basil, parsley, or thyme can elevate the dish even more. Thicken the Sauce: If you prefer a thicker sauce, let it simmer a bit longer on low heat, or mix in a cornstarch slurry (1 tablespoon cornstarch mixed with 2 tablespoons water) until the desired consistency is reached. Pairing Suggestions: This creamy garlic Tuscan chicken pairs beautifully with a light salad or roasted vegetables, making for a well-rounded meal. {{image_4}} You can enhance the dish by adding mushrooms or peppers. Both options add great flavor and texture. If you choose mushrooms, slice them and sauté them with garlic. For peppers, chop them into strips and cook them with the tomatoes. This adds color and nutrition to your meal. To make this dish gluten-free, use a gluten-free pasta or serve it without pasta. Ensure that the chicken broth, if used, is gluten-free as well. The other ingredients in this recipe are naturally gluten-free. So, you can enjoy this creamy garlic Tuscan chicken worry-free. If you're looking for a vegetarian option, replace chicken with firm tofu or mushrooms. Press and cube the tofu, then sauté it until golden. For a heartier dish, use both mushrooms and spinach. Keep the creamy sauce and enjoy a rich, flavorful meal that everyone will love. You can store leftover Creamy Garlic Tuscan Chicken in the fridge. Place it in an airtight container. Make sure it cools down first. It will stay fresh for about 3 to 4 days. When you want to eat it again, grab it from the fridge and enjoy! If you want to keep it longer, you can freeze it. First, let the chicken cool completely. Then, wrap it tightly in plastic wrap. Place it in a freezer-safe bag or container. It will last about 2 to 3 months in the freezer. Just remember to label it with the date! When you're ready to eat, reheating is easy. For best results, thaw it overnight in the fridge. Then, heat it in a skillet over low heat. Stir gently until it's warm. You can also use the microwave, but be careful not to overcook it. Enjoy your tasty meal! You can serve this dish with many sides. I love pairing it with pasta. It soaks up the creamy sauce well. You might also try rice or quinoa for a healthy option. If you want something lighter, a fresh salad works great too. Garlic bread is another delicious choice. It adds a nice crunch and flavor. Yes, you can! If you want a stronger flavor, try using feta cheese. Goat cheese also adds a tangy taste. If you prefer something milder, mozzarella is a good choice. Just remember that different cheeses melt differently. This can change the sauce's texture. To make this dish dairy-free, swap the heavy cream with coconut milk. It gives a rich feel without dairy. Use nutritional yeast instead of Parmesan for a cheesy flavor. You can also use a dairy-free cheese. Just check the label for any hidden dairy. This way, you can enjoy the dish without dairy! This article covered the key ingredients for creamy garlic Tuscan chicken, along with cooking methods. We looked at how to prepare and sear the chicken, and how to make a smooth cream sauce. I shared tips for cooking it perfectly, as well as variations you can try based on your needs. Lastly, I provided storage info and answered common questions. Now you can confidently cook and enjoy this dish in many ways. Happy cooking!
    Creamy Garlic Tuscan Chicken Easy and Flavorful Dish
  • - 4 boneless, skinless chicken thighs - 2 cups cherry tomatoes, halved - 1 zucchini, sliced into half-moons - 1 red bell pepper, sliced into strips - 1 red onion, cut into thick wedges - 1 cup Kalamata olives, pitted and roughly chopped - 3 cloves garlic, minced In this dish, the chicken thighs are juicy and full of flavor. The cherry tomatoes burst with sweetness, while zucchini adds a nice crunch. The red bell pepper brings a touch of sweetness, and the red onion gives a rich taste. Kalamata olives add a briny punch, and garlic fills the dish with warmth. - 2 tablespoons extra virgin olive oil - 2 teaspoons dried oregano - 1 teaspoon dried thyme - Salt and freshly ground black pepper to taste Extra virgin olive oil is key for moisture and depth. Dried oregano and thyme give that classic Greek flavor. Salt and pepper bring everything together and enhance the taste of each ingredient. - 1 lemon, thinly sliced - Fresh parsley, finely chopped (for garnish) Lemon slices add a bright zing. Fresh parsley gives a pop of color and freshness. To serve, place the dish on a large platter or keep it on the baking sheet for a rustic look. Pair it with warm pita bread and tzatziki for a full Mediterranean feast. {{ingredient_image_2}} - Preheat your oven to 425°F (220°C). - Get your chicken thighs and veggies ready. Slice the zucchini, bell pepper, and onion. Halve the cherry tomatoes and chop the olives. - In a large bowl, mix the chicken and veggies. - Add minced garlic, olive oil, oregano, thyme, salt, and pepper. Use your hands to toss everything well. Make sure each piece is coated nicely. - Line a large baking sheet with parchment paper. - Spread the chicken and veggies evenly on the sheet. Make sure they are not crowded. This helps them cook well. - Place thin lemon slices over the chicken and around the veggies. This adds a fresh taste as they cook. - Slide the baking sheet into the oven. Bake for 25 to 30 minutes. - Check that the chicken reaches 165°F (75°C). The veggies should be tender and a bit caramelized. - Once done, take the sheet pan out and let it rest for 5 minutes. This helps the juices settle in the chicken. - Just before serving, sprinkle fresh parsley on top for color. To get juicy chicken, start with bone-in thighs. The bones help keep the meat moist. If you use skinless thighs, marinate them well in olive oil and herbs. This adds flavor and keeps them tender. Cook the chicken at 425°F for 25-30 minutes. For gas ovens, check the chicken a bit early. They can cook faster than electric ones. For great caramelization, cut your veggies into even pieces. This helps them cook at the same rate. Use a mix of cherry tomatoes, zucchini, and bell peppers. They roast well together. You can also try carrots or asparagus if you want a change. Just keep them similar in size for even cooking. Serve the chicken and veggies right from the pan. It looks rustic and inviting. You can also transfer it to a platter for a fancier look. Pair it with warm pita bread and tzatziki sauce. This adds a nice touch and rounds out the meal. Garnish with fresh parsley for color. Pro Tips Marinate for More Flavor: If time allows, marinate the chicken in the seasoning for at least 30 minutes or overnight in the refrigerator. This will enhance the flavor and tenderness of the chicken. Use Fresh Herbs: For a fresher taste, substitute dried oregano and thyme with fresh herbs. Use three times the amount of fresh herbs for a vibrant flavor boost. Don’t Crowd the Pan: Ensure there is enough space between the chicken and vegetables on the baking sheet to promote even cooking and caramelization. If necessary, use two pans. Serve with Sides: Enhance the meal by serving with warm pita bread and tzatziki sauce. A simple side salad with feta cheese and olives works wonderfully too! {{image_4}} You can easily swap chicken thighs for chicken breasts. Breasts cook faster, so check them sooner. If you prefer a vegetarian dish, try chickpeas or tofu. These options still soak up all the tasty flavors. Adding herbs can change the dish's taste. Try fresh basil or dill for a different twist. You can also add feta cheese. It gives a creamy texture and salty flavor. Different olives, like green olives, can also add a new layer of taste. Using what's in season makes this meal even better. In summer, use fresh zucchini and ripe tomatoes. In winter, consider root vegetables like carrots or sweet potatoes. These choices ensure you enjoy fresh flavors year-round. To keep your Greek chicken sheet pan dinner fresh, follow these steps: - Let the dish cool down before storing. - Place leftovers in an airtight container. - Store in the fridge for up to four days. This helps maintain flavor and texture. Use glass containers for better storage. They are safe and durable. When you’re ready to enjoy leftovers, consider these methods: - Use the oven at 350°F (175°C) for about 15 minutes. - You can also use a microwave on medium power for 2-3 minutes. To add flavor, drizzle a little olive oil or squeeze fresh lemon juice before reheating. This keeps the meal moist and tasty. If you want to save some for later, here’s how to freeze: - Place portions in freezer-safe bags. - Remove as much air as possible before sealing. This way, your meal stays fresh for up to three months. To thaw, move it to the fridge overnight. You can also use the microwave on defrost mode. This method is quick and safe. You can serve this dish with many tasty sides. Here are a few ideas: - Warm pita bread - Tzatziki sauce - Greek salad with feta and olives - Rice or quinoa with herbs - Roasted potatoes seasoned with lemon These sides add flavor and balance to your meal. Check the chicken's internal temperature with a meat thermometer. It should reach 165°F (75°C). If you don’t have a thermometer, cut into the chicken. The juices should run clear, not pink. Yes! You can prep the chicken and veggies a day before. Just store them in the fridge. When ready to cook, simply follow the baking steps. This saves time on busy nights. Absolutely! This recipe is naturally gluten-free. Just avoid adding any gluten-containing sides. Pita bread can be swapped for a gluten-free option to keep the meal safe. To add heat, try these options: - Add red pepper flakes to the seasoning mix - Use spicy olives, like those with chili - Mix in a dash of hot sauce before serving These tweaks will give your dish a nice kick! This blog post covered a delicious Greek Chicken Sheet Pan Dinner. You learned about the key ingredients like chicken, veggies, and seasoning. I shared easy steps for prepping, baking, and serving. You also discovered tips for perfecting your dish and creative variations. In the end, this meal is simple, tasty, and great for any occasion. Enjoy making this dish your own!
    Greek Chicken Sheet Pan Dinner Flavorful and Easy Recipe
  • To make honey garlic roasted carrots, gather these simple ingredients: - 1 lb (450g) baby carrots, peeled - 3 tablespoons honey - 3 cloves garlic, minced - 2 tablespoons extra virgin olive oil - 1 teaspoon fresh thyme, finely chopped (or ½ teaspoon dried thyme) - Salt and black pepper, to taste - Optional: 1 tablespoon toasted sesame seeds for garnish You can swap some ingredients if needed. If you don't have baby carrots, use regular carrots cut into sticks. Maple syrup can replace honey for a vegan option. If you are out of garlic, garlic powder works, but use less. For olive oil, you can use vegetable oil or melted butter. Using fresh thyme gives a bright flavor. It brings a lovely aroma that dried thyme might not match. If you use dried thyme, remember it is stronger. Use less than the fresh amount. A half teaspoon of dried thyme is perfect for this recipe. Fresh or dried, thyme adds a nice touch to these carrots. {{ingredient_image_2}} First, I preheat the oven to 425°F (220°C). A hot oven helps the carrots caramelize. Next, I take 1 pound of baby carrots and peel them. This step makes them tender and sweet. In a big bowl, I combine three tablespoons of honey, three minced garlic cloves, and two tablespoons of olive oil. I add one teaspoon of fresh thyme and a pinch of salt and black pepper. I whisk the mix until it is smooth. This glaze gives the carrots a sweet and savory flavor. I toss the peeled carrots in the honey garlic mix. Each carrot should be well-coated. Next, I line a baking sheet with parchment paper. This keeps the carrots from sticking. I spread the carrots in a single layer. Then, I place the baking sheet in the oven. I roast the carrots for 20 to 25 minutes. Halfway through, I toss them for even cooking. They will be tender and caramelized when done. After roasting, I take them out and sprinkle toasted sesame seeds on top if I want. To roast carrots perfectly, follow a few easy tips. First, ensure your oven is at 425°F (220°C). This high heat helps caramelize the natural sugars in the carrots. Use baby carrots for a sweet and tender result. If you're using larger carrots, cut them into even pieces to cook evenly. Spread the carrots in a single layer on the baking sheet. This allows them to roast, not steam. Toss the carrots halfway for even cooking and color. You can add more flavor to your honey garlic roasted carrots. A splash of balsamic vinegar gives a tangy taste. You can also mix in a pinch of cayenne pepper for a spicy kick. Fresh herbs like parsley or dill can add freshness. For a nutty crunch, sprinkle toasted sesame seeds on top after roasting. These extras can elevate the dish and impress your guests. Serve your honey garlic roasted carrots warm for the best taste. Arrange them on a platter and drizzle with the leftover honey garlic mix for added gloss. You can garnish with fresh herbs or extra sesame seeds for a beautiful touch. These carrots pair well with grilled meats, fish, or even as part of a veggie platter. They also make a great side for a holiday meal or a casual dinner. Pro Tips Choose Fresh Carrots: Opt for small, firm baby carrots for the best texture and sweetness. Fresh carrots will caramelize beautifully and enhance the overall flavor of the dish. Experiment with Herbs: Feel free to mix and match herbs like rosemary or parsley along with thyme for added complexity in flavor. Fresh herbs can elevate the dish to a new level. Check for Doneness: Roasting times may vary based on the size of the carrots. Start checking for tenderness around the 20-minute mark to prevent overcooking. Serve with a Twist: For an extra flavor punch, drizzle a bit of balsamic reduction over the roasted carrots before serving. It adds a delightful tang that complements the sweetness. {{image_4}} You can easily switch up the carrots for other veggies. Try using baby potatoes for a hearty dish. Brussels sprouts also work well; they get nice and crispy. You can even use sweet potatoes for a sweeter taste. Each veggie brings its own flavor, adding fun to your meals. If you want a kick, add red pepper flakes to the honey garlic mix. For a savory twist, try adding soy sauce or balsamic vinegar. These changes give the dish a different feel. You can also mix in ginger for a zesty touch. Experiment and find what you love best! For a casual lunch, serve these carrots with a simple sandwich. They make a great side for a family dinner, too. If you're hosting a party, arrange them on a platter with a drizzle of extra honey mixture. Garnish with fresh herbs or sesame seeds for a pretty look. These carrots fit any occasion! After enjoying your honey garlic roasted carrots, you might have some left. To store them, let the carrots cool to room temperature. Then, place them in an airtight container. They will stay fresh in the fridge for up to four days. Make sure to keep the glaze on them; it adds flavor! When you are ready to eat the leftovers, reheating is simple. Preheat your oven to 350°F (175°C). Spread the carrots on a baking sheet. Cover them with foil to keep moisture in. Heat for about 10-15 minutes. This way, they stay soft and tasty. You can also microwave them for about two minutes, but the oven method gives better results. You can freeze honey garlic roasted carrots if you want to save them longer. First, let them cool completely. Then, place them in a freezer-safe bag or container. Remove as much air as possible to prevent freezer burn. They can last up to three months in the freezer. When you are ready to eat, thaw them overnight in the fridge before reheating. Roast the carrots for 20-25 minutes at 425°F (220°C). Halfway through, toss them. This helps them cook evenly. You want them tender and caramelized. Check them at 20 minutes for doneness. Yes, you can use regular carrots! Just cut them into sticks or coins. Aim for similar sizes for even cooking. They will still taste great with the honey and garlic. These carrots go well with many dishes! They pair nicely with grilled chicken or fish. Try them with rice or quinoa for a hearty meal. They also work well in salads, adding a sweet touch. In this post, we covered the key ingredients for honey garlic roasted carrots, tips for perfect roasting, and fun variations. You learned how to make a tasty glaze and the best practices for cooking. There’s also storage info to keep leftovers fresh. Roasting carrots can be simple and rewarding. With these tips, you can impress anyone at your table. Enjoy your delicious carrots, and don’t be afraid to experiment with flavors!
    Honey Garlic Roasted Carrots Tasty and Simple Dish
  • - Chicken and Marinade Components - 2 chicken breasts, cut into strips - 2 tablespoons extra virgin olive oil - 3 cloves of garlic, finely minced - 1 teaspoon dried oregano - 1 teaspoon smoked paprika - Sea salt and freshly cracked pepper to taste - Quinoa and Vegetable Ingredients - 1 cup quinoa, thoroughly rinsed and drained - 2 cups vegetable broth (or water) - 1 cup cherry tomatoes, halved - 1 cucumber, diced into small pieces - ½ red onion, thinly sliced - Toppings and Garnishes - 1 cup feta cheese, crumbled - ¼ cup fresh parsley, roughly chopped - Zest and juice of 1 lemon - Creamy tzatziki sauce for drizzling Gathering these ingredients is key to a tasty Greek Chicken Gyro Bowl. Each item plays a role in flavor and texture. The chicken is marinated to soak up those rich flavors. Quinoa serves as a hearty base. Fresh veggies add crunch and color. Finally, toppings like feta and tzatziki make your dish shine. Trust me, these bowls will impress! {{ingredient_image_2}} To start, I mix the chicken strips with olive oil, minced garlic, dried oregano, smoked paprika, sea salt, and pepper in a medium bowl. I ensure all the chicken gets coated well. This marinade gives the chicken a burst of flavor. Cover the bowl and refrigerate for at least 30 minutes. This helps the chicken absorb all the tasty spices. I bring 2 cups of vegetable broth to a boil in a medium saucepan. Once it bubbles, I add 1 cup of rinsed quinoa. Lower the heat to a gentle simmer and cover it. I let it cook for about 15 minutes until all the liquid is gone. After it’s done, I fluff the quinoa with a fork. This makes it light and fluffy, perfect for the bowl. In a large skillet, I heat it over medium-high heat and add the marinated chicken. I cook it for 6-8 minutes, stirring often. I want to see a nice golden brown color on the chicken. This shows it’s cooked through and ready to enjoy. While the chicken cooks, I chop the fresh toppings. I slice the cherry tomatoes in half, dice the cucumber, and thinly slice the red onion. I keep these toppings fresh and colorful. They add crunch and flavor to my gyro bowls. Now, it’s time to layer the ingredients! In individual serving bowls, I start with a generous scoop of quinoa as the base. Next, I add the sautéed chicken on top. Then, I pile on the diced cucumber, halved cherry tomatoes, sliced red onion, crumbled feta cheese, and a sprinkle of fresh parsley. This makes the bowl look bright and inviting. For the finishing touch, I drizzle fresh lemon juice over each bowl. Then, I swirl on some creamy tzatziki sauce. To brighten the flavors even more, I sprinkle lemon zest on top. This adds a refreshing burst to every bite. Recommended Marinade Time for Best Flavor For the best taste, marinate the chicken for at least 30 minutes. This allows the flavors to seep in. If you have more time, marinate for up to 2 hours. Longer marination adds extra depth to your dish. Alternative Ingredients for Customization You can change the marinade to fit your taste. Try adding lemon zest or switching smoked paprika for sweet paprika. If you like heat, add a pinch of cayenne pepper. Experiment with fresh herbs like thyme or rosemary for a unique twist. Avoiding Undercooked or Overcooked Quinoa To cook quinoa perfectly, use a 1:2 ratio of quinoa to liquid. If you use 1 cup of quinoa, add 2 cups of vegetable broth. Bring it to a boil, then reduce to simmer for 15 minutes. Don’t lift the lid while it cooks! This keeps the steam in for fluffy quinoa. Best Practices for Rinse and Drain Always rinse quinoa before cooking. Place it in a fine mesh strainer and rinse under cold water. This removes bitter saponins and improves the taste. Drain it well to avoid excess water in your dish. Knowing When the Chicken Is Fully Cooked Cook chicken until it reaches an internal temperature of 165°F. Use a meat thermometer for accuracy. The chicken should be golden brown on the outside and no longer pink inside. Tips for Keeping Chicken Moist To keep chicken juicy, avoid overcooking. Let it rest for a few minutes after cooking. This allows the juices to redistribute throughout the meat, making each bite tender and flavorful. Pro Tips Marinate Longer for Flavor: For an even richer flavor, consider marinating the chicken for 1-2 hours or even overnight. This allows the spices and olive oil to penetrate the meat more deeply. Quinoa Cooking Tip: Always rinse quinoa before cooking to remove its natural coating, called saponin, which can impart a bitter taste. This step is crucial for achieving a pleasant flavor. Fresh Ingredients Matter: Use the freshest vegetables and herbs you can find to enhance the overall taste of your gyro bowls. Fresh ingredients provide vibrant colors and better textures. Tzatziki Twist: For a unique flavor, try adding a hint of dill or mint to your tzatziki sauce. This addition can elevate the taste profile and provide refreshing notes. {{image_4}} You can change the protein in your Greek chicken gyro bowls. Turkey works well instead of chicken. It has a light taste and cooks fast. You can also try tofu for a plant-based option. Tofu absorbs flavors well, making it a great choice. Quinoa is great, but other grains can work too. Brown rice adds a nutty flavor and is filling. Barley gives a chewy texture and is rich in fiber. If you want to cut carbs, try cauliflower rice. It cooks quickly and has a mild taste. Mix in extra veggies for a colorful bowl. Bell peppers, olives, or spinach are great options. You can also try different cheeses, like goat cheese or ricotta. For added flavor, sprinkle some spices like cumin or paprika. A drizzle of spicy harissa sauce adds a nice kick too! To keep your Greek chicken gyro bowls fresh, store them in airtight containers. This helps prevent moisture loss. Make sure the chicken, quinoa, and veggies cool down before sealing. If you have any tzatziki sauce left, store it separately to maintain its creamy texture. Use these recommended containers for best results: - Glass containers with tight lids - BPA-free plastic containers - Silicone bags for easy storage When it’s time to enjoy your leftovers, the best way to reheat chicken and quinoa is in the oven or on the stove. This keeps the chicken juicy and the quinoa fluffy. Use these methods for the best results: - Oven: Preheat to 350°F (175°C). Place the chicken and quinoa in an oven-safe dish. Cover with foil and heat for about 15-20 minutes. - Stove: In a skillet, add a splash of water or broth. Heat over medium-low heat, stirring occasionally, until warmed through. To avoid soggy vegetables, reheat the chicken and quinoa first. Then, add fresh veggies like cucumber and tomatoes just before serving. This keeps them crisp and colorful. To make Greek Chicken Gyro Bowls from scratch, follow these steps: 1. Marinate the Chicken: In a bowl, mix sliced chicken, olive oil, minced garlic, oregano, smoked paprika, sea salt, and pepper. Cover and chill for 30 minutes. 2. Cook the Quinoa: Bring vegetable broth to a boil in a saucepan. Add rinsed quinoa and lower the heat. Cover and simmer until liquid is absorbed, about 15 minutes. Fluff with a fork. 3. Sauté the Chicken: In a skillet, cook the marinated chicken over medium-high heat for 6-8 minutes until golden brown. 4. Prepare Fresh Toppings: Chop cherry tomatoes, dice cucumber, and slice red onion. Set aside. 5. Assemble the Bowls: Layer quinoa, then add chicken, cucumber, tomatoes, onion, feta cheese, and parsley. 6. Finish with Flavor: Drizzle lemon juice and tzatziki sauce over the top. Add lemon zest for more flavor. Yes, you can prepare gyro bowls ahead of time. Here are some tips for meal prep: - Cook the Chicken and Quinoa: You can grill or sauté the chicken and prepare quinoa in advance. Store in airtight containers in the fridge. - Chop Fresh Veggies: Pre-chop the vegetables. Keep them in separate containers to stay fresh. - Tzatziki Sauce: Make tzatziki sauce a day before. Store it in the fridge for the best taste. - Assemble Before Serving: When you’re ready to eat, just assemble the bowls and drizzle with sauce. If you need alternatives for tzatziki sauce, consider these options: - Greek Yogurt: Use plain Greek yogurt with lemon juice, garlic, and herbs for a quick dip. - Hummus: Swap tzatziki for hummus for a creamy and flavorful option. - Avocado Dressing: Blend ripe avocado with lime juice and garlic for a fresh twist. - Dairy-Free Options: Use a cashew or almond yogurt mixed with herbs for a dairy-free tzatziki. To make quinoa fluffier, follow these tips: - Rinse the Quinoa: Always rinse quinoa thoroughly to remove its bitter coating. - Use the Right Water Ratio: Use a 2:1 ratio of liquid to quinoa for perfect texture. - Let It Sit: After cooking, let the quinoa sit for 5 minutes before fluffing. This helps the grains separate. - Fluff with a Fork: Use a fork to gently fluff the quinoa. This aerates it and makes it light. You now have a complete guide to making Greek chicken gyro bowls. We covered each ingredient, marinating techniques, cooking tips, and assembly. Remember to choose fresh ingredients and customize your bowls to fit your taste. Try different proteins or grains for variety. Properly storing and reheating your leftovers will help keep them fresh. Enjoy experimenting with flavors and textures. This dish is not only tasty but also a fun way to eat healthy! Get started and share your delicious creations.
    Greek Chicken Gyro Bowls Simple and Flavorful Recipe

Seasonal

  • - 1 lb boneless chicken thighs, cut into 1-inch pieces - 2 tablespoons extra virgin olive oil - Juice and zest of 2 fresh lemons - 3 cloves garlic, finely minced - 1 teaspoon dried oregano - 1 teaspoon dried thyme - 1 teaspoon smoked paprika - Salt and black pepper to taste For the main dish, I love using chicken thighs. They stay juicy and tender when cooked. The extra virgin olive oil brings a rich flavor, while the fresh lemons add brightness. Garlic adds depth, and the spices give that classic Greek touch. - 1 red bell pepper, cut into 1-inch pieces - 1 yellow bell pepper, cut into 1-inch pieces - 1 medium red onion, cut into wedges - Fresh parsley, chopped, for garnish I like to add colorful vegetables. The red and yellow bell peppers add sweetness and crunch. The red onion gives a nice bite and flavor. Don't forget the fresh parsley; it brightens the dish and makes it look pretty! - Skewers - Grill or grill pan - Mixing bowl You will need skewers to hold everything together. Wooden skewers work well, but soak them in water first to prevent burning. A grill or grill pan is best for cooking these kebabs. A good mixing bowl helps to blend the marinade perfectly. {{ingredient_image_2}} 1. First, I prepare the marinade. In a large bowl, I mix: - 2 tablespoons extra virgin olive oil - Juice and zest of 2 lemons - 3 cloves garlic, finely minced - 1 teaspoon dried oregano - 1 teaspoon dried thyme - 1 teaspoon smoked paprika - Salt and black pepper to taste I whisk it all together until it smells amazing. 2. Next, I add 1 pound of cut chicken thighs to the marinade. I make sure each piece is well coated. Then, I cover the bowl with plastic wrap. I place it in the fridge for at least an hour. For the best flavor, I recommend marinating for 2 to 3 hours. 1. While the chicken marinates, I prepare the skewers. I use wooden skewers, soaking them in water for 30 minutes to stop burning. 2. I take the marinated chicken and start threading it onto the skewers. I alternate with: - 1 red bell pepper, cut into 1-inch pieces - 1 yellow bell pepper, cut into 1-inch pieces - 1 medium red onion, cut into wedges I leave small gaps between each item. This helps them cook evenly. 1. Now, I preheat my grill to medium-high heat. It’s important to let it get hot before cooking. 2. Once the grill is ready, I place the skewers on the grates. I cook them for about 8 to 10 minutes. I rotate them often. This gives the kebabs nice grill marks and helps them cook evenly. 3. I check the chicken’s temperature. It should reach 165°F (74°C) for safe eating. 4. After grilling, I carefully remove the kebabs from the grill. I let them rest for a few minutes. This helps keep the chicken juicy. 5. Just before serving, I sprinkle fresh parsley on top and add lemon wedges for extra zest. Marinating the chicken is key for great flavor. It helps the chicken soak up all the tasty herbs and spices. I recommend marinating for at least one hour. For the best taste, let it sit for two to three hours. This extra time makes a huge difference. Adjust the seasoning to your liking. If you enjoy a bit more heat, add a pinch of cayenne pepper. Don't be afraid to experiment and find what works for you! When grilling, choose between gas and charcoal. Gas grills heat up fast and are easy to control. Charcoal grills give a smoky flavor but take longer to set up. Whichever you choose, preheat your grill to medium-high heat. This helps cook the chicken evenly. Always check that the chicken is fully cooked. Use a meat thermometer to ensure it reaches 165°F (74°C). This keeps everyone safe and the chicken juicy. Plating is just as important as cooking. Serve your kebabs on a large, colorful platter. Add a mix of fresh parsley and lemon wedges around them. This makes the dish pop with color. For a complete meal, pair the kebabs with tzatziki sauce or a Greek salad. These sides add flavor and freshness, making your meal even better. Pro Tips Marination Time: Allow the chicken to marinate for at least 2-3 hours for the best flavor absorption. Grill Temperature: Make sure your grill is preheated to medium-high for optimal cooking and to achieve perfect grill marks. Resting the Kebabs: Let the kebabs rest for a few minutes after grilling to ensure the juices redistribute and keep the chicken moist. Vegetable Variety: Feel free to add other vegetables like zucchini or cherry tomatoes for a colorful and nutritious addition to your kebabs. {{image_4}} You can use different proteins for your kebabs. Chicken thighs are great, but chicken breast works too. Chicken breast gives a leaner option, but it can dry out if overcooked. If you prefer seafood, shrimp is a tasty choice. Just make sure to marinate them for less time, about 30 minutes. For a vegetarian option, you can skip the meat entirely. Use firm tofu or halloumi cheese in your kebabs. Both soak up flavors well and grill nicely. Add mushrooms or zucchini for extra taste and texture. Mediterranean flavors shine in these kebabs. You can add more spices to change the taste. Try cumin or coriander for a twist. Fresh herbs like basil or mint can also enhance the flavor. Mix in different vegetables for variety. Cherry tomatoes add sweetness, while asparagus gives a nice crunch. Use what you have on hand. This makes your dish unique every time you grill. Pair your kebabs with great sides. Greek salad is a classic choice. The fresh veggies and tangy dressing balance the rich flavors of the chicken. Don't forget about tzatziki sauce! This creamy cucumber dip is perfect for dipping. It cools the heat and adds a zesty kick. You can also serve warm pita bread or rice to round out the meal. Enjoy your flavorful feast! To keep your Greek lemon chicken kebabs fresh, place them in an airtight container. Store them in the fridge. They will stay good for up to three days. If you want to save them longer, you can freeze them. Wrap each kebab in plastic wrap, then place them in a freezer bag. They can last up to three months in the freezer. When you reheat your kebabs, use the oven or a skillet. This keeps the flavor and moisture. Preheat the oven to 350°F (175°C) and place the kebabs on a baking sheet. Heat for about 10-15 minutes. If using a skillet, add a touch of olive oil and cook on medium heat, turning gently. Avoid the microwave if you can. It can make the chicken dry and tough. Greek lemon chicken kebabs last about three days in the fridge. Check for signs of spoilage before eating. If the chicken has a bad smell or changes color, it’s best to throw it away. Always trust your senses. If it looks or smells off, don’t eat it. Enjoy this tasty dish safely! You should marinate the chicken for at least 1 hour. For the best flavor, aim for 2-3 hours. The longer you marinate, the more the chicken absorbs the lemon and herb flavors. This time helps tenderize the meat and makes it juicy when grilled. Yes, you can use wooden skewers, but soak them in water for at least 30 minutes. This step helps prevent burning on the grill. If you skip this, the skewers may catch fire. Metal skewers are also an option if you want to avoid this step. Serve these kebabs with fresh tzatziki sauce for dipping. A Greek salad makes a great side, too. You can also add warm pita bread or grilled vegetables. For a complete meal, consider pairing with rice or quinoa. In this post, we explored making Greek lemon chicken kebabs, focusing on key ingredients like chicken thighs, fresh herbs, and vegetables. We covered marinating methods, skewering tips, and grilling techniques. Plus, we shared storage and reheating advice to keep leftovers fresh. Grilling kebabs is easy and fun. You can mix flavors and use different proteins to suit your taste. Enjoy your kebabs with sides or sauces for a perfect meal. Remember, great food starts with good ingredients and a little love.
    Greek Lemon Chicken Kebabs for Flavorful Grilling
  • To make Almond Cranberry Energy Bites, gather these key ingredients: - 1 cup rolled oats - ½ cup almond butter - ⅓ cup honey or maple syrup - ½ cup dried cranberries, roughly chopped - ½ cup raw almonds, roughly chopped - ¼ cup chia seeds - 1 teaspoon pure vanilla extract - A pinch of sea salt Each ingredient plays a role in creating a tasty snack. Rolled oats give a hearty base, while almond butter adds creaminess. Honey or maple syrup brings natural sweetness. Dried cranberries add a chewy burst of flavor. Chopped raw almonds provide crunch, and chia seeds boost nutrition. Lastly, vanilla extract and sea salt enhance all the flavors. Feel free to mix and match some of these ingredients for a personal touch. You can swap almond butter for another nut butter if you like. Use different dried fruits or nuts as well. These small changes can make the bites uniquely yours! {{ingredient_image_2}} Start by mixing the dry ingredients. In a large bowl, combine: - 1 cup rolled oats - ½ cup dried cranberries, roughly chopped - ½ cup raw almonds, roughly chopped - ¼ cup chia seeds - A pinch of sea salt Stir these ingredients together well. Make sure they are evenly mixed. This step ensures a good balance of flavors in each bite. Next, prepare the wet mixture. In a smaller bowl, whisk together: - ½ cup almond butter - ⅓ cup honey or maple syrup (your choice) - 1 teaspoon pure vanilla extract Mix until it is smooth. This creamy blend will help bind the dry ingredients together. Now, it’s time to combine everything. Pour the wet mixture over the dry mix. Stir with a spatula or spoon. Make sure every piece gets coated. To form the energy bites, use slightly damp hands. Scoop a tablespoon of the mix and compress it into a ball. If it feels sticky, dampen your hands again. Shape all the mixture into small balls. You should make about 12-15 bites, depending on how big you want them. Finally, chill the bites on a parchment-lined tray. Space them out well. Place them in the fridge for at least 30 minutes. This step helps them hold their shape. Enjoy them immediately or store in an airtight container for later! - Overmixing the ingredients: Mix just until combined. Overmixing can make the bites tough. You want a nice, soft texture. - Not chilling them long enough: Chilling is key. If you skip this step, the bites may fall apart. Aim for at least 30 minutes in the fridge. - Adding spices or extra ingredients: Spice things up! Consider adding a dash of cinnamon or nutmeg for warmth. You can also mix in some shredded coconut or seeds for crunch. - Adjusting sweetness to taste: Not all of us enjoy the same level of sweetness. Start with the recommended honey or maple syrup. Taste, then add more if you prefer a sweeter bite. - Ideas for plating and garnishing: Make your energy bites pop! Use a colorful plate to display them. Sprinkle extra chia seeds or chopped almonds on top for a fun look. Arrange them in a circle or stack them for height. Serve them as a snack or after workouts! Pro Tips Use Fresh Ingredients: Always opt for fresh cranberries and raw almonds for the best flavor and nutritional benefits in your energy bites. Customize Your Sweetener: Feel free to experiment with different sweeteners like agave nectar or coconut syrup to suit your taste preferences. Mix-in Variations: Add other ingredients like dark chocolate chips, shredded coconut, or pumpkin seeds to give your energy bites a unique twist. Perfect Storage: Store your energy bites in the fridge in an airtight container to maintain their freshness and chewy texture longer. {{image_4}} You can easily swap some ingredients to fit your needs. - Nut butter alternatives: If you can't use almond butter, try peanut or sunflower seed butter. Both add great flavor. - Dried fruit options: Instead of cranberries, use raisins, apricots, or cherries for a different taste and texture. - Sweetener alternatives: If you want to skip honey, maple syrup works well. You can also use agave nectar for a lighter option. Get creative with flavors to make these bites your own. - Chocolate chips: Add dark or milk chocolate chips for a sweet twist. They melt in your mouth and pair well with nuts. - Coconut flakes: Mix in unsweetened coconut flakes for a tropical vibe. They add chewiness and a hint of sweetness. You can modify this recipe to meet specific dietary needs. - Gluten-free modifications: Use gluten-free oats to keep your energy bites safe for those with gluten sensitivities. - Vegan options: Replace honey with maple syrup to make these bites vegan. It’s a simple switch that still tastes great. Store your almond cranberry energy bites in airtight containers. This keeps them fresh and tasty. Make sure to use a container that seals well. It helps prevent moisture from getting in. For best results, put the container in the fridge. The cool air will help keep them firm. If they sit out too long, they may get soft. These energy bites last about one week in the fridge. After that, they may lose their flavor and texture. You can also freeze them for longer storage. Just place them in a freezer-safe bag or container. They can stay frozen for up to three months. When you’re ready to eat, let them thaw in the fridge overnight. This way, they stay tasty and fresh! Yes, you can make these energy bites nut-free. Use seed butter like sunflower seed butter or pumpkin seed butter. These options are delicious and still pack a good amount of protein and healthy fats. You can also swap out the chopped almonds for seeds, like pumpkin or sunflower seeds. I suggest eating two to three energy bites as a snack. Each bite gives you a good mix of energy and nutrients. If you need a post-workout boost, you can have a few more. Listen to your body and adjust based on your hunger. Yes, you can add protein powder to boost nutrition. Use one to two tablespoons of your favorite protein powder. Mix it in with the dry ingredients to ensure even distribution. This will help keep the texture nice while adding protein. Adjust the liquid slightly if you notice it becomes too dry. This post covered how to make delicious energy bites using simple ingredients. We looked at the full list, prep steps, and ways to enhance flavor and texture. I shared tips on storing and freezing these treats, ensuring they stay fresh. In closing, you can enjoy these energy bites in many ways. Make them your own by adjusting flavors or ingredients. They are both healthy and fun!
    Almond Cranberry Energy Bites Healthy Snack Recipe
  • - 1 pound large shrimp, peeled and deveined - 4 cloves garlic, minced - 3 tablespoons extra-virgin olive oil - Zest and juice of 2 lemons - 1 teaspoon smoked paprika - 1 teaspoon red pepper flakes - Sea salt and black pepper - Fresh parsley for garnish The first key to this recipe is the shrimp. Large, peeled, and deveined shrimp work best. They soak up the flavor well and cook quickly. Garlic is next. I use four cloves because it gives a strong, tasty punch. The olive oil adds richness and helps the seasoning stick. Lemon is a must. The zest and juice brighten the dish and add freshness. Smoked paprika brings a warm, smoky flavor. Red pepper flakes add heat, so adjust them to your taste. Don’t forget sea salt and black pepper for seasoning. Finally, fresh parsley adds color and a hint of earthiness. - Calories per serving: About 220 - Breakdown of macronutrients: - Protein: 24g - Fat: 12g - Carbohydrates: 3g Each serving provides a good balance of protein and healthy fats, making this dish a great choice for a light meal. - Alternative oils: You can use avocado oil or grapeseed oil instead of olive oil. - Different types of shrimp: Feel free to use smaller shrimp or even shrimp with the shell on for added flavor. - Citrus variations: For a twist, try using lime or orange juice instead of lemon juice. These substitutions let you play with flavors while keeping the dish delicious and fun! {{ingredient_image_2}} Preheating your oven to 400°F (200°C) is key. This temperature ensures even cooking. If the oven is not hot enough, the shrimp will not roast well. They may turn rubbery or mushy. Always start with a preheated oven for the best results. In a large mixing bowl, combine the following: - 4 cloves garlic, minced - 3 tablespoons extra-virgin olive oil - Zest and juice of 2 lemons - 1 teaspoon smoked paprika - 1 teaspoon red pepper flakes - Sea salt and freshly cracked black pepper Whisk these ingredients until well mixed. This marinade adds a ton of flavor. The garlic and lemon blend perfectly, creating a zesty mix. The smoked paprika enhances the taste with depth. Next, add the shrimp to the bowl. Ensure that each shrimp is fully coated in the marinade. Let them sit for about 15 minutes at room temperature. This time allows the flavors to soak in. If you have more time, you can marinate longer. Just don’t go overboard; too long can make the shrimp mushy. Line a baking sheet with parchment paper. Spread the marinated shrimp in a single layer. This gives them enough space to cook evenly. Place the baking sheet in the preheated oven. Roast the shrimp for 8-10 minutes. Keep an eye on them. The shrimp are done when they are pink and opaque. Overcooking can make them tough. To check for doneness, cut one in half. If it is still translucent, give it a bit more time. Once cooked, take them out and sprinkle with fresh parsley. This adds a nice touch and extra flavor. Enjoy your meal! To know when shrimp are done, watch for color change. They should look pink and opaque. This usually takes about 8-10 minutes at 400°F. If overcooked, shrimp become tough. To avoid this, check them a minute early. You want them just cooked, not chewy. Add herbs and spices for more flavor. Fresh herbs like parsley or basil brighten the dish. Use smoked paprika for a deeper taste. Fresh ingredients usually taste better than dried ones. However, if dried is all you have, it still works. Pair your shrimp with sides like rice or quinoa. Both soak up flavors well. For a pop, serve on a colorful plate. Drizzle extra lemon juice over the shrimp for brightness. Garnish with lemon wedges and parsley to make the dish look fresh and inviting. Pro Tips Perfect Shrimp Size: Use large shrimp for this recipe, as they hold up better during roasting and have a satisfying texture. Marinating Time: Allow the shrimp to marinate at room temperature for no more than 15 minutes to prevent them from becoming overly salty. Watch the Cook Time: Shrimp cook quickly; keep an eye on them to ensure they don’t overcook and turn rubbery. Serving Suggestions: Pair the shrimp with a side of crusty bread or a fresh salad to complement the zesty flavors. {{image_4}} To spice things up, add more red pepper flakes. Start with the 1 teaspoon from the recipe. If you like heat, sprinkle in more. Taste the mix before you add the shrimp. Adjust to your heat level. This gives you control over the flavor. A little spice adds excitement to every bite. For summer fun, use skewers. Thread the marinated shrimp onto wooden or metal skewers. This makes grilling easier and adds a nice char. Grill them for about 2-3 minutes on each side. Keep an eye on them, as they cook fast. Serve these skewers at parties for a tasty treat. Roasting veggies with shrimp adds color and flavor. Try bell peppers, zucchini, or asparagus. They pair well with the lemon garlic taste. Cut the veggies into similar sizes as the shrimp. Toss them in the same marinade. Spread them on the baking sheet with the shrimp. This creates a complete meal on one tray. To keep your lemon garlic roasted shrimp fresh, place them in an airtight container. Make sure the shrimp cool down completely before sealing. This helps prevent sogginess. Store the container in the fridge. It’s best to eat leftovers within two days for optimal taste. To reheat shrimp, use a skillet over low heat. Add a splash of olive oil to prevent sticking. Heat gently, stirring often. This method keeps shrimp from getting rubbery. You can also use the microwave. Place shrimp on a plate, cover, and heat in short bursts. Check every 30 seconds to avoid overcooking. If you want to save shrimp for later, freezing is a great option. First, let shrimp cool completely. Then, place them in a freezer-safe bag. Remove as much air as possible before sealing. Label the bag with the date. You can freeze shrimp for up to three months. When ready to use, thaw in the fridge overnight. This keeps them juicy and tasty. It takes about 8 to 10 minutes to cook shrimp in the oven. The best way to tell if they are done is by checking their color. Cooked shrimp turn pink and opaque. Make sure not to overcook them; otherwise, they will become tough. Keep an eye on them while they roast. Yes, you can use frozen shrimp for this recipe. Frozen shrimp are often easier to find and can be more affordable. Just remember to thaw them first. You can thaw shrimp in cold water for 15 to 20 minutes. The downside is that frozen shrimp may have less flavor. Fresh shrimp often taste better, but frozen shrimp work well too. Lemon garlic roasted shrimp pairs nicely with many sides. Here are some ideas: - Fluffy quinoa - Fragrant rice - Steamed broccoli - Roasted asparagus - Mixed green salad These sides enhance the meal and add color to your plate. Enjoy experimenting to find your favorite pairings! This blog post explored how to prepare delicious lemon garlic roasted shrimp. You learned about the key ingredients, cooking methods, and helpful tips to achieve perfect results. I also shared some tasty variations and storage options for leftovers. This dish is simple yet packed with flavor, making it a great choice for any meal. Enjoy your cooking journey, and don't hesitate to experiment with different ingredients. You can create your own shrimp masterpiece!
    Lemon Garlic Roasted Shrimp Flavorful and Simple Recipe
  • For this treat, you need just a few simple ingredients: - 12 oz dark chocolate (70% cocoa or higher), chopped into small pieces - 1 cup mixed nuts (almonds, walnuts, and pecans), roughly chopped - ½ cup dried cranberries or cherries, chopped if large - ¼ cup unsweetened coconut flakes - 1 teaspoon flaky sea salt (plus extra for an additional sprinkle) Each ingredient plays a vital role in the flavor and texture of the bark. The dark chocolate brings rich flavor and a hint of bitterness. The mixed nuts add crunch and healthy fats. Dried fruit gives a sweet contrast, while coconut offers a tropical twist. Finally, flaky sea salt enhances every bite with a savory touch. - Dark Chocolate: This ingredient is high in antioxidants. It may lower blood pressure and improve heart health. - Mixed Nuts: Nuts are a great source of protein and healthy fats. They provide energy and support brain health. - Dried Cranberries or Cherries: These fruits are packed with vitamins and fiber. They can help with digestion and may boost immunity. - Coconut Flakes: Coconut adds healthy fats and fiber. It can help keep you full and satisfied. - Flaky Sea Salt: While salt is often seen as bad, a little can enhance flavor and balance sweetness. For the best taste, I recommend using high-quality dark chocolate. Look for brands like Ghirardelli or Lindt. They offer great options with at least 70% cocoa. For sea salt, try Maldon or Fleur de Sel. These brands provide a flaky texture that melts into the chocolate and adds a lovely crunch. Quality ingredients make a big difference in your final treat! {{ingredient_image_2}} Start by grabbing a baking sheet. Use one that is about 8x10 inches. Line it with parchment paper. Make sure the paper covers the whole surface. This helps with easy removal later. It also makes cleanup quick and simple. Next, take 12 ounces of dark chocolate. Chop it into small pieces. Place the chocolate in a microwave-safe bowl. Heat it in the microwave for 30 seconds. After that, take it out and stir well. Repeat this every 30 seconds until the chocolate is smooth. It should have no lumps. Be careful not to overheat it. Once the chocolate is melted, it’s time to mix. Add in 1 cup of mixed nuts. You can use almonds, walnuts, and pecans. Next, toss in ½ cup of dried cranberries or cherries. If the fruit is large, chop it first. Finally, add ¼ cup of unsweetened coconut flakes. Stir everything together until all ingredients are well coated in chocolate. Now, carefully pour the chocolate mixture onto the lined baking sheet. Use a spatula to spread it out evenly. Aim for a thickness of about ¼ inch. Make sure to reach the edges of the baking sheet. An even layer helps it set nicely. While the chocolate is still warm, grab your flaky sea salt. Sprinkle it evenly over the top. If you love a stronger salty taste, feel free to add more. This adds a great sweet and salty balance. Now, place the baking sheet in the refrigerator. Let it chill for 1 to 2 hours. This helps the chocolate set and become firm. Once it’s hard, carefully peel it from the parchment paper. Use your hands or a knife to break it into pieces. You can make them any size you want. Store the bark in an airtight container. It keeps well at room temperature or in the fridge for about two weeks. To get smooth melted chocolate, I use a microwave-safe bowl. Start with 30 seconds on high power. Stir the chocolate well. Repeat this in 30-second bursts until it melts completely. This method helps avoid scorched chocolate. If you don't have a microwave, you can use a double boiler. Just simmer water in a pot and place a bowl on top. Make sure the bowl does not touch the water. Stir until melted. To keep your dark chocolate sea salt bark fresh, store it in an airtight container. You can keep it at room temperature or in the fridge. If stored correctly, it will last up to two weeks. If you live in a warm area, I suggest using the fridge to prevent melting. Always separate layers with parchment paper to prevent sticking. To make your bark even more special, try adding spices. A pinch of cinnamon or a dash of chili powder can add a kick. You can also swap out nuts for your favorites. Try cashews or pistachios for a new taste. Adding a sprinkle of flaky sea salt on top boosts flavor. If you like a bit of crunch, consider using toasted coconut flakes. Each adjustment can create a unique twist on this simple treat. Pro Tips Use Quality Chocolate: Choose high-quality dark chocolate with at least 70% cocoa for the best flavor and texture. The better the chocolate, the more decadent your bark will be. Customize Your Toppings: Feel free to experiment with different nuts, dried fruits, or even spices. This bark can be tailored to your taste preferences or seasonal ingredients. Chill Before Cutting: Allow the chocolate to set completely in the refrigerator. This makes it easier to break into clean pieces without crumbling. Presentation Matters: For a stunning presentation, arrange the bark on a decorative platter and sprinkle a few extra flakes of sea salt on top right before serving. {{image_4}} You can switch up the nuts and dried fruits in your bark. Try using cashews, macadamia nuts, or hazelnuts for a new flavor. For dried fruits, consider raisins, apricots, or even figs. Each choice adds its unique taste and texture. This makes your dark chocolate sea salt bark even more fun and exciting. Adding spices can change the whole vibe of your bark. A sprinkle of cinnamon or a dash of cayenne pepper gives it a warm kick. You can also try adding a few drops of vanilla extract or orange zest for a fresh twist. These added flavors enhance the chocolate and make it truly special. Making this bark fit your diet is easy. For a vegan version, just use dairy-free dark chocolate. If you need a nut-free bark, replace the nuts with seeds like pumpkin or sunflower seeds. You can keep the other ingredients the same. This way, everyone can enjoy this tasty treat without worry. To keep your dark chocolate sea salt bark fresh, store it in an airtight container. You can keep it at room temperature or in the fridge. If you choose room temperature, make sure it's in a cool, dry place away from sunlight. If you prefer to chill it, the fridge will help it stay firm. Both methods work well, but I find the fridge best for longer storage. When stored properly, your bark can last up to two weeks. If you store it at room temperature, it may soften slightly but still tastes great. In the fridge, it holds its shape better. Just remember to check for any signs of melting or moisture, which can affect its quality. If your bark breaks or melts, don’t worry. You can remelt it gently in the microwave. Place the pieces in a microwave-safe bowl and heat in short bursts, stirring often. This will help you avoid burning the chocolate. Once it's smooth again, you can mix in any new toppings and let it set again on parchment paper. This way, you can enjoy your treat fresh, even if it needs a second chance! The best cocoa percentage for dark chocolate is 70% or higher. This gives you a rich flavor. Higher cocoa content means less sugar, making it less sweet. It also enhances the health benefits. Look for brands that specify their cocoa content. You can use milk chocolate, but it changes the taste. Milk chocolate is sweeter and creamier. This might not give you the same rich flavor. If you like sweeter treats, milk chocolate could work. Mix in some sea salt for balance. The bark takes about 1 to 2 hours to set in the fridge. It should be firm to the touch when ready. Don't rush this step. If you don't chill it long enough, the bark may not break well. Patience is key for the best results. Dark chocolate sea salt bark can be a healthy treat. Dark chocolate has antioxidants and can boost heart health. Mixed nuts offer healthy fats and protein. Dried fruits add vitamins and fiber. Just watch the portion size since it can be calorie-dense. You can find ready-made dark chocolate sea salt bark at gourmet shops. Many online stores also offer it. Check the ingredients to ensure quality. Some local bakeries may carry it too. Always look for brands that use high-quality chocolate. Dark chocolate sea salt bark is a fun and tasty treat. Using quality ingredients makes it both satisfying and nutritious. With simple steps, you can create this bark at home. Experiment with different nuts or spices to make it your own. Remember to store it well for maximum freshness. Make this treat for yourself or share it with friends. It's sure to be a hit! Enjoy making something delicious and healthy.
    Dark Chocolate Sea Salt Bark Simple and Delicious Treat

Footer

↑ back to top

About

  • Privacy Policy
  • Disclaimer
  • Terms & Conditions
  • Accessibility Policy

Contact

  • Contact
  • Services
  • Media Kit
  • FAQ

Copyright © 2024 Tastytaleskitchen