Craving a cozy meal that's easy to make and full of flavor? Look no further! My Baked Pasta Creamy Broccoli and Chicken Casserole is the perfect dish for busy weeknights or family gatherings. With tender pasta, shredded chicken, and bright broccoli, it combines satisfying textures and rich tastes in every bite. You’ll love how simple it is to whip up this creamy delight. Let’s dive into the easy steps and delicious ingredients that will make your taste buds dance!
Why I Love This Recipe
- Comfort Food Classic: This creamy casserole combines tender pasta, chicken, and broccoli for a warm, satisfying meal that feels like a hug.
- Easy to Make: With simple steps and straightforward ingredients, this dish is perfect for busy weeknights or family gatherings.
- Versatile Ingredients: Feel free to swap out chicken for turkey or add in your favorite veggies, making it adaptable to your taste preferences.
- Perfect for Leftovers: This casserole stores well in the fridge, making it an excellent option for meal prep or next-day lunches.
Ingredients
Main Ingredients
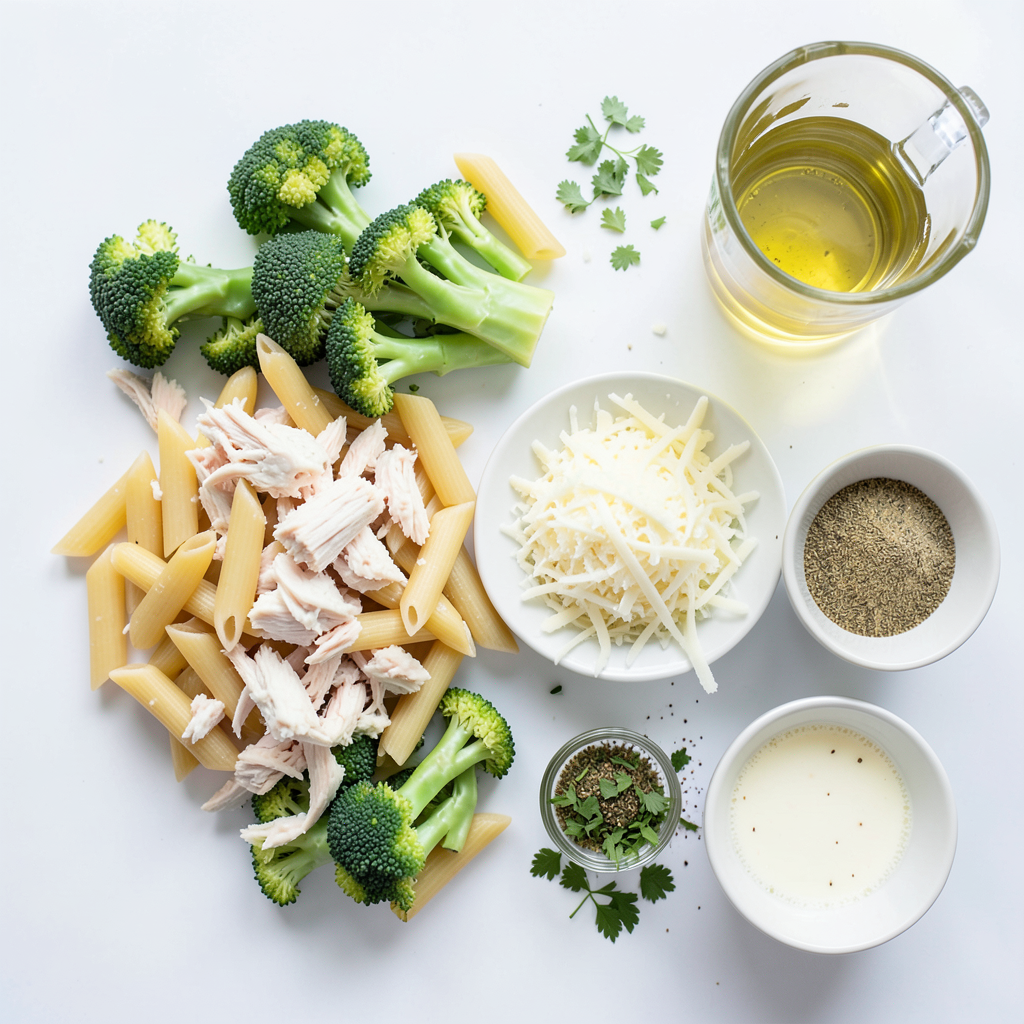
- 2 cups cooked pasta (choose between penne or rotini)
- 1 cup cooked chicken, shredded into bite-sized pieces
- 2 cups broccoli florets, steamed until tender
Dairy Ingredients
- 1 cup ricotta cheese, soft and spreadable
- 1 cup shredded mozzarella cheese for a melty topping
- 1/2 cup grated Parmesan cheese, for a savory finish
Liquids and Seasonings
- 1 cup low-sodium chicken broth to keep the dish moist
- 1 cup whole milk for creaminess
- 2 tablespoons olive oil for sautéing
- 2 cloves garlic, minced finely for added flavor
- 1 teaspoon dried oregano, a classic herb
- 1 teaspoon garlic powder to enhance the garlic flavor
- Salt and pepper, to taste, for seasoning
- Fresh parsley, chopped (for garnishing)
Every ingredient plays a role in making this casserole delightful. You can choose between penne or rotini for your pasta base. Both hold the creamy sauce well. Shredded chicken gives protein and flavor. Steamed broccoli adds color and nutrition.
For the creamy part, ricotta cheese blends smoothly with broth and milk. It creates a rich base. Topping with mozzarella and Parmesan gives a nice melt and a golden finish.
Using low-sodium chicken broth keeps it moist without being too salty. Whole milk adds creaminess. Olive oil and minced garlic start off the dish with a tasty aroma. Oregano and garlic powder boost the flavor profile.
Finally, don't forget salt and pepper to taste. They help bring out all the flavors in this dish. And a sprinkle of fresh parsley at the end adds a nice touch.
Step-by-Step Instructions
Prepping the Oven and Dish
- Preheat oven to 350°F (175°C).
- Grease a 9x13-inch baking dish with a little olive oil.
Start by preheating your oven. This step warms the oven for even cooking. Greasing the dish keeps the casserole from sticking. You can use a paper towel to spread the oil around.
Cooking Instructions
- Sauté garlic in olive oil.
- Combine chicken, broccoli, and pasta in a skillet.
In a large skillet, heat the olive oil over medium heat. Add the minced garlic and sauté it for about one minute. Stir it well to avoid burning. Then, add the shredded chicken, steamed broccoli, and cooked pasta to the skillet. Gently toss everything together until mixed well.
Making the Creamy Sauce
- Mix ricotta, broth, milk, and seasonings.
- Pour sauce over pasta mixture and stir.
In a mixing bowl, combine the ricotta cheese, chicken broth, and whole milk. Add dried oregano, garlic powder, and a pinch of salt and pepper. Whisk this mixture until it is nice and smooth. Then, pour this creamy sauce over the pasta mixture in the skillet. Stir it well so that all the ingredients are coated with the sauce.
Baking the Casserole
- Transfer to baking dish and top with cheese.
- Bake covered, then uncovered for desired browning.
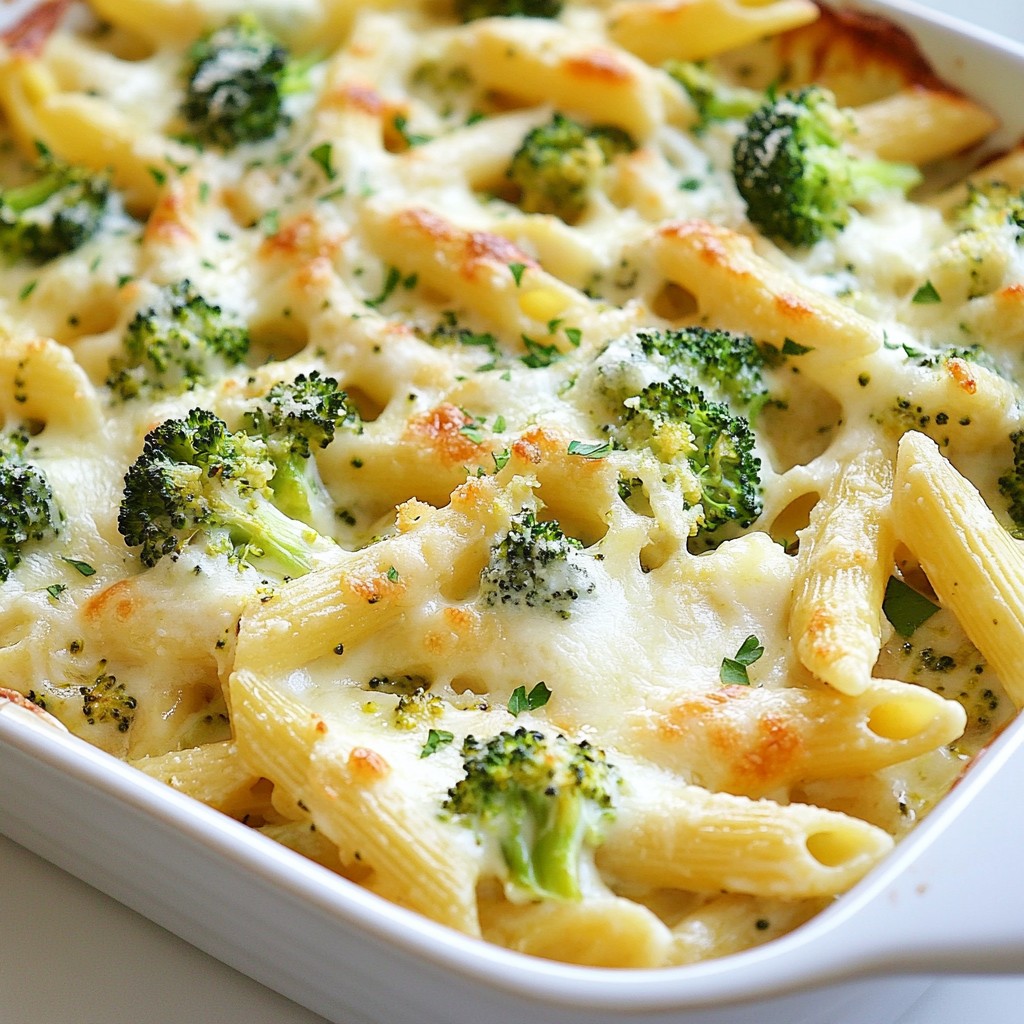
Carefully transfer the combined mixture into the greased baking dish. Spread it evenly across the dish. Now, sprinkle the shredded mozzarella and grated Parmesan cheese on top. Cover the dish with aluminum foil, which helps keep it moist. Bake it for 25 minutes. After that, take off the foil and bake it for another 10 to 15 minutes. Watch as the cheese gets bubbly and turns golden brown.
Tips & Tricks
Cooking Tips
- Cook broccoli until tender. Avoid overcooking to keep its bright color.
- Shred cheese fresh for better melting. Pre-packaged cheese may not melt as well.
Serving Suggestions
- Serve portions in bowls. A sprinkle of fresh parsley adds color and flavor.
- Pair with a side salad or garlic bread. This adds crunch and flavor.
Ingredient Substitutions
- Swap chicken for turkey. Tofu works well for a vegetarian meal.
- Use cream cheese instead of ricotta. This adds a rich, creamy flavor.
Pro Tips
- Choose the Right Pasta: Opt for pasta shapes like penne or rotini that can hold the creamy sauce well and add a delightful texture to every bite.
- Fresh Broccoli for Best Flavor: Using fresh broccoli instead of frozen not only enhances the flavor but also adds a vibrant color to your casserole.
- Let it Rest: Allow the casserole to cool for a few minutes after baking. This helps it set, making it easier to serve and ensuring each slice holds its shape.
- Customize Your Cheese: Feel free to mix different cheeses like cheddar or gouda for a unique flavor profile that suits your taste.
Variations
Healthier Alternatives
For a healthier twist, you can make simple changes. First, use whole-grain pasta for added fiber. This swap helps you feel full longer and adds extra nutrients. Second, substitute low-fat dairy products. Instead of whole milk and regular cheese, choose low-fat options. This change lightens the dish without losing flavor.
Flavor Variations
To spice things up, add some heat. You can sprinkle in cayenne or red pepper flakes. This gives the casserole a nice kick. You can also include more veggies. Bell peppers or spinach blend well with the broccoli. They add color and boost the nutrition.
Casserole Enhancements
For extra texture, top with breadcrumbs before baking. This will give your casserole a delightful crunch. If you want more flavor, try adding sun-dried tomatoes. They bring a rich, tangy taste that complements the creamy sauce perfectly.
Storage Info
Storing Leftovers
Once you finish your meal, let the casserole cool completely. This step helps keep it fresh. After cooling, place the casserole in an airtight container. Store it in the refrigerator. This way, your dish stays safe to eat for a few days.
Reheating Instructions
When it's time to enjoy leftovers, you have two great options. You can use the microwave for quick heating. Or, bake it in the oven for better results. If you choose the oven, cover the dish with foil. This helps keep the casserole moist and prevents it from drying out.
Freezing Options
You can freeze the casserole if you want to save it for later. You can freeze it before baking or after. If you freeze it after baking, make sure it cools first. Always label your container with the date. Use it within 2-3 months for the best taste.
FAQs
Can I make this casserole ahead of time?
Yes, you can prepare it a day in advance and bake just before serving. To do this, follow all the steps until you put the casserole in the oven. Cover the dish and store it in the fridge. When you're ready to eat, just pop it in the oven. This saves time and makes meal prep easier.
How long does this casserole last in the fridge?
It can last up to 3-4 days when stored properly. Make sure to place it in an airtight container to keep it fresh. When you want to enjoy it again, just reheat it gently. The flavors will still be yummy, and it will taste almost like fresh!
Can I use frozen broccoli?
Yes, frozen broccoli works well; just thaw and drain excess moisture before using. Frozen broccoli is often picked at the peak of freshness. It can save time and is easy to keep on hand. Just remember to let it thaw, so it doesn’t make your casserole watery.
This blog post covered making a delicious pasta casserole with chicken and broccoli. We discussed key ingredients like pasta, chicken, and cheeses, plus handy tips for cooking. You learned how to create a creamy sauce and variations for different tastes. Storing leftovers and reheating options were also included.
In the end, this dish is easy, tasty, and versatile. You can enjoy it fresh or save it for later. Try this recipe, and make it your own!