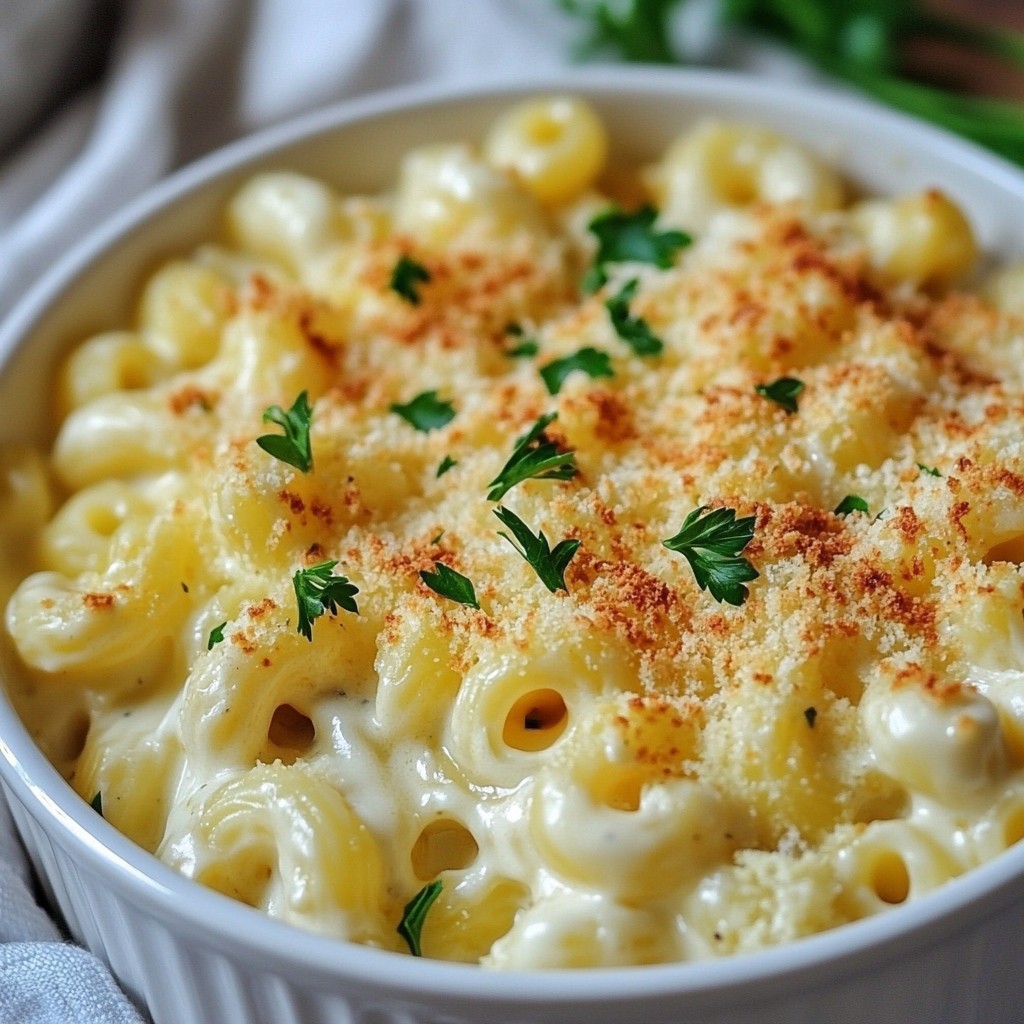
If you crave comfort food that's both rich and healthy, you're in for a treat. My Baked Pasta Creamy Cauliflower Mac and Cheese Delight combines gooey cheeses and tender cauliflower for a dish you'll love. It's easy to make and brings smiles at the dinner table. Whether you want to impress guests or enjoy a cozy night in, this recipe offers all the warmth and flavor. Ready to dive into cheesy bliss? Let’s get started!
Why I Love This Recipe
- Comforting and Creamy: This dish combines the nostalgic flavors of mac and cheese with a creamy cauliflower twist, making it a perfect comfort food for any occasion.
- Healthier Option: By incorporating cauliflower, this recipe adds extra nutrients and fiber, making it a healthier alternative to traditional mac and cheese without sacrificing flavor.
- Easy to Make: With simple ingredients and straightforward steps, this recipe is accessible for cooks of all skill levels, ensuring a delicious meal with minimal effort.
- Customizable: This recipe allows for endless variations; feel free to mix in your favorite veggies or swap out the cheeses to suit your taste preferences.
Ingredients
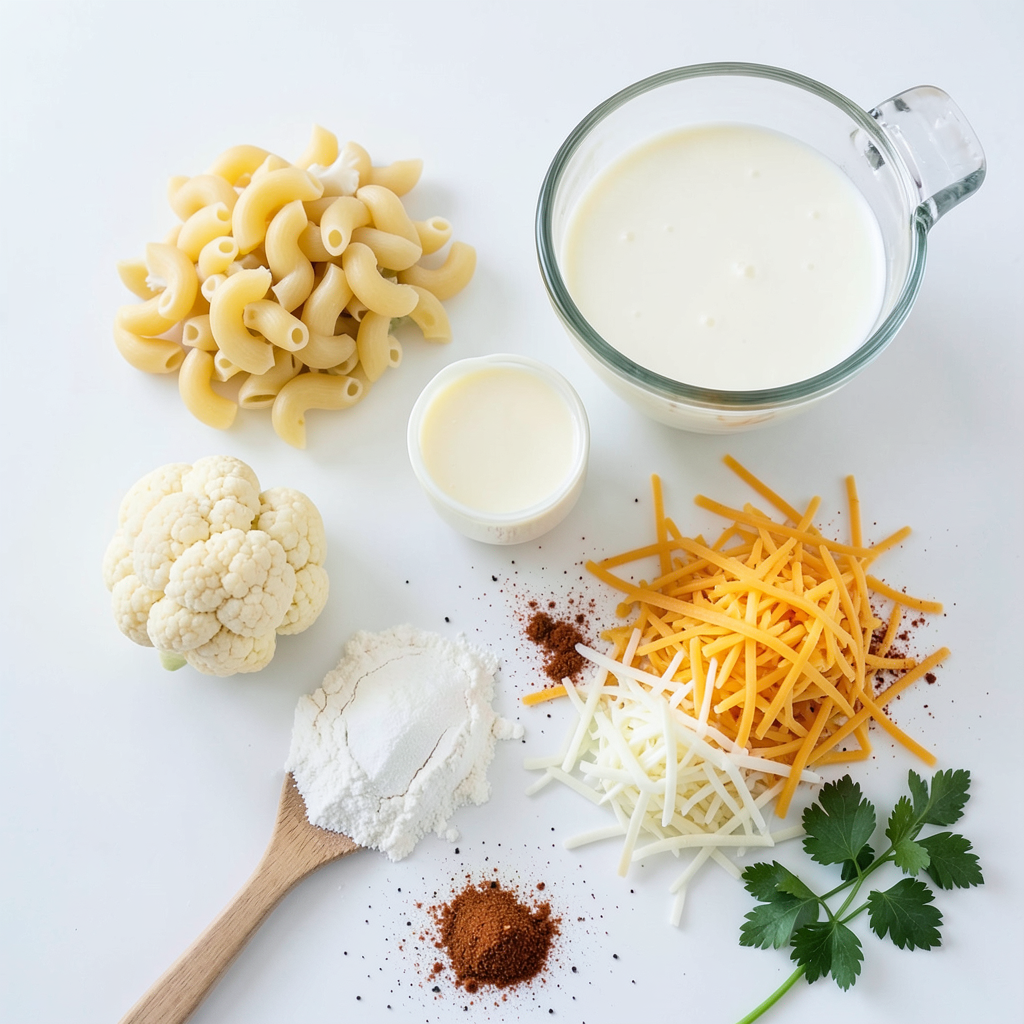
Main Ingredients
- 8 oz elbow macaroni or your favorite pasta
- 1 small head of cauliflower, cut into bite-sized florets
- 2 cups milk (dairy or plant-based)
Cheese Selection
- 1 cup sharp cheddar cheese, freshly shredded
- 1 cup mozzarella cheese, freshly shredded
- 1/4 cup grated Parmesan cheese
Seasoning and Other Ingredients
- 2 tablespoons unsalted butter
- 2 tablespoons all-purpose flour
- 1 teaspoon garlic powder
- 1 teaspoon onion powder
- 1/2 teaspoon paprika (optional, for extra flavor)
- Salt and freshly ground black pepper to taste
- Fresh parsley, chopped, for garnish (optional)
To create my creamy cauliflower mac and cheese, I start with the main ingredients. The elbow macaroni or any pasta you like is key for texture. You can use a small head of cauliflower, cut into small florets. This veggie adds creaminess and nutrition. Finally, I choose two cups of milk, dairy or plant-based, to help make the sauce rich and smooth.
Next, I focus on the cheese. I love using a cup of sharp cheddar cheese. It gives the dish a nice kick. I also blend in a cup of mozzarella cheese for that gooey stretch. To finish, I sprinkle in a quarter cup of grated Parmesan cheese. This cheese adds depth and flavor.
For seasoning, I use two tablespoons of unsalted butter as a base. Then, I add two tablespoons of all-purpose flour to thicken the sauce. I mix in garlic powder, onion powder, and paprika for extra taste. Salt and freshly ground black pepper help bring all the flavors together. If I want to add a pop of color, I garnish with fresh parsley.
These ingredients work together to create a dish that is creamy, cheesy, and simply delightful.
Step-by-Step Instructions
Preparing for Cooking
- Preheat the Oven: Set your oven to 350°F (175°C). This helps it get hot for baking.
- Cook the Pasta: Boil a large pot of salted water. Add 8 oz of elbow macaroni. Cook until al dente, about 6-8 minutes. Drain and set aside.
Cooking the Cauliflower
- Steam the Cauliflower: Place the small head of cauliflower in a steamer basket. Steam for 5-7 minutes. Cauliflower should be fork-tender when done.
Making the Cheese Sauce
- Create the Roux and Thicken: In a medium saucepan, melt 2 tablespoons of unsalted butter over medium heat. Add 2 tablespoons of flour, whisking for about 1 minute. This makes a roux.
- Incorporate Dairy and Cheese: Gradually pour in 2 cups of milk while whisking. Cook until thickened, about 3-5 minutes. Remove from heat and stir in 1 cup sharp cheddar, 1 cup mozzarella, garlic powder, onion powder, salt, and pepper. Mix until smooth.
Blending the Cauliflower
- Combining Cauliflower with Sauce: In a blender, add the steamed cauliflower and half of the cheese sauce. Blend until creamy and smooth. This adds a healthy twist to the dish.
Final Assembly
- Combining Pasta and Cheese Sauce: In a large bowl, mix the cooked pasta with the cauliflower blend and the remaining cheese sauce. Stir well to coat all the pasta evenly.
- Transfer to Baking Dish: Lightly grease a baking dish. Pour the pasta mixture into it. Sprinkle 1/4 cup grated Parmesan cheese on top for extra crispness.
Baking Process
- Bake Until Golden Brown: Place the dish in the oven and bake for 20-25 minutes. Look for a golden brown top and bubbling cheese.
- Garnish and Serve: Let the dish cool for a few minutes. If you like, sprinkle fresh parsley on top for color and flavor. Enjoy your creamy cauliflower mac and cheese!
Tips & Tricks
Smoothing Out Sauce
To get a creamy sauce, start with the roux. Melt the butter and whisk in flour. This mix helps thicken your sauce. When you add the milk, pour it in slowly. Keep whisking until it’s thick. If the sauce seems too thick, add a little more milk. Blend in the cheese until it’s all melted. The secret? Blend half the cauliflower with the cheese sauce. This makes it super smooth and creamy.
Flavor Enhancements
For added taste, think about spices. Garlic and onion powder give depth. You can also add paprika for a hint of warmth. If you want more cheese flavor, try using extra sharp cheddar or a touch of Gruyère. Mixing in a bit of nutty Parmesan can also elevate the taste. Don’t be afraid to experiment with your favorite flavors.
Serving Suggestions
Serve your baked mac and cheese in bowls or right from the dish. For a nice touch, sprinkle extra cheese on top before baking. A drizzle of olive oil can add richness. Fresh parsley on top gives color and a fresh flavor. Pair it with a simple green salad or roasted veggies for a balanced meal.
Pro Tips
- Blend for Creaminess: For an extra smooth texture, blend the cauliflower until it's completely silky before mixing it with the cheese sauce.
- Cheese Choices: Feel free to experiment with different types of cheese such as Gruyere or Fontina for a unique flavor profile.
- Make Ahead: You can assemble the dish a day in advance and refrigerate it. Just add a few extra minutes to the baking time.
- Add Some Crunch: For a crunchy topping, mix breadcrumbs with a little melted butter and sprinkle it over the top before baking.
Variations
Different Pasta Shapes
You can switch up the elbow macaroni in this dish. Use penne, fusilli, or shells instead. Each shape holds cheese sauce differently and adds fun to your meal. For a twist, try whole wheat or lentil pasta. They add flavor and improve nutrition.
Healthier Substitutes
Want a healthier version? Use whole grain pasta for more fiber. Gluten-free pasta works well too, made from brown rice or chickpeas. You can also try vegetable-based pasta made from zucchini or spinach for a lighter option. These choices keep the dish tasty while adding nutrients.
Flavor Profile Tweaks
Add vegetables for more nutrition and taste. Try broccoli, peas, or spinach. These veggies blend well and boost vitamins. You can also add proteins like cooked chicken or bacon for more heartiness. These tweaks make your dish unique and satisfying.
Storage Info
How to Store Leftovers
To keep your baked pasta fresh, store it in a tight container. Make sure it cools down first. I suggest using glass or plastic containers with lids. This helps keep moisture in and air out. Place it in the fridge and use it within three to four days. If you want, you can also wrap it in plastic wrap before placing it in a container for extra protection.
Reheating Instructions
To reheat, I find the oven works best. Preheat the oven to 350°F (175°C). Place the pasta in an oven-safe dish. Cover it with foil to keep the moisture in. Bake for about 15 to 20 minutes. You can also add a splash of milk to keep it creamy. If you’re in a hurry, use the microwave. Heat in short bursts, stirring in between. This will help keep the sauce smooth.
Freezing Guidance
If you want to freeze your creamy cauliflower mac and cheese, let it cool completely first. Then, place it in a freezer-safe container. You can also use freezer bags. Make sure to remove as much air as possible to avoid freezer burn. It will last up to three months in the freezer. When you’re ready to eat, thaw it overnight in the fridge. Reheat it in the oven or microwave, as mentioned above.
FAQs
Can I Make This Recipe Vegan?
Yes, you can make this recipe vegan. Use plant-based milk like almond or oat milk. For cheese, try using vegan cheese shreds. They melt well and give a creamy texture. You can also use nutritional yeast for a cheesy flavor. Use vegan butter instead of regular butter for the roux.
How Can I Make it Spicier?
To add some heat, consider mixing in red pepper flakes. You can also add chopped jalapeños for a fresh kick. Another option is to use a spicy cheese, like pepper jack. Stir in some hot sauce into the cheese sauce for an extra zing.
What Can I Serve With Baked Mac and Cheese?
This dish pairs well with a simple green salad. A fresh Caesar salad adds crunch and flavor. You can also serve it with roasted vegetables for extra nutrients. Grilled chicken or fish makes a great protein addition too.
How Long Does It Last in the Fridge?
Baked mac and cheese lasts about 3-5 days in the fridge. Store it in an airtight container to keep it fresh. Reheat it in the oven or microwave until warmed through. Don’t forget to add a splash of milk if it seems dry.
This baked mac and cheese recipe blends pasta, cauliflower, and cheese into a creamy delight. You learned how to prepare each step, from cooking the pasta to making a smooth sauce. We discussed tips for flavor and proper storage, ensuring every bite is enjoyable.
Remember, you can customize this dish to fit your taste. Experiment with different cheeses or add veggies for extra nutrition. Enjoy your cheesy creation, and don't forget to share it with friends and family!