Fall is here, and that means it’s time for warm, sweet treats! If you love the taste of caramel and apples, you're in for a real treat with these Caramel Apple Pie Bars. This easy recipe blends the flavors of classic apple pie with delicious caramel, all in a fun bar format. Let’s embrace autumn with this perfect dessert that will delight your family and friends! Ready to bake? Let’s get started!
Ingredients
List of Ingredients
- 2 cups all-purpose flour
- ½ cup granulated sugar
- ½ teaspoon salt
- 1 teaspoon ground cinnamon
- 1 cup unsalted butter, cold and cubed
- ¼ cup brown sugar, packed tightly
- 4 medium apples, peeled, cored, and thinly sliced
- 1 tablespoon fresh lemon juice
- 1 teaspoon pure vanilla extract
- ¼ cup caramel sauce
- 1 egg, lightly beaten (for the egg wash)
- ¼ cup chopped pecans (optional)
You need fresh and quality ingredients for the best flavor. Start with all-purpose flour, granulated sugar, and salt. Ground cinnamon adds warmth. Cold butter is a must for a flaky crust. I recommend using Granny Smith or Honeycrisp apples for their sweet and tart balance. Fresh lemon juice keeps the apples bright. Pure vanilla extract enhances the overall taste, while caramel sauce adds a delightful drizzle. For a bit of crunch, you can toss in some chopped pecans.
Gather these ingredients before you start. It makes the process smooth and fun!
Step-by-Step Instructions
Prepare the Crust
In a large bowl, mix together 2 cups of all-purpose flour, ½ cup of granulated sugar, ½ teaspoon of salt, and 1 teaspoon of ground cinnamon. Use a whisk to blend these dry ingredients. Next, add 1 cup of cold, cubed butter. You can use your fingers or a pastry cutter to mix until the mix looks like coarse crumbs. You want small pieces of butter to remain, about the size of peas.
Form the Base
Now, preheat your oven to 350°F (175°C). Grease a 9x13 inch baking dish with butter or cooking spray. Press about two-thirds of your crumb mix into the bottom of the dish. Make it even and compact. Bake this crust for 15 to 20 minutes. You want it to be slightly golden on the edges. After baking, let it cool for a few minutes.
Prepare the Filling
In another large bowl, take 4 medium apples and peel, core, and thinly slice them. Add 1 tablespoon of fresh lemon juice, ¼ cup of packed brown sugar, and 1 teaspoon of pure vanilla extract. Toss the apple slices gently to coat them with the mixture. This step adds flavor and helps to keep the apples fresh.
Assemble Bars
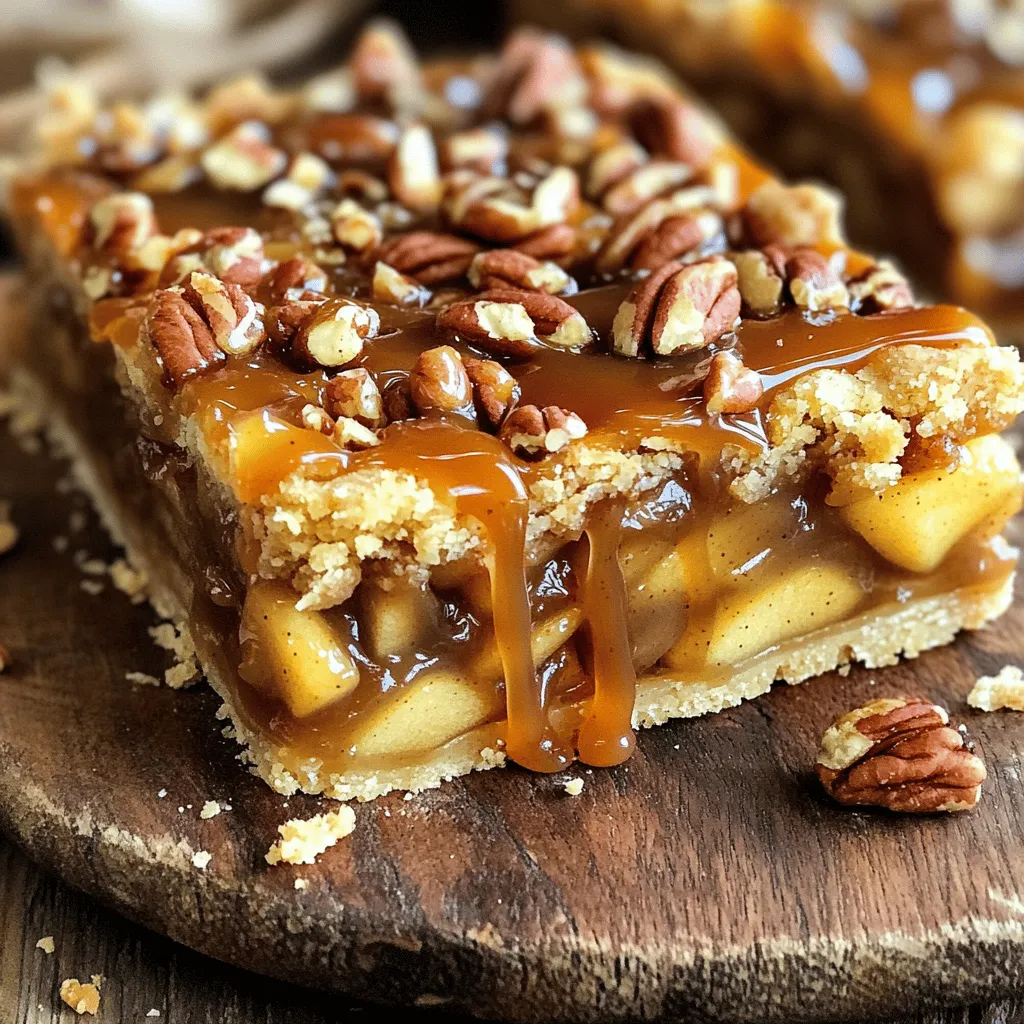
Spread the apple filling evenly over the cooled crust. Make sure you cover all areas. Drizzle ¼ cup of caramel sauce generously on top of the apple layer. If you like, you can sprinkle ¼ cup of chopped pecans for extra crunch and flavor.
Add Topping
Take the remaining one-third of the crust mixture and crumble it over the apple filling. Make sure the topping is evenly distributed. This will give your bars a nice, crunchy texture on top.
Bake
Return the baking dish to the oven. Bake the assembled bars for another 25 to 30 minutes. You want the topping to turn golden brown and the apples to be tender when you poke them with a fork.
Cool and Cut
Once baked, remove the dish from the oven. Let the bars cool completely in the dish. This cooling time helps make cutting them into squares easier.
Serve
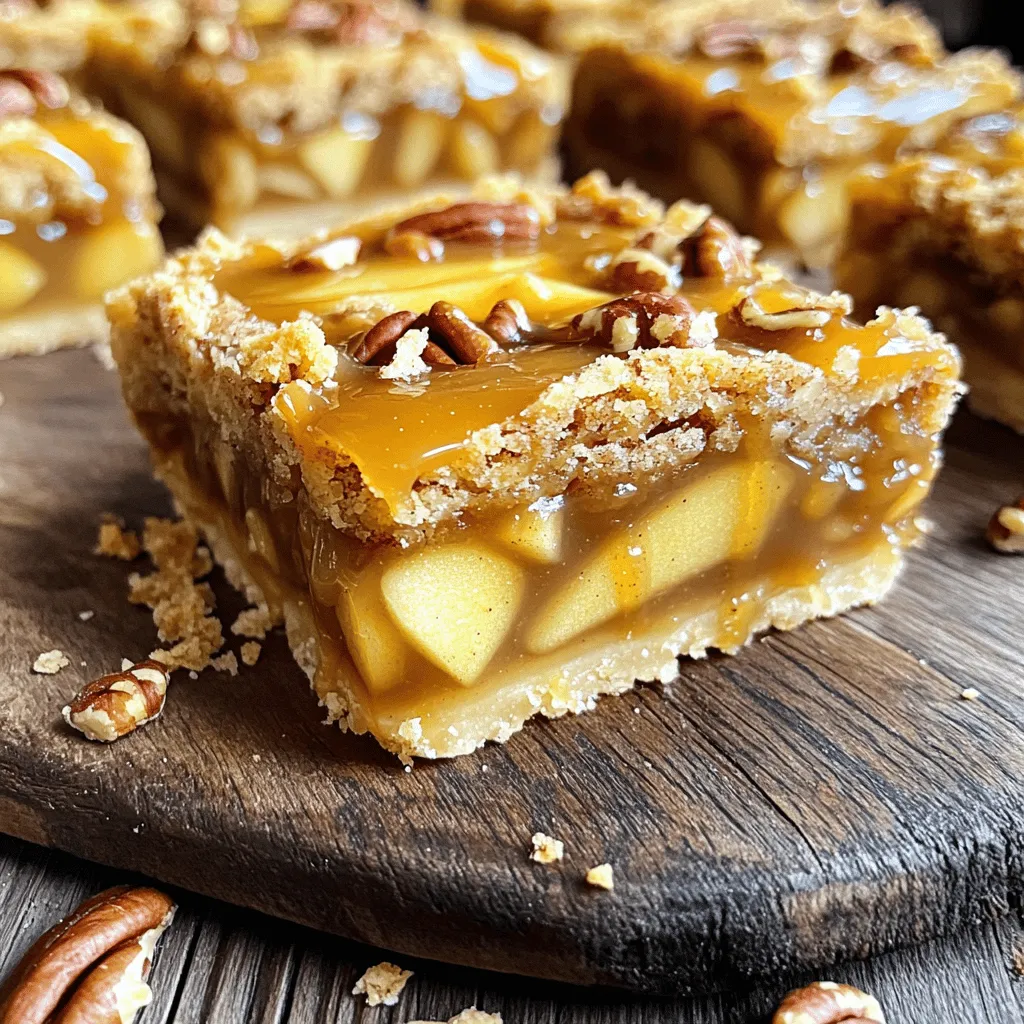
For a fun presentation, plate the bars on a rustic wooden board. You can serve them warm or at room temperature. Drizzle some extra caramel sauce over the bars just before serving. Enjoy them with a scoop of creamy vanilla ice cream or a dollop of whipped cream.
Tips & Tricks
Perfecting the Crust
To make a great crust, keep your butter cold. Cold butter helps to create a flaky texture. When mixing, use a pastry cutter or your fingers. You want to see some small pieces of butter in the mix. This texture is key for that perfect bite.
Apple Selection
Choosing the right apples is crucial. I recommend using Granny Smith or Honeycrisp apples. They have a nice balance of sweet and tart. These apples hold their shape well when baked. This gives you great flavor and texture in each bite.
Enhancements
You can boost the flavor with spices. A dash of nutmeg or ginger adds warmth. You can also top your bars with chopped pecans for crunch. This adds a delightful texture contrast. If you want a sweeter finish, drizzle more caramel sauce right before serving.
Variations
Gluten-Free Option
You can easily make these caramel apple pie bars gluten-free. Use a gluten-free all-purpose flour blend instead of regular flour. Ensure the blend contains xanthan gum for proper binding. This swap keeps the texture light and crumbly, just like the original. Adjust the baking time slightly if needed. Always check the package instructions for the best results.
Vegan Version
To create a vegan version, replace the butter with coconut oil or vegan butter. For the egg wash, use a mixture of plant-based milk and a bit of cornstarch. This will help create a nice golden crust. The flavor will stay rich and delicious while being suitable for a vegan diet.
Flavor Variations
Feel free to mix things up with different fruits or nuts. Pears can add a sweet twist to the filling. You can also try adding dried cranberries or cherries for a tart touch. If you want extra crunch, sprinkle in some walnuts or almonds. These additions will enhance the flavor and texture of your bars.
Storage Info
How to Store
To keep your caramel apple pie bars fresh, store them in an airtight container. This helps prevent drying out. Place parchment paper between layers for easy removal. Keep the container at room temperature for up to three days. If you want to extend their life, move them to the fridge. They will stay fresh for about a week in there.
Freezing Instructions
Freezing these bars is easy! First, let them cool completely. Then, cut them into squares. Wrap each square tightly in plastic wrap. Place them in a freezer-safe bag or container. They can last in the freezer for up to three months. To thaw, simply take them out and let them sit at room temperature for a few hours.
Shelf Life
At room temperature, your bars will last about three days. In the fridge, they last about a week. If you freeze them, they can be good for three months. Always check for signs of spoilage before enjoying. This way, you know you're getting the best taste!
FAQs
Can I use different types of apples?
Yes, you can use different types of apples. Granny Smith apples add a nice tartness. Honeycrisp apples offer a sweet crunch. Other good choices include Fuji and Braeburn. Each type gives a unique taste and texture. Mix different apples for a fun flavor twist!
What can I substitute for caramel sauce?
You can make homemade caramel sauce. Combine sugar, butter, and cream in a pan until smooth. Alternatively, use butterscotch sauce for a different taste. You can also try sweetened condensed milk for a quick option. These substitutes work well in this recipe.
How do I ensure my crust isn’t soggy?
To avoid a soggy crust, pre-bake it until golden. Make sure to press the crust tightly into the dish. Use cold butter in the dough for a flaky texture. Also, avoid overfilling with wet ingredients, as this can make the crust soggy.
Can these bars be made ahead of time?
Yes, you can make these bars ahead of time. Prepare and bake them, then let them cool. Store the bars in an airtight container at room temperature. They last up to three days. You can also freeze them for longer storage. Just thaw before serving.
You learned how to make delicious apple bars with a flaky crust and rich flavors. We covered essential ingredients, equipment, and step-by-step instructions for a perfect bake. With tips on variations and storage, you can customize your bars to your liking. Don't forget to experiment with different apple types and toppings. Now, you can impress friends and family with these tasty treats. Enjoy baking and sharing your yummy apple bars!