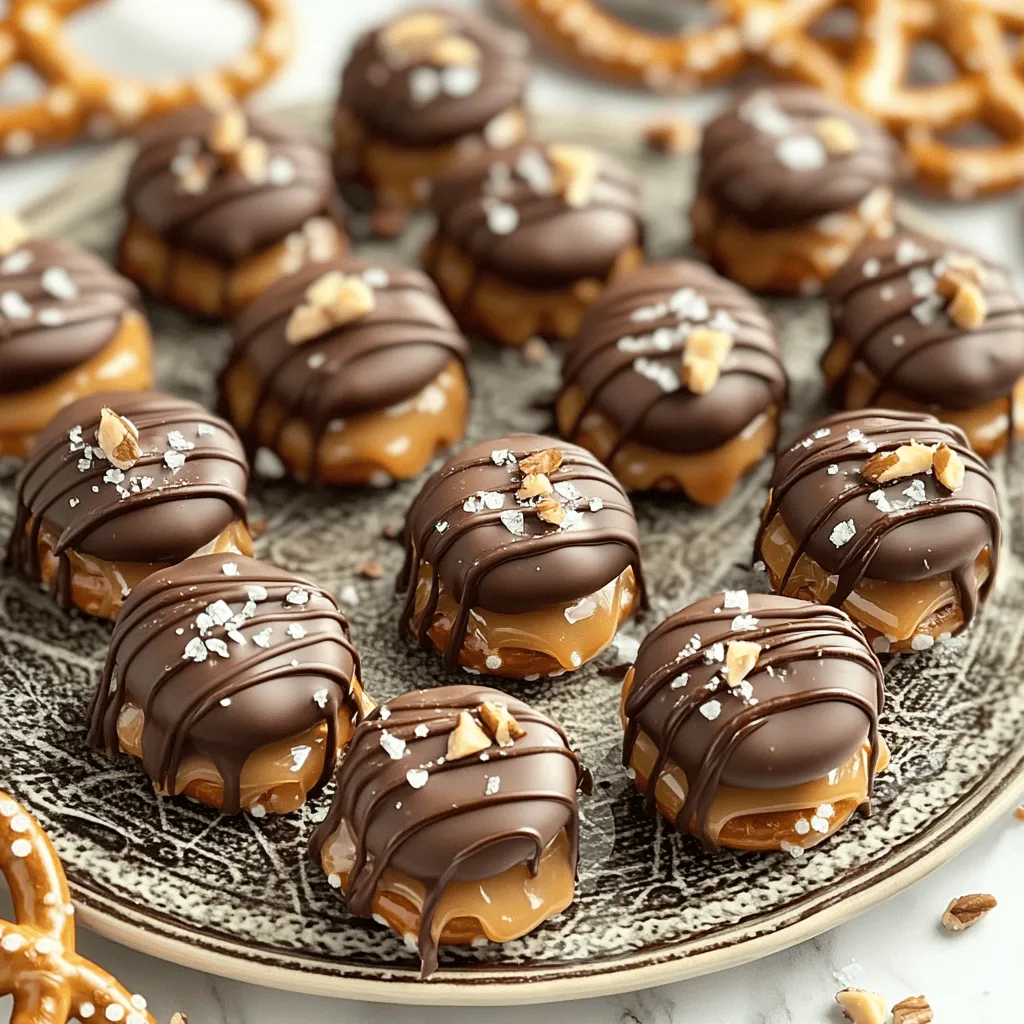
Craving a sweet and salty treat? You’ll love these Chocolate Caramel Pretzel Bites! They are easy to make, no baking required, and perfect for any occasion. With mini pretzels, soft caramel, and smooth chocolate, each bite bursts with flavor. Plus, a sprinkle of sea salt takes them to the next level. Let me show you how to whip up these delightful snacks that everyone will adore!
Ingredients
List of Ingredients
- Mini pretzels
- Soft caramel candies
- Semi-sweet chocolate chips
- Sea salt for garnish
- Coconut oil (optional)
- Crushed nuts (optional)
To make Chocolate Caramel Pretzel Bites, you need a few simple ingredients. Start with two cups of mini pretzels. These small snacks bring a great crunch. Next, gather one cup of soft caramel candies. You can buy these or make your own if you prefer.
For the chocolate, use one cup of semi-sweet chocolate chips. They melt well and taste sweet. A pinch of sea salt adds a nice touch to balance the sweetness. You might want to add one tablespoon of coconut oil. This helps the chocolate melt smoothly, but it is optional.
If you like some extra crunch, consider half a cup of crushed nuts. You can use any nuts you like. Walnuts, pecans, or almonds work great. Each ingredient plays a role in creating a sweet and salty treat that everyone will enjoy.
Step-by-Step Instructions
Preparation of Baking Sheet
Start by preparing your baking sheet. Line it with parchment paper. This helps keep the pretzels from sticking. Next, arrange the mini pretzels in a single layer. Make sure they don’t overlap. This step is key for even coating later.
Melting the Caramel
Now it’s time to melt the caramel. In a microwave-safe bowl, combine the soft caramel candies with two tablespoons of water. This helps the caramel melt smoothly. Heat the bowl in the microwave at 20-second intervals. Stir well between each interval. Keep doing this until the caramel is smooth and melted.
Assembling the Pretzel Sandwiches
Once the caramel is ready, it’s time to assemble. Use a teaspoon to drizzle caramel over half of the pretzels. Make sure each pretzel gets a generous amount. Then, top each caramel-covered pretzel with another pretzel. Press down gently to form a sandwich. Repeat this for all the pretzels.
Melting the Chocolate
In another microwave-safe bowl, melt the semi-sweet chocolate chips. If you want, add the coconut oil to help it melt better. Heat in 30-second intervals, stirring each time. You want to achieve a smooth consistency. This step is crucial for a nice coating.
Coating the Pretzel Sandwiches
Now, let’s coat the pretzel sandwiches. Dip each one into the melted chocolate. Ensure it is completely covered. This gives it that rich chocolate flavor. Once coated, place the pretzels back onto the parchment-lined baking sheet.
Final Touches and Setting
While the chocolate is warm, it’s time for the final touches. Sprinkle a pinch of sea salt on each pretzel bite. If you like, add some crushed nuts for extra crunch. Once all are garnished, transfer the baking sheet to the refrigerator. Let the chocolate set completely for about 30 minutes. After that, your delicious Chocolate Caramel Pretzel Bites are ready to enjoy!
Tips & Tricks
Best Practices for Melting Chocolate and Caramel
Avoiding burning:
To melt chocolate or caramel, use the microwave in short bursts. Heat for just 20 seconds for caramel. Stir well after each heating. This helps you avoid burning.
Perfecting consistency:
Add a teaspoon of water to your caramel. This keeps it smooth and easy to drizzle. For chocolate, a tablespoon of coconut oil helps it melt evenly. This gives your chocolate a nice, glossy finish.
Customization Ideas
Suggestions for different toppings:
You can try many toppings! Consider crushed nuts or sprinkles. You can also use mini M&Ms or sea salt for contrast. Each adds a new flavor or crunch.
Using various types of pretzels:
Switch things up with pretzel shapes! Use regular pretzels or chocolate-covered pretzels instead. Each type brings its own taste and fun. You can even try pretzel sticks for a different look.
Presentation Tips
Creative serving suggestions:
For a lovely display, arrange the pretzel bites on a nice platter. You can stack them in layers or make a colorful design. This makes them more inviting and eye-catching.
Garnishing ideas for visual appeal:
Add a touch of flair with a drizzle of melted chocolate on top. You can also sprinkle some sea salt or nuts for extra texture. This makes your treat not just tasty but also beautiful!
Variations
Different Flavor Profiles
You can change the taste of your chocolate caramel pretzel bites easily. Try using white chocolate instead of semi-sweet chocolate. This will give a creamy, sweet touch. If dark chocolate is your thing, use it for a richer flavor. You can also add a few drops of flavor extracts, like vanilla or almond, to the chocolate. This little change can make your treats even more exciting.
Alternative Ingredients
If you need a gluten-free option, choose gluten-free pretzels. They work just as well and taste great. For those who prefer vegan options, look for vegan caramel. Many brands offer this nowadays. It lets you enjoy the same sweet taste without animal products.
Serving Suggestions
Think about unique ways to serve these bites. They pair wonderfully with a scoop of ice cream for a sweet treat. You can also serve them at parties with drinks. Try pairing them with coffee or a creamy milkshake for a fun mix. These bites are not just snacks; they can be a part of a delightful dessert platter too!
Storage Info
Best Storage Practices
To keep your Chocolate Caramel Pretzel Bites fresh, use an airtight container. This protects them from moisture and keeps them crunchy. Store the container in a cool, dry place. A pantry shelf is perfect. Avoid direct sunlight, as it can melt the chocolate.
Shelf Life of Chocolate Caramel Pretzel Bites
These tasty bites stay fresh for about one week. You will know they are past their prime if they lose their crunch or the chocolate appears dull. If you see any signs of mold, discard them right away.
Freezing Options
You can freeze these bites for longer storage. First, place them in a single layer on a baking sheet. Freeze them until solid, about one hour. Then, transfer them to a freezer-safe container. Be sure to separate layers with parchment paper to avoid sticking.
To thaw, just move them to the fridge for a few hours before serving. This keeps the chocolate from getting too soft. Enjoy every bite of your delicious treat!
FAQs
How Long Do Chocolate Caramel Pretzel Bites Last?
Chocolate caramel pretzel bites last about a week when stored properly. Keep them in an airtight container at room temperature. You can also chill them, which helps keep them fresh. Just remember, the colder they get, the harder they become.
Can I Use Homemade Caramel for This Recipe?
Yes, you can use homemade caramel. It will add a personal touch and may taste better. Just ensure it is soft enough to drizzle. Store-bought caramel is easier and quicker, but homemade is often richer. Choose what fits your time and taste.
What Can I Substitute for Coconut Oil?
If you don’t have coconut oil, you can use butter instead. It will give a rich flavor. You can also use vegetable oil or canola oil. These alternatives work well for melting chocolate without affecting taste.
Are These Pretzel Bites Gluten-Free?
These pretzel bites can be gluten-free. Just use gluten-free pretzels instead of regular ones. Many brands offer delicious gluten-free options. Check the label to ensure they are suitable for your needs.
Can I Make These Ahead of Time?
Yes, you can make these bites ahead of time. Prepare them a day or two before you need them. Just store them in an airtight container. This makes them a great treat for parties or gatherings.
In this blog post, I shared a simple guide for making chocolate caramel pretzel bites. We explored each step, from melting caramel to final garnishes. You learned tips for customizing flavors and ensuring perfect consistency.
These treats are fun and easy to make, perfect for sharing. Enjoy them fresh or store for later. I hope you try making these bites and find joy in each step. Happy cooking!