tasty tales kitchen

  • Home
  • Recipes
    • Desserts
    • Appetizers
    • Drinks
    • Dinner
  • Contact
  • About
  • Privacy Policy
menu icon
go to homepage
  • Home
  • Recipes
    • Desserts
    • Appetizers
    • Drinks
    • Dinner
  • Contact
  • About
  • Privacy Policy
search icon
Homepage link
  • Home
  • Recipes
    • Desserts
    • Appetizers
    • Drinks
    • Dinner
  • Contact
  • About
  • Privacy Policy
×

Spicy Ranch Pretzels Crunchy and Flavorful Snack

Oct 5, 2025 · by Natalie ·

WANT TO SAVE THIS RECIPE?

1 shares
Get ready to spice up your snack game with these easy and delicious Spicy Ranch Pretzels! This simple recipe combines mini pretzels with a zesty ranch seasoning mix, garlic, onion, and a kick of cayenne for the perfect crunchy treat. Bake them to golden perfection and serve at your next party or movie night! Click to explore the full recipe and start snacking today! #SpicyRanchPretzels #SnackIdeas #PartyFood #RecipeInspiration

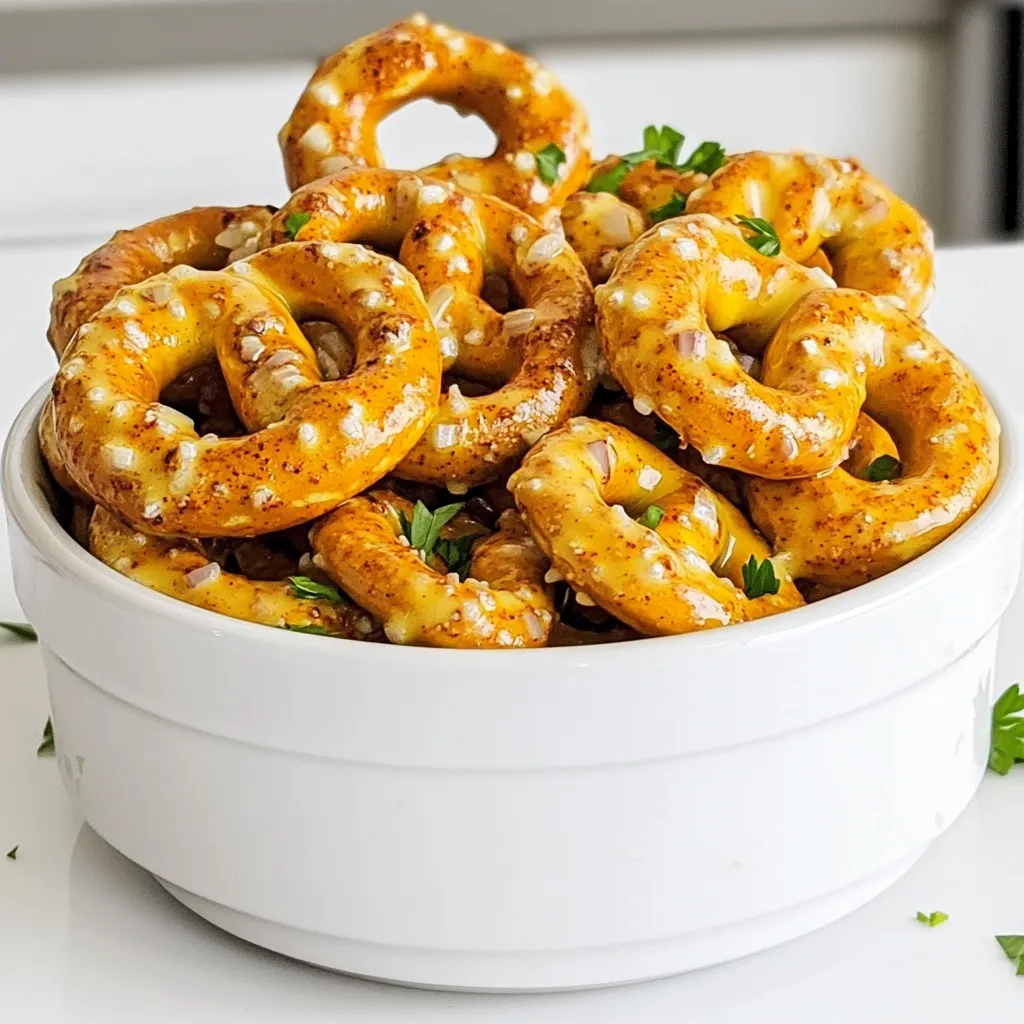
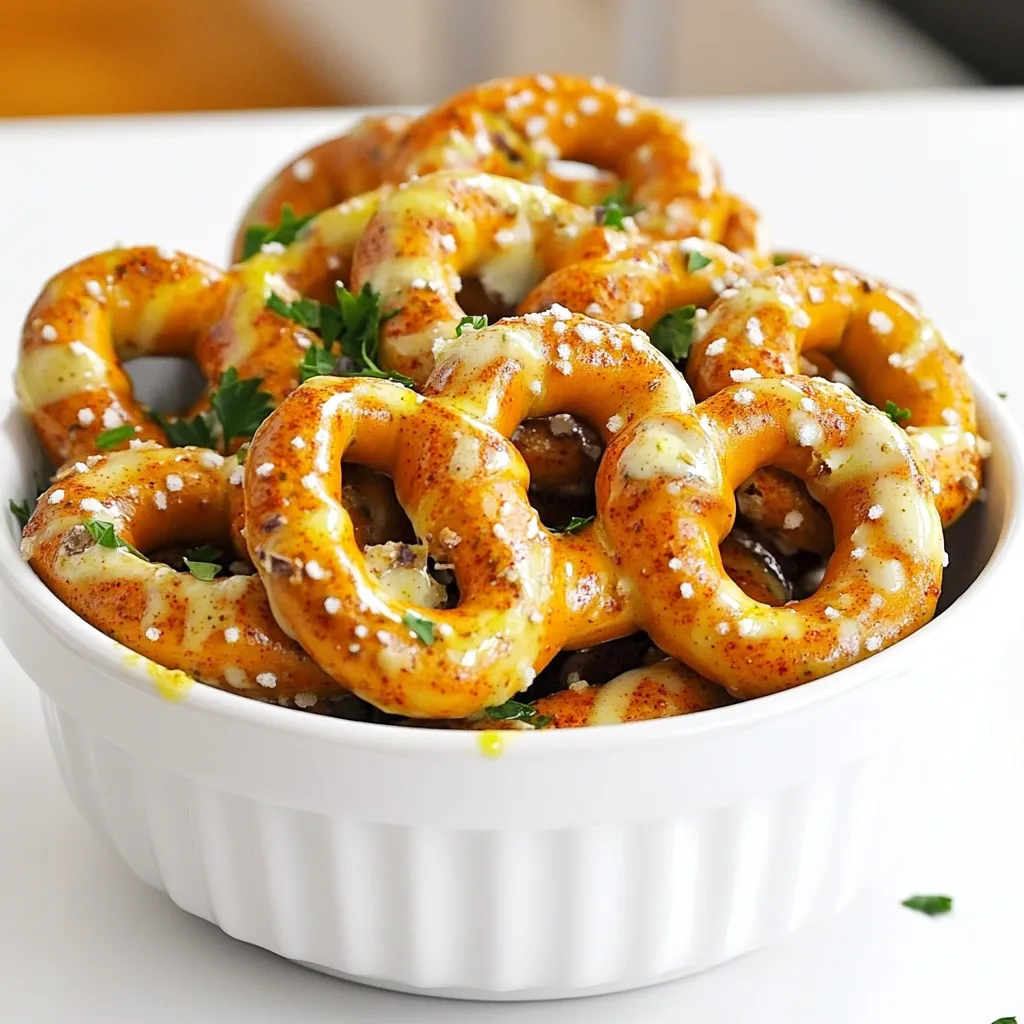
If you’re looking for a snack that packs a punch, you’ve found it! Spicy Ranch Pretzels offer a bold blend of flavors and a satisfying crunch. In just a few simple steps, you can create this tasty treat using mini pretzels, ranch dressing mix, and your favorite spices. Ready to spice up your snacking game? Let’s dive into the easy recipe that will keep you coming back for more!

- Mini pretzels (16 oz bag) - Vegetable oil (½ cup) - Ranch dressing mix (1 packet) - Garlic powder (1 teaspoon) - Onion powder (1 teaspoon) - Cayenne pepper (1 teaspoon, adjust to taste) - Paprika (1 teaspoon) - Black pepper (¼ teaspoon) Start by preheating your oven to 250°F (120°C). This low heat helps the flavors sink into the pretzels. In a large bowl, add the vegetable oil, ranch dressing mix, garlic powder, onion powder, cayenne pepper, paprika, and black pepper. Whisk these items together until smooth. This mix is where the magic happens. Carefully add the mini pretzels into your bowl. Toss them gently to coat every pretzel with the spicy ranch mix. It’s key to make sure each pretzel gets a good layer of flavor. If you see some pretzels missing the mix, just toss them again. Next, line a baking sheet with parchment paper. This will make cleanup easy. Spread the coated pretzels in one single layer on the sheet. Avoid crowding them. Place the baking sheet in the preheated oven. Bake for 30 minutes, stirring every 10 minutes. This helps every pretzel get that nice, even crunch. When the timer goes off, take them out and let them cool. Cooling makes them crispier, and you want that perfect snack! To make sure each pretzel is coated well, toss them gently in the ranch mix. You want every pretzel to get that zesty flavor. If you like it hotter, adjust the cayenne pepper to your taste. You can add less for a milder snack or more for a spicy kick. After baking, let the pretzels cool completely. This step is key for that crunchy texture we love. If you skip this, they might stay soft. Once cooled, store the pretzels in an airtight container. This keeps them fresh and crunchy, perfect for snacking later. To keep your Spicy Ranch Pretzels fresh, store them in an airtight container. This helps to lock in the flavor and crunch. Place the container in a cool, dry place. Avoid spots with heat or moisture, as they can ruin the texture. These pretzels can stay fresh for up to two weeks. After that, they may start to lose their crunch. Look for signs of staleness, like a soft texture or loss of flavor. If they don’t taste right, it’s best to toss them out. {{image_4}} You now have a simple way to make tasty spicy ranch pretzels. You learned about the key ingredients, easy steps, and storage tips. Remember, you can adjust the spices to fit your taste. Feel free to explore different flavors or substitutions. With just a bit of effort, these snacks can be a hit. Enjoy your pretzel journey and let the crunch begin!

Ingredients

Main Ingredients

  1. Mini pretzels (16 oz bag)
  2. Vegetable oil (½ cup)
  3. Ranch dressing mix (1 packet)

Spices & Seasoning

  1. Garlic powder (1 teaspoon)
  2. Onion powder (1 teaspoon)
  3. Cayenne pepper (1 teaspoon, adjust to taste)
  4. Paprika (1 teaspoon)
  5. Black pepper (¼ teaspoon)

Step-by-Step Instructions

Prepping the Oven and Mixing Ingredients

Start by preheating your oven to 250°F (120°C). This low heat helps the flavors sink into the pretzels. In a large bowl, add the vegetable oil, ranch dressing mix, garlic powder, onion powder, cayenne pepper, paprika, and black pepper. Whisk these items together until smooth. This mix is where the magic happens.

Coating the Pretzels

Carefully add the mini pretzels into your bowl. Toss them gently to coat every pretzel with the spicy ranch mix. It’s key to make sure each pretzel gets a good layer of flavor. If you see some pretzels missing the mix, just toss them again.

Baking the Pretzels

Next, line a baking sheet with parchment paper. This will make cleanup easy. Spread the coated pretzels in one single layer on the sheet. Avoid crowding them. Place the baking sheet in the preheated oven. Bake for 30 minutes, stirring every 10 minutes. This helps every pretzel get that nice, even crunch. When the timer goes off, take them out and let them cool. Cooling makes them crispier, and you want that perfect snack!

Tips & Tricks

Achieving the Perfect Coating

To make sure each pretzel is coated well, toss them gently in the ranch mix. You want every pretzel to get that zesty flavor. If you like it hotter, adjust the cayenne pepper to your taste. You can add less for a milder snack or more for a spicy kick.

Cooling & Crisping Tips

After baking, let the pretzels cool completely. This step is key for that crunchy texture we love. If you skip this, they might stay soft. Once cooled, store the pretzels in an airtight container. This keeps them fresh and crunchy, perfect for snacking later.

Storage Info

Best Practices for Storage

To keep your Spicy Ranch Pretzels fresh, store them in an airtight container. This helps to lock in the flavor and crunch. Place the container in a cool, dry place. Avoid spots with heat or moisture, as they can ruin the texture.

Shelf Life

These pretzels can stay fresh for up to two weeks. After that, they may start to lose their crunch. Look for signs of staleness, like a soft texture or loss of flavor. If they don’t taste right, it’s best to toss them out.

You now have a simple way to make tasty spicy ranch pretzels. You learned about the key ingredients, easy steps, and storage tips. Remember, you can adjust the spices to fit your taste. Feel free to explore different flavors or substitutions. With just a bit of effort, these snacks can be a hit. Enjoy your pretzel journey and let the crunch begin!

- Mini pretzels (16 oz bag) - Vegetable oil (½ cup) - Ranch dressing mix (1 packet) - Garlic powder (1 teaspoon) - Onion powder (1 teaspoon) - Cayenne pepper (1 teaspoon, adjust to taste) - Paprika (1 teaspoon) - Black pepper (¼ teaspoon) Start by preheating your oven to 250°F (120°C). This low heat helps the flavors sink into the pretzels. In a large bowl, add the vegetable oil, ranch dressing mix, garlic powder, onion powder, cayenne pepper, paprika, and black pepper. Whisk these items together until smooth. This mix is where the magic happens. Carefully add the mini pretzels into your bowl. Toss them gently to coat every pretzel with the spicy ranch mix. It’s key to make sure each pretzel gets a good layer of flavor. If you see some pretzels missing the mix, just toss them again. Next, line a baking sheet with parchment paper. This will make cleanup easy. Spread the coated pretzels in one single layer on the sheet. Avoid crowding them. Place the baking sheet in the preheated oven. Bake for 30 minutes, stirring every 10 minutes. This helps every pretzel get that nice, even crunch. When the timer goes off, take them out and let them cool. Cooling makes them crispier, and you want that perfect snack! To make sure each pretzel is coated well, toss them gently in the ranch mix. You want every pretzel to get that zesty flavor. If you like it hotter, adjust the cayenne pepper to your taste. You can add less for a milder snack or more for a spicy kick. After baking, let the pretzels cool completely. This step is key for that crunchy texture we love. If you skip this, they might stay soft. Once cooled, store the pretzels in an airtight container. This keeps them fresh and crunchy, perfect for snacking later. To keep your Spicy Ranch Pretzels fresh, store them in an airtight container. This helps to lock in the flavor and crunch. Place the container in a cool, dry place. Avoid spots with heat or moisture, as they can ruin the texture. These pretzels can stay fresh for up to two weeks. After that, they may start to lose their crunch. Look for signs of staleness, like a soft texture or loss of flavor. If they don’t taste right, it’s best to toss them out. {{image_4}} You now have a simple way to make tasty spicy ranch pretzels. You learned about the key ingredients, easy steps, and storage tips. Remember, you can adjust the spices to fit your taste. Feel free to explore different flavors or substitutions. With just a bit of effort, these snacks can be a hit. Enjoy your pretzel journey and let the crunch begin!

Spicy Ranch Pretzels

Get ready to spice up your snack game with these easy and delicious Spicy Ranch Pretzels! This simple recipe combines mini pretzels with a zesty ranch seasoning mix, garlic, onion, and a kick of cayenne for the perfect crunchy treat. Bake them to golden perfection and serve at your next party or movie night! Click to explore the full recipe and start snacking today! #SpicyRanchPretzels #SnackIdeas #PartyFood #RecipeInspiration
Print Recipe Pin Recipe

Ingredients
  

1 bag of mini pretzels (about 16 oz)

½ cup vegetable oil

1 packet ranch dressing mix

1 teaspoon garlic powder

1 teaspoon onion powder

1 teaspoon cayenne pepper (adjust to taste)

1 teaspoon paprika

¼ teaspoon black pepper

Instructions
 

Begin by preheating your oven to 250°F (120°C) to prepare for baking the pretzels.

    In a large mixing bowl, pour in the vegetable oil followed by the ranch dressing mix, garlic powder, onion powder, cayenne pepper, paprika, and black pepper. Use a whisk to mix these ingredients together until the mixture is smooth and homogenous. This will form your flavorful spicy ranch coating.

      Carefully add the mini pretzels into the bowl with your ranch mixture. Gently toss the pretzels to ensure they are evenly coated with the spicy ranch blend, making sure every pretzel gets a good amount of flavor.

        Next, take a baking sheet and line it with parchment paper for easy cleanup. Spread the coated pretzels out in a single layer on the baking sheet, ensuring they are not overcrowded.

          Place the baking sheet in the preheated oven and bake for 30 minutes. Every 10 minutes, give the pretzels a stir to promote even coating and to achieve a perfect golden color throughout.

            Once the baking time is up, remove the pretzels from the oven and allow them to cool completely on the baking sheet. As they cool, they will crisp up nicely, enhancing their texture.

              For storage, transfer the cooled pretzels to an airtight container to keep them fresh and crunchy.

                Prep Time: 10 minutes | Total Time: 40 minutes | Servings: 8-10

                  - Präsentationstipps: Serve these zesty pretzels in a stylish decorative bowl or jar, perhaps garnished with fresh herbs like parsley or chives for a vibrant touch. They make an excellent snack for parties, game nights, or as a delightful movie-time treat!

                    Related Recipes

                    • To make garlic herb focaccia bread, you need a few key ingredients. Each one plays an important role in creating that fluffy and flavorful delight. Here’s what you will need: - 4 cups all-purpose flour - 1 tablespoon instant yeast - 2 teaspoons salt - 1 tablespoon sugar - 1 ½ cups warm water (around 110°F) - 1/4 cup extra virgin olive oil (plus more for drizzling) - 6 cloves garlic, finely minced - 2 teaspoons dried oregano - 2 teaspoons dried rosemary - Freshly cracked black pepper (to taste) - Coarse sea salt for topping - Fresh rosemary sprigs for garnish These ingredients come together to create a focaccia that is soft on the inside and crispy on the outside. The all-purpose flour gives structure, while the instant yeast helps it rise. Sugar feeds the yeast, making it bubbly and light. Warm water activates the yeast, ensuring it works well. Adding olive oil keeps the dough moist and flavorful. The garlic, oregano, and rosemary bring in that classic herb taste. Finally, coarse sea salt enhances all the flavors and gives a nice crunch on top. Using fresh rosemary sprigs for garnish adds a lovely touch. This focaccia is perfect for sharing or enjoying on your own. You can dip it in balsamic vinegar or serve it on a rustic board. The simple ingredients make it easy, but the taste is gourmet! {{ingredient_image_2}} To start, you need to activate the yeast mixture. In a large bowl, mix warm water, sugar, and instant yeast. Let it sit for about 5 minutes. You want it to get frothy and bubbly. This means the yeast is ready to work. Next, combine the dough ingredients. Add all-purpose flour, salt, and olive oil to your frothy yeast mix. Use a wooden spoon or your hands to mix until a shaggy dough forms. It should pull away from the bowl edges. Now, knead the dough. Turn it out onto a lightly floured surface. Knead it for about 5-7 minutes. You want the dough to feel smooth and elastic. This step is key for a fluffy focaccia. For the first rise, find a warm area. This helps the dough grow. Cover the bowl with a kitchen towel or plastic wrap. Let it rise for about 1 hour, or until it doubles in size. You'll know it’s ready when it feels light and puffy. After the first rise, gently push down the center to deflate the dough. Transfer it to a greased baking sheet. Use your fingers to stretch and press the dough into the pan. Aim for about 1 inch thick. Cover the dough again with a kitchen towel. Let it rise for another 30 minutes. This second rise makes the focaccia soft and airy. Once it has risen, create dimples all over the dough with your fingers. This step gives focaccia its unique texture. Drizzle olive oil over it, then sprinkle the garlic, oregano, rosemary, and black pepper mix on top. Finish with coarse sea salt for extra flavor. Preheat your oven to 425°F (220°C). This step is crucial for a crispy crust. Once the oven is hot, place the focaccia inside. Bake for 20-25 minutes. It should turn golden brown and smell amazing. When done, take it out and let it cool slightly. Move it to a wire rack. Garnish with fresh rosemary sprigs for a nice touch. Enjoy your garlic herb focaccia! Kneading is key to great focaccia. You should knead the dough for about 5 to 7 minutes. The dough needs to feel smooth and elastic. This texture shows that the gluten has formed well. If the dough sticks too much, add a bit of flour. Avoid over-kneading; this can make the bread tough. Dimples are important! They help the focaccia hold oil and flavor. After your first rise, gently press your fingers into the dough to create deep dimples. Let the dough rise again for about 30 minutes. This second rise helps the bread become fluffy and light. Herbs and spices make focaccia special. Use fresh or dried herbs like rosemary and oregano. Minced garlic adds a punch of flavor. When topping the focaccia, sprinkle coarse sea salt evenly. This will bring out the best in the herbs. Too much salt can overwhelm the bread, so go light. Pro Tips Use Fresh Herbs: Fresh herbs can elevate the flavor of your focaccia. Consider adding fresh rosemary or thyme to the topping for a burst of freshness. Experiment with Toppings: Don’t hesitate to customize your focaccia with other toppings such as olives, sun-dried tomatoes, or cheese for added flavor and texture. Proper Dough Temperature: Ensure your water is at the right temperature (around 110°F) for activating the yeast effectively. Too hot can kill the yeast; too cold will not activate it. Let It Rest: Allowing the dough to rest after shaping will help it become lighter and airier, leading to a fluffier focaccia. {{image_4}} You can change the flavor of your focaccia. Try cheese and herb focaccia. Mix shredded cheese, like mozzarella or parmesan, into the dough. This adds a rich taste. Another option is Mediterranean olive focaccia. Add chopped olives to the dough for a salty kick. You can even top it with sun-dried tomatoes or artichokes. These flavors transport you to a sunny Mediterranean beach. If you want a healthier option, use whole wheat flour instead of all-purpose flour. This gives a nutty flavor. It also adds more fiber. You might need to adjust the water amount. Whole wheat flour absorbs more liquid. For a vegan version, swap the extra virgin olive oil for a plant-based oil. Avocado oil or coconut oil work well. This keeps the focaccia tasty and suitable for everyone. Get creative with toppings! You can use cherry tomatoes, bell peppers, or even caramelized onions. These add color and flavor. Dips are also a great pairing. Serve focaccia with balsamic vinegar or a mix of olive oil and herbs. Hummus or pesto also taste great alongside. You can explore different flavors to match your meal or snack. To keep your focaccia fresh, you have two main options: room temperature and refrigeration. - Room Temperature: Place the focaccia in a paper bag. This keeps it moist but allows some air flow. Avoid plastic bags, as they can make it soggy. - Refrigeration: If you need to store it longer, wrap it tightly in plastic wrap. This reduces air exposure but can dry it out. Freezing is a great option for longer storage. Here’s how to do it right: 1. Cool Completely: Let the focaccia cool down fully after baking. 2. Slice Before Freezing: Cut it into squares or pieces. This makes it easier to thaw just what you need. 3. Wrap It Up: Use plastic wrap and then aluminum foil to keep air out. 4. Label and Date: Mark the bag with the date. It can last up to three months in the freezer. To thaw, just take it out and leave it at room temperature for a few hours. When it comes to reheating, you have two good choices: the oven and microwave. - Oven: Preheat to 350°F. Place focaccia directly on the rack or a baking sheet. Heat for about 10-15 minutes until warm. This keeps it crispy. - Microwave: For a quick method, use the microwave. Place a piece on a plate and cover with a damp paper towel. Heat for 15-30 seconds. This method is fast but may soften the crust. Choosing the right method can make your focaccia taste fresh and delicious again! Yes, you can make focaccia ahead of time! To prepare it overnight, follow these steps: - After the first rise, shape the dough and place it in the pan. - Cover the pan tightly with plastic wrap or a kitchen towel. - Place it in the fridge. This slows down the rise and adds flavor. - The next day, take it out of the fridge. Let it sit for about 30 minutes to warm up. - Then, create dimples and add toppings before baking. Focaccia pairs well with many dishes. Here are some ideas: - Serve it with olive oil and balsamic vinegar for dipping. - Pair it with soups like minestrone or tomato. - Enjoy it alongside salads, especially Caesar or Greek salad. - Use it as a sandwich base for meats or veggies. To check if your focaccia is done, look for these signs: - The crust should be golden brown and look crisp. - Tap the bottom of the bread; it should sound hollow. - The top should be fragrant and slightly springy to touch. - If you have an instant-read thermometer, the inside should read about 190°F. Garlic herb focaccia bread is simple and fun to make at home. We covered main ingredients, step-by-step instructions, and tips for perfect results. Don't forget to experiment with different flavors and toppings! Store your bread properly for the best taste, and enjoy it fresh or reheated. With this guide, you'll bake delicious focaccia every time. I hope you feel inspired to try it out. Happy baking!
                      Garlic Herb Focaccia Bread Fluffy and Flavorful Delight
                    • To make Air Fryer Ranch Potato Bites, you need simple, fresh ingredients. Here’s the list you will need: - 1 pound baby potatoes, halved - 2 tablespoons extra virgin olive oil - 2 tablespoons ranch seasoning mix - 1 teaspoon garlic powder - 1 teaspoon onion powder - ½ teaspoon smoked paprika - Salt and pepper, to taste - Fresh chives or parsley, finely chopped (for garnish) These ingredients come together to create a tasty and crispy snack. The baby potatoes are key. They cook quickly and have a great texture. The olive oil helps them crisp up nicely in the air fryer. Ranch seasoning adds a bold flavor that pairs well with the garlic, onion, and paprika. When you choose your potatoes, look for firm ones without any blemishes. Fresh herbs like chives or parsley add a nice touch when you serve them. They make the dish look vibrant and add a fresh taste. Gather these ingredients, and you’re ready to start your cooking adventure! Start by preheating your air fryer to 400°F (200°C). This step takes about 5 minutes. Preheating helps cook the potatoes evenly and gives them that perfect crisp. Next, grab 1 pound of baby potatoes and cut them in half. Place the halved potatoes into a large mixing bowl. Pour 2 tablespoons of extra virgin olive oil over the potatoes. Toss them well so each half gets a nice coat of oil. Now it’s time to add flavor! Sprinkle 2 tablespoons of ranch seasoning mix, 1 teaspoon of garlic powder, 1 teaspoon of onion powder, and ½ teaspoon of smoked paprika over the potatoes. Add salt and pepper to taste. Mix everything together with a spatula or spoon. Make sure all the potato halves are coated in that tasty seasoning. Carefully place the seasoned potato halves in a single layer in the air fryer basket. Avoid overcrowding for the best results. Cook the bites for 15 to 20 minutes. At the halfway mark, gently shake the basket to ensure even cooking. You’ll know they are done when they turn golden brown and crispy outside, while staying tender inside. Once cooked, take the potato bites out of the air fryer. Let them cool for a moment to avoid burns. For a beautiful finish, sprinkle finely chopped fresh chives or parsley on top. This adds a lovely touch of color and freshness to your dish. Enjoy your crispy ranch potato bites! To get the best crisp on your ranch potato bites, start with dry potatoes. Pat them with a paper towel before cooking. This helps the oil stick better. Use enough oil, but don’t drown them. Two tablespoons is just right. The air fryer’s hot air needs space to move around the potatoes. I recommend setting your air fryer to 400°F (200°C). This high heat cooks the outside fast, making it crispy. Cook for 15 to 20 minutes. Check them at 10 minutes. Shake the basket gently to ensure even cooking. The perfect potato bites should be golden brown and tender inside. Crowding the basket can ruin your crispiness. It traps steam and makes the potatoes soggy. Arrange the potato halves in a single layer. If you have more, cook them in batches. This way, you’ll enjoy the best texture and flavor every time. {{image_4}} You can change the flavor of your ranch potato bites. Try different seasoning blends. For a spicy kick, use taco seasoning. For a zesty twist, mix in lemon pepper. Italian seasoning also adds great flavor. Just swap out the ranch mix for your chosen blend. This keeps things fun and fresh. Want to make your potato bites even better? Try adding veggies! Cut up bell peppers, zucchini, or carrots. Toss them in with the potatoes before cooking. This adds color, taste, and nutrients. These extra veggies cook well in the air fryer. They turn out crispy and delicious, just like the potatoes. For a cheesy treat, try cheese-stuffed potato bites. After halving the potatoes, scoop out a bit from the center. Fill each half with cheese, like cheddar or mozzarella. Then coat them with your seasoning mix. Air fry them until the cheese melts and the outside is golden. This adds a yummy surprise inside! After making Air Fryer Ranch Potato Bites, let them cool. Then, place the leftovers in an airtight container. They will stay fresh in the fridge for up to three days. If you want to keep them longer, consider freezing. To reheat your potato bites, use the air fryer again. Set it to 350°F (175°C) for about 5 to 7 minutes. This will help them regain their crispiness. If you don’t have an air fryer, a regular oven works too. Just preheat it to 375°F (190°C) and bake for about 10 minutes. If you want to freeze the potato bites, let them cool completely first. Place them in a single layer on a baking sheet. Freeze until solid, then transfer them to a freezer bag. They can last up to three months in the freezer. When you’re ready to eat, thaw them in the fridge overnight before reheating. This method keeps them tasty and crispy. Yes, you can use larger potatoes. However, you must cut them into smaller pieces. Aim for bite-sized chunks. This helps them cook evenly and get crispy. Larger pieces may take longer to cook and may not crisp up as well. Ranch seasoning is a tasty mix. It often includes dried herbs and spices. Common ingredients are dill, parsley, garlic, and onion powder. Some mixes may add buttermilk powder for creaminess. You can find ranch seasoning in stores or make your own at home. Frozen potato bites usually take about 10 to 15 minutes. Preheat your air fryer to 400°F (200°C) first. Shake the basket halfway through cooking. This will help them cook evenly and become crispy. Yes! You can bake these potato bites in an oven. Preheat your oven to 425°F (220°C). Spread the seasoned potatoes on a baking sheet in a single layer. Bake for 25 to 30 minutes, flipping once until they are golden and crispy. This blog post shares a simple way to make tasty air-fryer baby potatoes. We covered the key ingredients, step-by-step instructions, and tips for great results. I also shared variations for added flavor and how to store your leftovers properly. In conclusion, making delicious air-fryer potatoes is easy and fun. Embrace these ideas for tasty snacks or sides. Enjoy experimenting with the flavors that excite you.
                      Air Fryer Ranch Potato Bites Crispy and Flavorful Snack
                    • - 1 pound fresh broccoli florets - 3 tablespoons extra virgin olive oil - 4 cloves garlic, finely minced - 1/2 cup freshly grated Parmesan cheese - Optional: 1/4 teaspoon red pepper flakes - Seasoning: sea salt and freshly cracked black pepper - Zest and juice of lemon for added flavor Garlic Parmesan Roasted Broccoli is a simple dish that shines with fresh ingredients. Start with one pound of broccoli florets. Look for bright green, firm florets for the best taste. Next, grab three tablespoons of extra virgin olive oil. This oil adds richness and helps the broccoli roast well. Then, you’ll need four cloves of garlic, minced finely. Garlic gives a strong, savory flavor that pairs perfectly with broccoli. For a cheesy touch, use half a cup of freshly grated Parmesan cheese. This cheese adds a creamy texture and rich taste. If you like a bit of heat, add a quarter teaspoon of red pepper flakes. This step is optional but can give your dish a nice kick. Don't forget to season with sea salt and freshly cracked black pepper. These spices bring out the flavors of your ingredients. Finally, the zest and juice of one lemon will brighten the dish. The lemon adds a fresh, zesty flavor that lifts the roasted broccoli. Each ingredient plays an important role in making this side dish a hit. 1. Preheat the oven to 425°F (220°C). This heat gives the broccoli crispy edges. 2. In a large mixing bowl, add 1 pound of fresh broccoli florets. This will be the star of your dish. 1. Pour in 3 tablespoons of extra virgin olive oil. Toss the broccoli to coat it well. 2. Add 4 cloves of finely minced garlic. This will add rich flavor. 3. Sprinkle in 1/2 cup of freshly grated Parmesan cheese. This makes everything cheesy and delicious. 4. If you want a spicy kick, add 1/4 teaspoon of red pepper flakes. 5. Season with sea salt and freshly cracked black pepper to taste. Toss everything together well. 1. Spread the seasoned broccoli evenly on a lined baking sheet. Keep the florets in a single layer. 2. Roast in the oven for 20-25 minutes. Stir halfway through to ensure even cooking. You want fork-tender broccoli with browned edges. This method makes a simple yet flavorful side dish that pairs with many meals. To get crispy edges, spread the broccoli in a single layer on your baking sheet. This allows hot air to circulate around each floret. When the broccoli is crowded, it will steam instead of roast. Also, roast at a high temperature, like 425°F (220°C). Heat helps the broccoli brown and become crispy. After roasting, add lemon zest and juice. This brightens the taste and adds freshness. You can also try different cheeses, like pecorino or feta. Adding spices, like smoked paprika or cumin, can change the flavor too. Feel free to experiment and find your favorite mix! {{image_4}} You can change things up with different vegetables. Asparagus and Brussels sprouts are great options. They roast well and soak up flavors just like broccoli. You can also try cauliflower for a unique twist. If you want to switch cheeses, try pecorino. It has a sharp taste that pairs nicely with garlic. For a vegan option, use nutritional yeast. It gives a cheesy flavor without dairy. Garlic Parmesan roasted broccoli pairs well with many main dishes. Grilled chicken or fish complement its flavors nicely. You can serve it next to steak for a hearty meal, too. This dish also works well as a snack. Enjoy it hot or cold. You can dip it in your favorite sauce. Serve it with hummus or ranch for a tasty treat. To keep your Garlic Parmesan Roasted Broccoli fresh, store it in the fridge. Let it cool completely first. Then, place it in an airtight container. This helps keep moisture out. You can store it for up to three days. If you want to keep it longer, freeze it. Use a freezer-safe bag and squeeze out the air before sealing. When you reheat the broccoli, aim to keep it crispy. The best method is to use the oven. Preheat your oven to 350°F (175°C). Spread the broccoli on a baking sheet. Heat for about 10 minutes. This will restore some crunch. To refresh the flavors, add a splash of lemon juice before serving. You could also sprinkle a bit of new Parmesan cheese on top. This revives the taste and makes it tasty again. Can I make this recipe ahead of time? Yes, you can prep the broccoli ahead of time. Toss it with oil and seasonings. Store it in the fridge for up to 24 hours. When ready, just roast it for a fresh side dish. How can I make it spicier? To add heat, increase the red pepper flakes. You can also mix in some cayenne pepper or a dash of hot sauce. Adjust the spice to fit your taste. What is a good vegetarian main dish to pair with this side? Garlic Parmesan roasted broccoli goes great with quinoa or a hearty vegetable risotto. Grilled portobello mushrooms also make a tasty main dish. They complement the broccoli’s rich flavor well. Can I use frozen broccoli instead of fresh? You can use frozen broccoli, but fresh tastes better. If you use frozen, thaw and drain it first. Pat it dry to avoid sogginess. Adjust roasting time since frozen broccoli may cook faster. This post shared how to make Garlic Parmesan Roasted Broccoli. You learned about fresh ingredients and step-by-step instructions for roasting. Tips included how to get crispy edges and flavor boosts. I also suggested tasty variations and storage methods to keep leftovers fresh. Enjoy trying this easy recipe! Remember, using fresh ingredients and the right techniques makes all the difference. A healthy side can elevate any meal. Happy cooking!
                      Garlic Parmesan Roasted Broccoli Flavorful Side Dish
                    • All-purpose flour is the main base for your scones. It gives structure and lightness. You need 2 cups for this recipe. Measure it carefully for best results. Baking powder helps the scones rise. You only need 1 tablespoon. This ingredient makes them fluffy and soft. Make sure it’s fresh for the best effect. Sharp cheddar cheese adds a rich flavor. Use 1 cup of freshly grated cheese. Grating it yourself gives the best taste. The sharpness pairs well with the herbs. Fresh herbs brighten the scone's flavor. You’ll need 1/4 cup of finely chopped chives and 1/4 cup of parsley. These herbs add a fresh, vibrant touch. Don't skip this step; the herbs make your scones special. Start by preheating your oven to 400°F (200°C). This step is key for a nice bake. While your oven heats, line a baking sheet with parchment paper. This helps the scones not stick. In a large mixing bowl, whisk together the following dry ingredients: - 2 cups all-purpose flour - 1 tablespoon baking powder - 1/2 teaspoon salt - 1/4 teaspoon ground black pepper Mix them well until they are fully combined. This creates a good base for your scones. Now, it’s time to add the cold butter. Cut it into small cubes (1/2 cup). Add the cubes to your dry mix. Use your fingers or a pastry cutter to work the butter into the flour. You want it to look like coarse crumbs. This step is important for a flaky scone. Next, fold in the good stuff! Add 1 cup of freshly grated sharp cheddar cheese. Then, toss in: - 1/4 cup fresh chives, finely chopped - 1/4 cup fresh parsley, finely chopped Make sure the cheese and herbs are spread evenly throughout the mixture. This adds great flavor. Slowly pour in 2/3 cup of whole milk. Use a spatula or wooden spoon to mix gently. You want the dough to just come together. Be careful not to overwork it. This keeps your scones light and fluffy. Flour a clean surface and place the dough on it. Pat the dough into a circle, about 1-inch thick. Don't press too hard. Next, cut the dough into 8 wedges using a sharp knife or pizza cutter. Place them on the prepared baking sheet, leaving space between each wedge. Bake them in the preheated oven for 15-18 minutes. They should turn golden brown. A toothpick should come out clean when done. Let them cool for a few minutes before transferring to a wire rack. Enjoy your savory cheddar herb scones warm! To keep your scones light, use cold butter. Cut it into small cubes first. Mix the butter quickly into the flour until it looks like coarse crumbs. If the butter melts, the scones will not rise well. Remember, less mixing is better. It helps keep air pockets in the dough. When you add the milk, stir gently. Use a spatula or wooden spoon to mix. You want to combine the dough without overworking it. Overmixing can make the scones tough. Just mix until the dough sticks together. If it feels too dry, add a little more milk. Preheat your oven to 400°F (200°C) before baking. This helps the scones to rise evenly. Bake them for 15-18 minutes. Look for a golden brown color on top. A toothpick should come out clean when you test them. Let them cool for a few minutes before you enjoy them. {{image_4}} You can try different cheeses in your scones. If you want a stronger taste, use Gruyère or blue cheese. For a milder flavor, Swiss cheese works well too. Each cheese will change the taste of your scones. Experiment and see what you like best! Herbs can add a lot of flavor to your scones. Besides chives and parsley, you can use thyme or rosemary. Basil adds a sweet note, and dill brings a fresh kick. Mix and match herbs for unique flavors that suit your taste. Feel free to add more ingredients for extra flavor. Cooked bacon bits or sun-dried tomatoes can give a savory touch. Adding olives or jalapeños can create a spicy twist. Get creative and make these scones your own! To keep your savory cheddar herb scones fresh, place them in an airtight container. You can store them at room temperature for up to two days. If you want to keep them longer, refrigeration is a good option. Just remember to wrap them tightly in plastic wrap or foil. When you want to enjoy your leftover scones, reheating makes them taste fresh. Preheat your oven to 350°F (175°C). Place the scones on a baking sheet and heat for about 5-10 minutes. This warms them through and keeps them nice and crisp. Freezing is a great way to save scones for later. Allow them to cool completely first. Then, wrap each scone in plastic wrap and place them in a freezer-safe bag. They can stay in the freezer for up to three months. When you’re ready to eat, thaw them in the fridge overnight and reheat as mentioned above. Enjoy your delicious treat anytime! Yes, you can use other types of milk. Options include almond milk or oat milk. These may change the taste but will still work. If you want a creamier texture, try half-and-half. Look for a golden brown color. A toothpick inserted in the center should come out clean. The edges should feel firm but not hard. Trust your senses; they will guide you! These scones pair well with whipped herb butter. You can also serve them with jam for a sweet twist. Try them with a warm soup or salad for a complete meal. Yes! You can prepare the dough and wrap it tightly. Store it in the fridge for up to 24 hours. When you're ready, just bake it as usual. This makes meal prep a breeze! In this blog post, we explored the key ingredients for savory cheddar herb scones. I shared step-by-step instructions, helpful tips, and storage advice. You learned about variations to personalize your scones too. Savory cheddar herb scones are fun to make and taste great. Try them for breakfast or with soup. Enjoy exploring new flavors and recipes. Happy baking!
                      Savory Cheddar Herb Scones Flavorful and Simple Treat

                    WANT TO SAVE THIS RECIPE?

                    1 shares

                    Leave a Reply Cancel reply

                    Your email address will not be published. Required fields are marked *

                    Recipe Rating


                    Get ready to spice up your snack game with these easy and delicious Spicy Ranch Pretzels! This simple recipe combines mini pretzels with a zesty ranch seasoning mix, garlic, onion, and a kick of cayenne for the perfect crunchy treat. Bake them to golden perfection and serve at your next party or movie night! Click to explore the full recipe and start snacking today! #SpicyRanchPretzels #SnackIdeas #PartyFood #RecipeInspiration

                    Welcome!

                    This is an introduction to me and my site to establish E-E-A-T. Keep this short and simple.

                    More about me

                    Popular

                    • - Oreo cookies: 1 package (about 36 cookies), finely crushed - Unsalted butter: ½ cup, melted - Cream cheese: 8 oz, softened to room temperature - Powdered sugar: 1 cup - Whipped topping: 1 cup (like Cool Whip) - Instant chocolate pudding mix: 1 package (3.9 oz) - Cold milk: 2 cups - Additional whipped topping: 1 cup (for the final layer) - Garnish: Chocolate shavings or crushed Oreo cookies For the best flavor, use fresh cream cheese and high-quality whipped topping. If you want a fun twist, you can swap Oreo cookies for another chocolate cookie. This adds a unique taste while keeping it delicious. {{ingredient_image_2}} To start, grab a medium mixing bowl. Add 36 crushed Oreo cookies and ½ cup melted butter. Stir this mix until the crumbs are well-coated. Now, take your 9x13 inch baking dish and press the mixture firmly into the bottom. Make sure it’s even. This helps the crust hold together. You can use a flat-bottomed cup to pack it down. Once done, place the dish in the fridge. Let it chill while you prepare the next layers. Next, in a separate bowl, take 8 oz of softened cream cheese and 1 cup of powdered sugar. Beat them together using an electric mixer. Mix on medium speed until it’s creamy and smooth. Avoid over-mixing to keep it fluffy. Now, gently fold in 1 cup of whipped topping with a spatula. Be careful not to deflate the mix. Spread this cream cheese layer evenly on the chilled crust. This layer adds a rich, creamy taste. In another bowl, whisk together 1 package of instant chocolate pudding mix with 2 cups of cold milk. Whisk for 2-3 minutes until it thickens. This is key for a perfect pudding layer. Pour the thickened pudding over the cream cheese layer. Use a spatula to spread it evenly. This ensures every bite has that delightful chocolate flavor. Now, take the remaining 1 cup of whipped topping. Carefully spread it over the chocolate pudding layer. Use a spatula to smooth the top. A smooth finish looks great and makes serving easier. This layer adds a light, airy touch to your dessert. Cover your lasagna with plastic wrap and refrigerate for at least 4 hours. For the best flavor, chill it overnight. This helps the layers set properly. Before serving, add some fun garnishes! Sprinkle chocolate shavings or crushed Oreo cookies on top. This not only looks nice but adds a tasty crunch to the dessert. To make your Chocolate Oreo Lasagna look stunning, layering is key. Start with the crust. Press it evenly into the pan. This gives a solid base. Next, spread the cream cheese layer smoothly over it. Use a spatula for a nice finish. The pudding layer comes next. Pour it gently to keep layers separate. Finally, top it with whipped topping. Smooth it out for a clean look. To avoid sogginess, chill the crust before adding layers. A cold crust holds up better. Let the layers set well in the fridge. This helps them stay distinct when you cut the dessert. Use a sharp knife for clean slices. Chocolate Oreo Lasagna pairs well with coffee or milk. A scoop of vanilla ice cream adds a tasty touch. You can also serve it with fresh berries for a fruity contrast. For a fun twist, serve it in individual cups. Layer the ingredients in clear cups for a beautiful view. This makes it easy for guests to grab and enjoy. You could even use mini jars for a cute presentation. Encourage everyone to dig in and enjoy all the layers together. Pro Tips Chill for Best Results: Allow the lasagna to chill overnight for the flavors to meld and the texture to firm up, making it easier to cut into clean squares. Variations on Toppings: Experiment with different toppings such as crushed nuts, sprinkles, or even a drizzle of caramel sauce for added flavor and visual appeal. Use Quality Ingredients: For the best flavor, use high-quality cocoa powder and chocolate pudding mix. The better the ingredients, the better your dessert will taste. Serve with Ice Cream: Elevate your dessert by serving individual squares of chocolate lasagna with a scoop of vanilla ice cream or whipped cream on the side. {{image_4}} You can easily switch up the flavors in your Chocolate Oreo Lasagna. Here are some fun ideas: - Peanut Butter: Mix peanut butter into the cream cheese layer. This adds a rich, nutty taste. - Mint: Use mint-flavored Oreos for a fresh twist. You can also add mint extract to the cream cheese layer. - Coffee: Add instant coffee granules to the chocolate pudding for a tasty kick. For ingredient swaps, try different cookies. Use gluten-free cookies if you want a gluten-free option. You can also use flavored whipped toppings. This way, you can create your own signature lasagna. If you need a gluten-free version, look for gluten-free Oreo cookies. Many brands offer great alternatives. Just follow the same steps in the recipe. For a dairy-free option, choose dairy-free cream cheese and whipped topping. You can also use almond milk or oat milk for the pudding layer. These swaps let everyone enjoy this dessert without worry. To keep your Chocolate Oreo Lasagna fresh, refrigerate it promptly. Place it in an airtight container or cover it tightly with plastic wrap. This helps keep the layers intact and prevents drying out. If you plan to eat it later, you can freeze it. To freeze, cut the lasagna into squares. Wrap each piece in plastic wrap and place them in a freezer-safe bag. This method allows for easy thawing later. The lasagna stays fresh in the fridge for about 3 to 5 days. After that, the layers may start to lose their texture. If you freeze the lasagna, it can last up to 2 months. Always check for signs of spoilage before eating. If you notice any off smells, a change in color, or an unusual texture, it’s best to throw it away. Enjoying this dessert while it's fresh ensures you savor every layer of yum! Chocolate Oreo Lasagna is a layered dessert. It has a crust made of crushed Oreo cookies. The crust holds a creamy layer of cream cheese mixed with whipped topping. Then comes a rich layer of chocolate pudding. Finally, more whipped topping tops it all off. You can garnish it with chocolate shavings or crushed Oreos. This dessert is both tasty and fun to serve as a treat. Yes, you can make this dessert ahead of time! It needs at least four hours in the fridge to set. For best results, chill it overnight. This gives the layers time to blend. You can impress guests by making it a day earlier. Just keep it covered in the fridge until you are ready to serve. Yes, you can create a vegan chocolate lasagna! Use vegan Oreo cookies for the crust. For the cream cheese layer, swap regular cream cheese for a dairy-free version. You can use coconut cream or a vegan whipped topping. For the pudding, make sure to use a vegan chocolate pudding mix. This way, everyone can enjoy the dessert. Scaling this recipe is simple. If you want more servings, double the ingredients. Use a larger baking dish if needed. For fewer servings, halve the ingredients and use a smaller dish. Keep the ratios the same for each layer. This way, you will still have a delicious treat no matter the size! To sum up, we covered how to make a tasty Chocolate Oreo Lasagna. We looked at the key ingredients and their quality, then followed step-by-step instructions for each layer. I shared tips for beautiful layers and how to elevate your presentation. Don't forget the variations and storage tips to keep your dessert fresh. With what you learned, you can impress anyone with this treat. Enjoy making and sharing this delicious dessert!
                      Chocolate Oreo Lasagna Decadent and Easy Delight
                    • - 2 ripe bananas, thoroughly mashed - 1 cup rolled oats - ½ cup almond butter (or any nut butter of your choice) - ¼ cup honey or maple syrup - ½ teaspoon pure vanilla extract - ½ teaspoon ground cinnamon - ¼ teaspoon sea salt - ¼ cup dark chocolate chips - ¼ cup of your favorite chopped nuts or seeds (such as walnuts or chia seeds) These ingredients create a simple yet tasty snack. The ripe bananas add natural sweetness. Their soft texture mixes well with oats and nut butter, giving these bars a chewy feel. Rolled oats bring fiber, making these bars filling. Almond butter, or any nut butter, gives healthy fats and protein. Honey or maple syrup adds sweetness and binds the bars together. Pure vanilla extract enhances the flavor, making every bite enjoyable. Optional add-ins let you customize your bars. Ground cinnamon adds warmth and spice. A bit of sea salt balances the sweetness. Dark chocolate chips can make the snack feel like a treat. Nuts or seeds add crunch and extra nutrients. These bars are great for breakfast or an afternoon snack. You can even share them with friends. Enjoy creating your own version! {{ingredient_image_2}} - Preheat the Oven: Start by setting your oven to 350°F (175°C). This step warms the oven for even baking. - Line an 8x8 inch baking pan: Grab your 8x8 inch pan and line it with parchment paper. Let the paper hang over the sides. This helps you lift the bars out easily later. - Combine Wet Ingredients: In a large bowl, mash 2 ripe bananas well. Add ½ cup almond butter, ¼ cup honey (or maple syrup), and ½ teaspoon vanilla extract. Mix until smooth and combined. - Incorporate Dry Ingredients: Now, add 1 cup rolled oats, ½ teaspoon ground cinnamon, and ¼ teaspoon sea salt to the bowl. Stir well. If you like, fold in ¼ cup dark chocolate chips and ¼ cup chopped nuts or seeds for extra flavor. - Pour Mixture into the Pan: Pour the mixture into your prepared baking pan. Use a spatula to spread it out evenly and flatten the top. - Bake to Perfection: Place the pan in the oven. Bake for 20-25 minutes. You know the bars are done when the edges turn golden brown. Test with a toothpick; it should come out clean. - Cool Before Cutting: After baking, take the pan out and let it cool for about 10 minutes. Then, lift the bars out using the parchment paper and place them on a wire rack to cool completely. - Slice and Serve: Once cooled, cut the bars into squares or rectangles. They are ready to enjoy as a snack! - Presentation Tips: For a nice touch, stack the bars on a pretty plate. Drizzle some honey on top, and add banana slices or a sprinkle of nuts for garnish. - Choosing Ripe Bananas: Use bananas with brown spots. They are sweeter and softer. The more ripe they are, the better your bars will taste. - Adjusting Baking Time: Keep an eye on your bars. Bake them until the edges turn golden brown. A toothpick should come out clean from the center. - Adding Spices: Try adding a pinch of nutmeg or ginger. They can give your bars a nice kick. Ground cinnamon is a classic choice that works well, too. - Incorporating Nut Butters: Almond butter is great, but feel free to use peanut butter or cashew butter. Each nut butter adds its own unique flavor to the bars. - Drizzling Options: You can drizzle honey or maple syrup on top for extra sweetness. A chocolate drizzle also makes them look fancy. - Garnishing Suggestions: Add banana slices, chopped nuts, or seeds as a garnish. This not only looks good but adds texture, too. Pro Tips Use Overripe Bananas: The riper the bananas, the sweeter and more flavorful your bars will be. Look for bananas with plenty of brown spots for the best results. Nut Butter Variations: Feel free to experiment with different nut butters like cashew or peanut butter to customize the flavor of your bars. Chilling for Firmness: For firmer bars, refrigerate the cut pieces for an hour before serving. This will help them hold their shape better. Customize Add-Ins: Get creative by adding dried fruits, seeds, or spices to the mixture for extra texture and flavor. Think raisins, cranberries, or even a pinch of nutmeg! {{image_4}} - Use sunflower seed butter instead of almond butter. This keeps the bars creamy. - You can also omit all nuts entirely. The bars will still taste great and stay healthy. - For gluten-free bars, choose certified gluten-free oats. This keeps the recipe safe for everyone. - If you want a vegan option, use maple syrup instead of honey. This keeps it plant-based. - You can add different fruits like blueberries or diced apples. This adds new flavors and textures. - Try using other extracts, like almond or coconut. These can enhance the taste of your bars. Store your banana oatmeal bars at room temperature for a quick snack. Keep them in an airtight container to maintain freshness. If it’s hot, put them in the fridge. Refrigeration helps prevent spoilage. To freeze the bars, cut them into squares first. Wrap each bar in plastic wrap. Then, place them in a freezer-safe bag. This helps keep them fresh for a longer time. When you want to eat one, take it out and let it thaw on the counter for about 30 minutes. You can also microwave it for a few seconds. Banana oatmeal bars last about a week at room temperature. In the fridge, they can last up to two weeks. If you freeze them, they can last for three months. Look for signs of spoilage like a change in smell or color. If they feel mushy or have mold, it’s best to toss them. Banana oatmeal bars are a tasty snack made mainly from ripe bananas and oats. They are chewy and sweet, perfect for a quick bite. These bars are easy to make and use simple ingredients. You can enjoy them for breakfast, as a snack, or even dessert. Yes, you can swap almond butter for other nut butters. Peanut butter works well and gives a nice flavor. Sunflower seed butter is a good choice too if you want a nut-free option. Any creamy nut butter will mix well with the bananas and oats. Yes, these bars are a healthy choice! They contain whole grains from oats and natural sweetness from bananas. Almond butter adds healthy fats and protein. Dark chocolate chips can add a bit of fun without too much guilt. Each bar gives you energy and satisfies your hunger. To lower the sugar, reduce the honey or maple syrup. You can also try using mashed bananas to sweeten more. If you are using chocolate chips, pick a lower-sugar option or skip them. Adding spices like cinnamon can also enhance flavor without extra sugar. Absolutely! You can mix in protein powder for an extra boost. Adding seeds like chia or hemp seeds also increases protein content. Mixing nuts into the batter can add crunch and protein too. This way, you make your bars even more filling and nutritious. These banana oatmeal bars are simple and tasty. You start with ripe bananas and oats. Then, mix in almond butter and sweeteners. Optional add-ins like chocolate chips add fun flavor. With tips on texture and flavor, you can tailor these bars to your liking. Store them well and freeze extras for later. Enjoy making these easy snacks, and feel free to get creative with the ingredients!
                      Savory Banana Oatmeal Bars Healthy Snack Option
                    • - Mini pretzels (16 oz bag) - Vegetable oil (½ cup) - Ranch dressing mix (1 packet) - Garlic powder (1 teaspoon) - Onion powder (1 teaspoon) - Cayenne pepper (1 teaspoon, adjust to taste) - Paprika (1 teaspoon) - Black pepper (¼ teaspoon) Start by preheating your oven to 250°F (120°C). This low heat helps the flavors sink into the pretzels. In a large bowl, add the vegetable oil, ranch dressing mix, garlic powder, onion powder, cayenne pepper, paprika, and black pepper. Whisk these items together until smooth. This mix is where the magic happens. Carefully add the mini pretzels into your bowl. Toss them gently to coat every pretzel with the spicy ranch mix. It’s key to make sure each pretzel gets a good layer of flavor. If you see some pretzels missing the mix, just toss them again. Next, line a baking sheet with parchment paper. This will make cleanup easy. Spread the coated pretzels in one single layer on the sheet. Avoid crowding them. Place the baking sheet in the preheated oven. Bake for 30 minutes, stirring every 10 minutes. This helps every pretzel get that nice, even crunch. When the timer goes off, take them out and let them cool. Cooling makes them crispier, and you want that perfect snack! To make sure each pretzel is coated well, toss them gently in the ranch mix. You want every pretzel to get that zesty flavor. If you like it hotter, adjust the cayenne pepper to your taste. You can add less for a milder snack or more for a spicy kick. After baking, let the pretzels cool completely. This step is key for that crunchy texture we love. If you skip this, they might stay soft. Once cooled, store the pretzels in an airtight container. This keeps them fresh and crunchy, perfect for snacking later. To keep your Spicy Ranch Pretzels fresh, store them in an airtight container. This helps to lock in the flavor and crunch. Place the container in a cool, dry place. Avoid spots with heat or moisture, as they can ruin the texture. These pretzels can stay fresh for up to two weeks. After that, they may start to lose their crunch. Look for signs of staleness, like a soft texture or loss of flavor. If they don’t taste right, it’s best to toss them out. {{image_4}} You now have a simple way to make tasty spicy ranch pretzels. You learned about the key ingredients, easy steps, and storage tips. Remember, you can adjust the spices to fit your taste. Feel free to explore different flavors or substitutions. With just a bit of effort, these snacks can be a hit. Enjoy your pretzel journey and let the crunch begin!
                      Spicy Ranch Pretzels Crunchy and Flavorful Snack
                    • Fresh strawberries are the star of this recipe. Use about 2 cups, hulled and sliced. They add natural sweetness and a vibrant color. Strawberries are juicy and fragrant, giving your popsicles a fresh taste. Choose ripe strawberries for the best flavor. Look for deep red color and a sweet scent. For sweetness, you can use either honey or maple syrup. Both add a nice touch. Honey gives a floral note and is thicker. Maple syrup has a rich flavor and is slightly thinner. Use ½ cup of your choice. Adjust the amount to match your taste. If you like it sweeter, add more. Greek yogurt is key for creaminess. You'll need 1 cup for the recipe. It adds a smooth texture and pairs well with the tart lemon juice. Greek yogurt is also a good source of protein and calcium. This makes your popsicles not just tasty, but also nutritious. It helps balance the sweetness and adds depth to each bite. To make the strawberry puree, start with fresh strawberries. Hull and slice them into smaller pieces. Place these slices in a blender. Add honey or maple syrup for sweetness. Blend the mix until smooth. You want it to be creamy but keep some small chunks of strawberry. This gives your popsicles a nice texture. Set this puree aside for later. In a separate bowl, gather your plain Greek yogurt. Squeeze in fresh lemon juice for a tangy kick. Add lemon zest to brighten the flavor. Pour in a little vanilla extract for depth. Don’t forget a pinch of salt to enhance all the tastes. Whisk these ingredients well until creamy and smooth. This yogurt mix adds a rich layer to your popsicles. Now, it’s time to layer your popsicle mold. Start with a spoonful of the strawberry puree. Fill the mold about halfway. Next, add a layer of the yogurt mixture. Repeat this process, alternating between the strawberry and yogurt layers. Keep layering until your molds are full. Carefully insert the popsicle sticks into each mold. Tap the mold gently on the counter to remove any air pockets. Finally, place the molds in the freezer. Let them freeze for at least 4 to 6 hours. They should be solid and hold their shape. Enjoy your homemade popsicles! To get the right texture, blend the strawberries until they are smooth but still have small chunks. This gives a nice bite when you eat the popsicles. Make sure the yogurt mixture is creamy but not too thick. A balanced mix leads to a fun, refreshing treat. To easily remove the popsicles, run warm water over the outside of the mold for a few seconds. This warms the sides just enough to loosen the pops. Pull them out gently from the bottom. If a popsicle sticks, try twisting it a little as you pull. For a bright and tasty display, arrange the popsicles on a colorful platter. You can add fresh strawberries and lemon wedges around them. This not only looks great but also hints at the flavors inside. It makes the popsicles even more inviting! {{image_4}} You can mix in other fruits to change the taste. Try using blueberries, raspberries, or mango. Simply blend them with the strawberries or layer them in the popsicle mold. Each fruit adds its own flavor. This lets you create fun combinations. You can even use a mix of tropical fruits for a sunny twist! You don't have to stick with Greek yogurt. You can use regular yogurt, dairy-free options, or even flavored yogurt. Each type affects the taste and texture. For creaminess, stick with full-fat yogurt. For a lighter feel, low-fat yogurt works well. Dairy-free yogurts made from almond or coconut are great for those who want a non-dairy option. Adding herbs and spices can boost the flavor. A pinch of fresh mint or basil can add a unique twist. You might also try a bit of cinnamon or nutmeg for warmth. These flavors mix well with the fruit and yogurt. Just a small amount can make a big difference. Experiment to find your favorite combo! To freeze your strawberry lemon yogurt popsicles, follow these steps for the best results: - Use a strong mold: Choose a sturdy popsicle mold. It helps keep the shape. - Fill carefully: Don’t overfill the molds. Leave a little space at the top. This allows for expansion as they freeze. - Layer right: Alternate layers of strawberry puree and yogurt mixture. This gives a beautiful look. - Use sticks: Insert popsicle sticks straight. They help you remove the popsicles later. If you have leftover popsicles, here’s how to store them: - Keep in the mold: If you plan to eat them soon, keep them in the mold. - Wrap individually: For long-term storage, wrap each popsicle in plastic wrap. This keeps them fresh. - Use a container: Place wrapped popsicles in an airtight container. This prevents freezer burn. Your popsicles can last a while if stored right: - Shelf life: They stay good for about 2 months in the freezer. - Check for ice crystals: If you see large ice crystals, they may not taste fresh. - Look for changes: If the color or smell changes, it’s best to toss them. Following these tips can help you enjoy your strawberry lemon yogurt popsicles for longer! Yes, you can use frozen strawberries. Just let them thaw first. This helps them blend well. Thawed strawberries may be softer, which can change the texture. You might want to adjust the sweetness too. You can change the sweetness by adding more or less honey or maple syrup. Start with half a cup. Taste the mixture before you freeze it. If it's not sweet enough, add more. You can also add a bit of sugar if you like. No popsicle mold? No problem! Use small cups or ice cube trays instead. Pour the mixture into these. Just make sure to insert sticks after a bit of freezing. This way, you still get tasty popsicles without a mold. We’ve explored how to make refreshing strawberry popsicles with simple steps. Fresh strawberries, sweeteners like honey and maple syrup, and creamy Greek yogurt create a tasty treat. Remember to layer carefully for the best texture. You can try different fruits, yogurt types, and flavors to mix things up. Store your popsicles correctly for fresh enjoyment later. Now, with your knowledge, you can impress family and friends with these delicious, homemade popsicles. Dive in and enjoy every bite!
                      Strawberry Lemon Yogurt Popsicles Easy and Refreshing

                    Seasonal

                    • When making Minute Teriyaki Shrimp Fried Rice, you need fresh and vibrant ingredients. Here is what you will need: - 2 cups cooked jasmine rice (preferably chilled) - 1 pound large shrimp, peeled and deveined - 2 tablespoons teriyaki sauce - 1 cup mixed vegetables (such as carrots, peas, and bell peppers) - 2 green onions, chopped (set aside some for garnish) - 2 cloves garlic, minced - 1 tablespoon ginger, minced - 2 tablespoons soy sauce - 1 tablespoon sesame oil - 1 tablespoon vegetable oil - Salt and pepper to taste - Sesame seeds for garnish Using chilled jasmine rice is key. It makes your fried rice fluffy and helps it fry up nicely. Fresh shrimp adds a sweet taste and tender texture. The mixed vegetables bring color and crunch to the dish. The garlic and ginger add a warm, spicy kick. Teriyaki and soy sauce blend together for a rich flavor. The sesame oil gives a nutty aroma that ties it all together. Make sure to gather all your ingredients before starting. Having everything ready helps you cook quickly and easily. Now you are set to make a delicious meal! - Heating the Skillet Start by heating 1 tablespoon of vegetable oil in a large skillet over medium-high heat. You want the oil to shimmer before adding any ingredients. This helps create a nice stir-fry. - Sautéing Garlic and Ginger Once the oil is hot, add 2 cloves of minced garlic and 1 tablespoon of minced ginger. Stir them for about 30 seconds. You want to smell their wonderful aroma. - Cooking the Shrimp Next, add 1 pound of peeled and deveined shrimp to the skillet. Cook them for about 2-3 minutes. Flip them once until they turn pink and opaque. After that, remove the shrimp and set them aside to keep warm. - Stir-Frying Mixed Vegetables In the same skillet, toss in 1 cup of mixed vegetables like carrots, peas, and bell peppers. Stir-fry these for 2-3 minutes. They should be tender but still crisp. This will add great texture. - Mixing in the Rice and Sauces Now, push the veggies to one side of the skillet. Add 2 cups of chilled jasmine rice to the clear space. Break apart any clumps with your spatula. Drizzle 2 tablespoons of teriyaki sauce and 2 tablespoons of soy sauce over the rice. Toss everything together so the rice soaks up the flavors. - Final Stir-Fry with Shrimp and Green Onions Finally, return the cooked shrimp to the skillet along with 2 chopped green onions. Drizzle 1 tablespoon of sesame oil over the mix. Stir-fry everything for an additional 2-3 minutes until heated through. Taste and season with salt and pepper as you like. Your Minute Teriyaki Shrimp Fried Rice is now ready to enjoy! - Using Chilled Rice for Best Results Chilled rice is key for fried rice. Freshly cooked rice has too much moisture. This makes it sticky and clumpy. Use rice that has been cooked and cooled. You can make it ahead of time. Store it in the fridge for at least an hour. - Keeping Vegetables Crisp To keep your vegetables crisp, don’t overcook them. Sauté them just until tender. This usually takes 2-3 minutes. It helps maintain their bright color and crunch. Stir-fry them quickly over high heat. This method locks in their flavor and nutrients. - Ensuring Shrimp are Cooked Perfectly Cook shrimp until they turn pink and opaque. This should take about 2-3 minutes. Don't overcrowd the pan; cook in batches if needed. Overcooked shrimp can become rubbery. So, watch them closely and remove them from the heat as soon as they are done. - Garnishing Ideas Garnish your dish for a pop of color and flavor. Use chopped green onions and a sprinkle of sesame seeds. This adds a nice crunch and visual appeal. You can also add a dash of extra teriyaki sauce on top for more flavor. - Ideal Pairings Pair this dish with a simple side salad or steamed broccoli. Both add freshness and balance to the meal. If you want more protein, serve it with a side of edamame. This makes a complete, satisfying dinner. {{image_4}} You can switch up the mixed vegetables to fit your taste. Instead of peas and carrots, try: - Broccoli florets - Corn - Snap peas These options add color and crunch. You can also use frozen mixed veggies for ease. For protein, shrimp is great, but other choices work well too. Try: - Chicken, diced and cooked - Tofu, cubed and sautéed Each protein brings its own flavor. This lets you customize the dish to your liking. To boost the flavor, add spices or sauces. Consider: - Red pepper flakes for heat - A splash of sriracha for a kick These additions can change the taste while keeping it simple. You can also add more veggies for nutrition. Try adding: - Bell peppers, sliced thin - Baby spinach, wilted in the pan These veggies add vitamins and make your dish even more colorful. To store your Minute Teriyaki Shrimp Fried Rice, let it cool first. Use an airtight container. This keeps it fresh for up to three days. Always label the container with the date. If you want to avoid sogginess, do not let it sit out too long. Keeping it chilled helps maintain the best taste and texture. Reheating this dish is easy and quick. You can use several methods: - Microwave: Place the rice in a microwave-safe dish. Add a splash of water. Cover it with a damp paper towel. Heat in short bursts, stirring in between, until warm. - Skillet: Heat a little oil in a skillet over medium heat. Add the rice and stir-fry for about five minutes. This method brings back some crispness. - Oven: Preheat your oven to 350°F (175°C). Spread the rice in a baking dish. Cover it with foil and heat for about 15 minutes. Choose the method that suits you best. Each option keeps the flavors intact and delicious. Yes, you can use frozen shrimp and vegetables. Just thaw them first. For shrimp, run them under cold water until they are soft. For veggies, microwave them for a minute or two. This will help them cook faster in the pan. To keep the rice from getting mushy, use chilled jasmine rice. The cold rice helps each grain stay separate. Also, avoid overcooking the rice in the pan. Stir-fry it just enough to heat it through. You can serve Teriyaki Shrimp Fried Rice with a side of steamed broccoli or a fresh salad. A simple cucumber salad adds a nice crunch too. You could also enjoy this dish with some crispy spring rolls for extra flavor. To make this dish gluten-free, use gluten-free soy sauce, like tamari. Check the teriyaki sauce label to ensure it is gluten-free as well. Using these swaps will keep the dish tasty while meeting your gluten-free needs. This blog post covered how to make Teriyaki Shrimp Fried Rice. We discussed the key ingredients, including shrimp, jasmine rice, and mixed vegetables. I shared step-by-step instructions to ensure your meal turns out tasty and satisfying. You found tips to keep the rice fluffy and the shrimp perfectly cooked. Lastly, we explored variations, storage, and answers to common questions. Now, you can create your own delicious dish, making it your own. Enjoy making this recipe!
                      Minute Teriyaki Shrimp Fried Rice Easy Dinner Idea
                    • To make Brown Butter Pumpkin Blondies, you need these ingredients: - 1 cup unsalted butter - 1 cup brown sugar, packed - ½ cup granulated sugar - 2 large eggs, at room temperature - 1 teaspoon pure vanilla extract - 1 cup pumpkin puree - 2 cups all-purpose flour - 1 teaspoon baking powder - ½ teaspoon baking soda - 1 teaspoon ground cinnamon - ½ teaspoon ground nutmeg - ¼ teaspoon salt - 1 cup chocolate chips or chopped nuts (optional) These ingredients come together to create a soft and tasty treat. The unsalted butter gives the blondies richness. Brown sugar adds deep flavor while granulated sugar balances the sweetness. Eggs bind everything, making them moist. Vanilla extract enhances the taste, while pumpkin puree brings a lovely fall flavor. The flour gives structure, and baking powder and baking soda help them rise. Cinnamon and nutmeg add warmth and spice. You can mix in chocolate chips or nuts to add texture. This blend of flavors makes these blondies hard to resist. - Set your oven to 350°F (175°C). - Grease a 9x13 inch baking pan or line it with parchment paper. - Melt the unsalted butter in a medium saucepan over medium heat. - Stir the butter continuously. Watch for it to bubble and foam. - After about 5-7 minutes, the butter will turn golden brown. - You’ll smell a nutty aroma when it’s ready. - In a large bowl, mix the warm browned butter with brown sugar and granulated sugar. - Whisk until smooth and combined. - Let the mixture cool for a few minutes. - Add two large eggs one at a time. Whisk well after each egg. - Stir in one teaspoon of pure vanilla extract until well blended. - Gently fold in one cup of pumpkin puree. - Make sure there are no lumps in the batter for a smooth texture. - In a separate bowl, whisk together flour, baking powder, baking soda, cinnamon, nutmeg, and salt. - Proper mixing helps distribute the leavening agents evenly. - Gradually add the dry mixture to the pumpkin mixture. - Stir gently until just combined. Don’t overmix. - If you want, fold in one cup of chocolate chips or chopped nuts. - Pour the batter into the prepared pan. Smooth the top with a spatula. - Bake for 25-30 minutes. - To check if they’re done, insert a toothpick into the center. It should come out clean with a few moist crumbs. - Let the blondies cool in the pan for about 10 minutes. - Carefully move them to a wire rack to cool completely. - Slice into squares for serving. If you want to change up the butter, try coconut oil or vegan butter. Both options will give you a rich flavor. For sugars, you can use coconut sugar or maple syrup. These alternatives will change the taste slightly but keep it delicious. If you need gluten-free options, use almond flour or a gluten-free all-purpose blend. Just make sure it has xanthan gum for the right texture. This will help keep your blondies soft and chewy. Do not overmix your batter. Stir just until the flour disappears. This keeps your blondies soft and tender. Overmixing can make them tough, and nobody wants that! To perfect the texture, watch the baking time closely. Check them around 25 minutes. A toothpick should come out with a few moist crumbs. This means they are done but still soft. Serve the blondies on a rustic wooden board for a cozy look. Dust them with powdered sugar or a sprinkle of cinnamon on top. This adds a nice touch and makes them look fancy. For an extra treat, add a dollop of whipped cream or a scoop of vanilla ice cream. This makes your dessert even more tempting. Warm blondies with ice cream create a perfect fall treat! {{image_4}} You can change the flavor of your blondies easily. Adding spices or extracts can make a big difference. Try adding a pinch of ginger for a spicy kick. You can also use almond extract instead of vanilla for a unique twist. A bit of allspice can give your blondies a warm, cozy flavor. Mix-ins add texture and extra taste. You might want to add chocolate chips or nuts. Chocolate chips provide a sweet surprise in each bite. Walnuts or pecans can add a nice crunch. You can also try butterscotch chips or white chocolate for a fun twist. Seasonal ingredients can make your blondies special. Adding cranberries brings a tart flavor that pairs well with pumpkin. Chopped pecans add a nice crunch and a hint of nuttiness. You could even mix in some dried apples for a fall feel. These twists keep your blondies fresh and exciting. To keep your Brown Butter Pumpkin Blondies fresh, store them in an airtight container. This keeps moisture out and helps them stay soft. You can also layer them with parchment paper to avoid sticking. If you like, you can sprinkle some powdered sugar on top before covering. This adds a nice touch and keeps them pretty. Freezing blondies is super easy. First, let them cool completely. Cut them into squares. Wrap each square in plastic wrap tightly. Then place them in a freezer bag or container. This prevents freezer burn and keeps them tasty. When you want to enjoy one, just take it out and let it thaw at room temperature. You can also warm it in the microwave for a few seconds for a fresh-baked taste. Brown Butter Pumpkin Blondies can last for about 3-4 days at room temperature. Just make sure to keep them in an airtight container. If you store them in the fridge, they can last up to a week. The cool air helps preserve their flavor and texture. Always check for any signs of spoilage before eating. Enjoy these delicious treats while they’re at their best! You can use mashed bananas or applesauce. Both options add moisture. They also bring a hint of sweetness. You can even try butternut squash puree for a similar flavor. Yes, you can use coconut oil or a dairy-free butter substitute. Both work well in this recipe. Just ensure your chocolate chips are dairy-free too. Check for a toothpick inserted in the center. If it comes out clean or with a few moist crumbs, they are ready. The edges will look set and slightly golden. Absolutely! Cream cheese frosting pairs well with the pumpkin flavor. You can also use a simple glaze for added sweetness. Not quite! Blondies are richer and denser than brownies. They have a lighter flavor due to the brown sugar and pumpkin. Yes, you can! They stay fresh for up to three days at room temperature. You can also freeze them for later enjoyment. Just wrap them well before freezing. You learned how to make tasty Brown Butter Pumpkin Blondies with simple steps. We covered key ingredients, important mixing methods, and tips for great results. Use my tips for fun twists and perfect texture. Remember to store them right so they stay fresh. Enjoy your baking and share your delicious results with friends and family. This treat will surely impress!
                      Brown Butter Pumpkin Blondies Irresistible Fall Treat
                    • - 3 medium sweet potatoes - 4 tablespoons unsalted butter - 4 cloves garlic - 1 teaspoon dried thyme - 1 teaspoon smoked paprika - Sea salt and black pepper - Fresh parsley for garnish Gathering the right ingredients is key for great flavor. Start with sweet potatoes. I like using medium-sized ones. Their sweetness shines when roasted. You need unsalted butter to create a rich, buttery taste. Garlic brings a bold flavor that pairs well with sweet potatoes. Use fresh garlic, not powder for the best taste. Dried thyme adds a nice herbal note. Smoked paprika gives a warm, smoky flavor that enhances the dish. Don’t forget sea salt and black pepper to elevate all the tastes. Lastly, fresh parsley adds color and a fresh touch when you serve. These ingredients come together to make a side dish that’s both simple and delicious. Each bite is a mix of sweet, savory, and aromatic flavors. Set your oven temperature to 425°F (220°C). This hot heat makes the sweet potatoes crisp and tasty. Melt 4 tablespoons of unsalted butter in a small pan over low heat. Once it melts, add 4 cloves of finely minced garlic. Cook it for 1-2 minutes until it smells great. Be careful not to let the garlic brown. Brown garlic can taste bitter. Take 3 medium sweet potatoes, peel them, and cut them into 1-inch cubes. In a large bowl, mix the sweet potatoes with the melted garlic butter. Add 1 teaspoon of dried thyme, 1 teaspoon of smoked paprika, and a good pinch of sea salt and black pepper. Toss everything well, so each piece gets coated with the flavor. Line a baking sheet with parchment paper for easy cleanup. Spread the sweet potato mix on the sheet in a single layer. This helps them roast evenly. Put the baking sheet in the preheated oven. Roast the sweet potatoes for 25-30 minutes. Flip them halfway through cooking. They should be fork-tender and golden brown when ready. When done, take the baking sheet out of the oven. Let the sweet potatoes cool for a few minutes. Before serving, sprinkle fresh parsley on top for color and freshness. Set your oven to 425°F (220°C). This high temperature helps caramelize the sweet potatoes. They will turn golden and taste great! Do not let the garlic brown. Browned garlic can taste bitter. Sauté the minced garlic gently for just 1-2 minutes until it smells nice. This keeps the garlic sweet and flavorful. To get fork-tender sweet potatoes, cut them into 1-inch cubes. This size cooks evenly. Flip them halfway through roasting. This ensures they cook all sides and become soft and delicious. {{image_4}} You can change the flavor by adding different herbs. Rosemary and sage work well. Just chop them fresh and mix them in. Try using one tablespoon of fresh herbs for each sweet potato. This will give your dish a new twist and make it more fragrant. Want a little heat? Try adding cayenne or chili powder. Just a pinch can bring a nice kick. You can start with ¼ teaspoon and adjust to your taste. These spices add depth and warmth to the sweet potatoes, making them more exciting. For a sweeter touch, add maple syrup or brown sugar. Drizzle one tablespoon of maple syrup over the sweet potatoes before roasting. If you prefer brown sugar, sprinkle one tablespoon over them. This creates a nice caramelized finish that balances the savory garlic and butter perfectly. To store leftovers, let the sweet potatoes cool first. Place them in an airtight container. Keep them in the fridge for up to three days. This helps maintain their flavor and texture. If you want to freeze the roasted sweet potatoes, first cool them completely. Spread them out in a single layer on a baking sheet. Freeze for about one hour. Once frozen, transfer them to a freezer-safe bag. They can stay in the freezer for up to three months. When you're ready to enjoy the sweet potatoes again, preheat your oven to 375°F (190°C). Place the sweet potatoes on a baking sheet. Bake them for about 15-20 minutes, or until heated through. You can also reheat them in a microwave for quick results. Just be sure to use a microwave-safe dish. Yes, you can swap sweet potatoes with other types. Use regular potatoes, Yukon Gold, or red potatoes. Each type will give a different taste and texture. However, adjust cooking time if needed. Regular potatoes may cook faster. Garlic Butter Roasted Sweet Potatoes last up to four days in the fridge. Keep them in an airtight container. For best flavor, eat them fresh. They may lose some texture when stored. You can easily make this dish vegan. Replace the butter with plant-based butter or olive oil. Use garlic-infused oil for added flavor. The dish will still be tasty and satisfying without dairy. These sweet potatoes pair well with many meals. Try serving them with grilled chicken or fish. They also work great with a green salad. For a vegetarian option, serve with quinoa or lentils. Garlic Butter Roasted Sweet Potatoes are easy to make and full of flavor. We covered the ingredients, steps, and tips for perfecting this dish. You learned about tasty variations and how to store leftovers. Remember, roasting at the right temperature and avoiding burnt garlic is key. With these simple tips, you can enjoy sweet, savory, and tender bites every time. Happy cooking!
                      Garlic Butter Roasted Sweet Potatoes Flavorful Side
                    • To make Pumpkin Cheesecake Swirl Muffins, gather these key ingredients. They create a rich, flavorful treat. - 1 cup all-purpose flour - 1 teaspoon baking powder - 1 teaspoon baking soda - 1 teaspoon pumpkin pie spice - ½ teaspoon salt - 1 cup canned pumpkin puree - ½ cup granulated sugar - ½ cup brown sugar, packed - ½ cup vegetable oil - 2 large eggs - 1 teaspoon vanilla extract - 4 ounces cream cheese, softened - 1 large egg (for cheesecake swirl) - ¼ cup powdered sugar (for cheesecake swirl) - 1 teaspoon vanilla extract (for cheesecake swirl) These ingredients combine to create muffins with a warm pumpkin flavor and a creamy cheesecake twist. The canned pumpkin puree adds moisture and depth. The blend of sugars gives a lovely sweetness. Don't forget the spices! They bring warmth and a hint of autumn to every bite. The cream cheese adds smoothness to the swirl. Using fresh, quality ingredients makes a big difference in taste. For best results, use room temperature eggs and cream cheese. This helps them mix well. Each ingredient plays a role in creating this delightful treat. Enjoy the process of gathering and preparing these ingredients. They will help you bake something truly special! First, you need to preheat your oven to 350°F (175°C). This step is key for baking the muffins evenly. While the oven warms up, prepare your muffin tin. You can use paper liners or a non-stick spray to keep the muffins from sticking. Next, sift together your dry ingredients. In a medium bowl, mix the all-purpose flour, baking powder, baking soda, pumpkin pie spice, and salt. Sifting helps to aerate the flour and ensures your muffins rise well. In a larger bowl, combine the wet ingredients. Add the canned pumpkin puree, granulated sugar, brown sugar, vegetable oil, two large eggs, and one teaspoon of vanilla extract. Mix until the batter is smooth. This step adds moisture and flavor to your muffins. Now, it’s time to combine the mixtures. Gradually add the dry ingredients to the wet pumpkin mix. Stir gently until just combined. Be careful not to overmix, as this can make your muffins tough and dense. For the cheesecake swirl, beat the softened cream cheese in a separate bowl. Use an electric mixer to make it creamy. Then, add one egg, powdered sugar, and one teaspoon of vanilla extract. Mix until you have a smooth and fluffy batter. To fill the muffin liners, spoon the pumpkin batter halfway up each liner. Then, add dollops of the cheesecake batter on top. With a toothpick or skewer, create a swirl by gently mixing the two batters. This gives your muffins a beautiful marbled look. Now, place the muffin tin in the preheated oven and bake for 20 to 25 minutes. Check doneness by inserting a toothpick into the center. If it comes out clean, your muffins are ready! After baking, let them cool in the pan for five minutes before transferring them to a wire rack. This allows them to cool completely and helps keep them fluffy. To create the best pumpkin cheesecake swirl muffins, avoid overmixing the batter. If you stir too much, the muffins can turn out tough. Mix just until you see no dry flour. Also, use room temperature ingredients. This helps everything blend smoothly, giving you a light and fluffy muffin. For a lovely finish, dust the muffins with powdered sugar and a sprinkle of cinnamon. This not only adds sweetness but also enhances the autumn vibe. You can place small decorative pumpkins around the muffins for a charming display. This makes your treats look even more inviting! These muffins pair great with coffee or a warm drink. The rich flavors complement each other perfectly. To store the muffins, keep them in an airtight container. They stay fresh for three days at room temperature. If you want to enjoy them later, you can freeze them. Just warm them in the oven when you're ready to eat! {{image_4}} You can make these muffins even more fun! Try adding chocolate chips or nuts. These add crunch and depth. Chocolate pairs well with pumpkin. Nuts give a nice texture. You can also switch up the spices. Instead of pumpkin pie spice, try cinnamon or nutmeg. Use almond or maple extract for a unique twist. Each change gives a new flavor to your muffins. If you need gluten-free muffins, swap the all-purpose flour with a gluten-free blend. Make sure the blend has a binding agent, like xanthan gum. This keeps the muffins from being too crumbly. For vegan muffins, use flax eggs instead of regular eggs. Mix one tablespoon of flaxseed meal with three tablespoons of water. Let it sit until it thickens. You can also replace cream cheese with a vegan cream cheese. These changes keep the muffins tasty while fitting your diet. To keep your pumpkin cheesecake swirl muffins fresh, store them in an airtight container. This helps prevent moisture from getting in. If you leave them out, they can last about two days at room temperature. In the fridge, they stay good for up to a week. Make sure to keep them covered to avoid drying out. Freezing is a great way to enjoy muffins later. First, let them cool completely. Then, wrap each muffin in plastic wrap. Place the wrapped muffins in a freezer bag or container. Label it with the date for easy tracking. Muffins can freeze well for up to three months. When you’re ready to eat one, thaw it in the fridge overnight or warm it in the microwave. Enjoy your treat anytime! You can use fresh pumpkin puree instead. Cook and mash a small pumpkin until smooth. You can also use butternut squash puree for a similar flavor. Both options work well in this recipe. Check the muffins with a toothpick. Insert it into the center of one muffin. If it comes out clean, the muffins are ready. They should also feel firm to the touch. Yes, you can prepare the batter a day in advance. Store it in the fridge until you are ready to bake. Just remember to stir it gently before filling the muffin tin. If the cheesecake mix is too runny, add more powdered sugar. This will help thicken the mixture. You can also chill it in the fridge for a bit before swirling it into the muffins. You can create delicious pumpkin cheesecake muffins with simple steps and fresh ingredients. Start by mixing your dry and wet components carefully, then swirl in the cheesecake mix for a tasty blend. Remember to avoid overmixing for the best texture. You can customize with add-ins like chocolate chips or nuts. Store them right to keep them fresh, and feel free to freeze extras for later. Enjoy these treats with coffee and share them with friends for a cozy snack!
                      Pumpkin Cheesecake Swirl Muffins Irresistible Treat

                    Footer

                    Get ready to spice up your snack game with these easy and delicious Spicy Ranch Pretzels! This simple recipe combines mini pretzels with a zesty ranch seasoning mix, garlic, onion, and a kick of cayenne for the perfect crunchy treat. Bake them to golden perfection and serve at your next party or movie night! Click to explore the full recipe and start snacking today! #SpicyRanchPretzels #SnackIdeas #PartyFood #RecipeInspiration
                    ↑ back to top

                    About

                    • Privacy Policy
                    • Disclaimer
                    • Terms & Conditions
                    • Accessibility Policy

                    Contact

                    • Contact
                    • Services
                    • Media Kit
                    • FAQ

                    Copyright © 2024 Tastytaleskitchen