Go Back
To make these tasty chocolate peanut butter cheesecake cups, you'll need: - 1 cup chocolate cookie crumbs - ¼ cup unsalted butter, melted - 8 oz cream cheese, softened - ½ cup creamy peanut butter - ½ cup powdered sugar - 1 teaspoon pure vanilla extract - 1 cup heavy whipping cream, chilled - Chocolate shavings and/or cocoa powder for garnish You can swap out some ingredients if needed: - For chocolate cookie crumbs, use graham cracker crumbs. - If you want a healthier option, try using low-fat cream cheese. - You can replace creamy peanut butter with crunchy peanut butter for more texture. - For a vegan version, use plant-based cream cheese and coconut cream instead of heavy cream. Choosing the right ingredients makes a big difference: - Use fresh cream cheese. It should feel smooth and free of lumps. - Pick high-quality peanut butter. Look for brands with only peanuts and salt. - Select unsweetened cocoa powder for a deeper chocolate flavor. - When buying heavy cream, check for a high fat content (at least 36%). - For chocolate shavings, use a good quality dark chocolate for rich taste. Making these cups with quality ingredients will bring out the best flavors. To start, grab a medium bowl. Add 1 cup of chocolate cookie crumbs and ¼ cup of melted butter. Mix these two until the crumbs are well coated. This step is key for a tasty crust. Next, use a tablespoon to scoop the mixture into serving cups. Press it down firmly to make a solid base. This helps the crust hold its shape. Once you finish, set the cups aside. Let them firm up while you prepare the filling. Now, take a large bowl. Beat 8 ounces of softened cream cheese with an electric mixer. Go on medium speed until it’s smooth and creamy. No lumps should remain! Gradually mix in ½ cup of creamy peanut butter, ½ cup of powdered sugar, and 1 teaspoon of vanilla extract. Keep mixing until everything is mixed well. The mixture should be thick and smooth. In another bowl, whip 1 cup of chilled heavy cream. Use high speed until stiff peaks form. Be careful not to over-whip it! Gently fold the whipped cream into the peanut butter mixture. Use a spatula to keep it airy. Spoon the peanut butter cheesecake filling into each cup. Fill them generously over the chocolate crust. Smooth the tops with a spoon for a neat look. Once filled, cover the cups with plastic wrap. Refrigerate for at least 4 hours. This time lets the filling set and become firm. The final result will be creamy and delicious cheesecake cups. Enjoy! To make great whipped cream, start with cold cream. Use heavy whipping cream for best results. Beat it in a clean bowl until stiff peaks form. This means the cream holds its shape. Avoid over-beating, as it can turn grainy. If it does, you can add a bit of fresh cream to fix it. Remember, the goal is a light and fluffy texture. This whipped cream will make your cheesecake cups extra special. A smooth cheesecake filling is key to great flavor. Begin with room temperature cream cheese. This helps it mix well without lumps. Use an electric mixer on medium speed when blending. Gradually add peanut butter, powdered sugar, and vanilla. Mix until everything is combined and creamy. When you fold in the whipped cream, do it gently. This keeps the filling light and airy. The perfect filling is rich and smooth, making each bite a delight. Presentation matters, especially for dessert. Use clear cups or small glasses to show off layers. Arrange them on a pretty platter for a nice touch. Before serving, drizzle warm peanut butter and chocolate sauce on top. Add chocolate shavings or a dusting of cocoa powder for flair. These small details make your cheesecake cups look gourmet. Guests will love the taste and the look of this treat! {{image_4}} You can jazz up your Chocolate Peanut Butter Cheesecake Cups with fun add-ins. Try adding chocolate chips for extra texture and sweetness. You can mix in chopped nuts for a crunchy bite. If you love fruit, consider folding in some mashed bananas or a splash of raspberry puree. These flavors will blend well with the rich peanut butter and chocolate. If you need a gluten-free option, swap chocolate cookie crumbs for gluten-free cookies or almond flour. You can use dairy-free cream cheese and heavy cream for a vegan version. Just ensure your peanut butter is also free from added sugars. These swaps keep the dessert tasty while meeting your dietary needs. Toppings can take your cheesecake cups to a new level. Drizzle warm peanut butter or chocolate sauce on top for a rich finish. You can also sprinkle crushed graham crackers or nuts for crunch. Try adding fresh berries or a mint leaf for color. These simple touches make your dessert look gourmet and inviting. Store your chocolate peanut butter cheesecake cups in the fridge. Use an airtight container to keep them fresh. Covering each cup with plastic wrap also works well. This keeps moisture out and flavors in. These cheesecake cups last up to five days in the fridge. If you want to freeze them, wrap each cup tightly. Use plastic wrap and then foil to protect them. They can last in the freezer for up to three months. When you’re ready to eat, thaw them in the fridge overnight. You do not need to reheat these cheesecake cups. They taste best when served cold. If you want to enhance the flavor, drizzle warm peanut butter or chocolate sauce on top. Enjoy these creamy treats straight from the fridge! Yes, you can make these cheesecake cups a day or two ahead. They taste great after chilling. Just cover them well with plastic wrap. Keep them in the fridge until you are ready to serve. This will save you time on the day of your event. If your filling is too runny, try these steps. First, make sure you whip the cream until stiff peaks form. This adds volume and helps set the mixture. If it’s still runny, you can add a bit more powdered sugar. This will help thicken it up. Lastly, make sure to chill the cups long enough. The filling needs time to set properly. Yes, you can use low-fat cream cheese if you prefer. It will still work well in the recipe. The texture may be a bit different but it will taste great. Just remember that it may not be as rich as the full-fat version. If you use low-fat, watch the mixing time. Overmixing can make it watery. You now have all the details for making delicious peanut butter cheesecake cups. From choosing quality ingredients to mastering the crust, each step is key. Remember, small tricks can make a big difference in taste and look. Variations let you adapt the cups to your needs or flavor likes. Store them right, and they’ll stay fresh for days. With all this info, you'll create amazing dessert cups that everyone will love. Enjoy every bite and share your results!

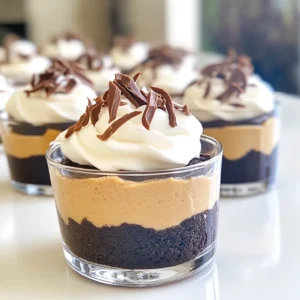
Chocolate Peanut Butter Cheesecake Cups No Bake

Indulge in the rich flavors of Chocolate Peanut Butter Cheesecake Cups with this easy recipe! Perfectly layered with a crunchy chocolate crust and a silky smooth peanut butter filling, these delightful cups are a crowd-pleaser. Whip them up in just 20 minutes and chill for a delicious dessert that will impress anyone. Click to discover how to make these decadent treats! #ChocolatePeanutButter #CheesecakeCups #DessertRecipes #NoBakeDesserts

Ingredients
  

1 cup chocolate cookie crumbs

¼ cup unsalted butter, melted

8 oz cream cheese, softened to room temperature

½ cup creamy peanut butter

½ cup powdered sugar

1 teaspoon pure vanilla extract

1 cup heavy whipping cream, chilled

Chocolate shavings and/or cocoa powder for garnish

Instructions
 

In a medium-sized bowl, combine the chocolate cookie crumbs and melted butter. Stir thoroughly until the cookie crumbs are evenly coated in butter.

    Using a tablespoon, evenly distribute and press the cookie mixture firmly into the bottom of individual serving cups or small dessert glasses to form a solid crust layer. Set the cups aside for the crust to firm slightly.

      In a large mixing bowl, beat the softened cream cheese with an electric mixer on medium speed until it is smooth and creamy with no lumps.

        Gradually add the creamy peanut butter, powdered sugar, and vanilla extract to the cream cheese mixture. Continue mixing until everything is fully incorporated and the mixture is luxuriously smooth.

          In a separate bowl, use an electric mixer to whip the chilled heavy cream on high speed until stiff peaks form. Take care not to over-whip.

            Gently fold the whipped cream into the peanut butter and cream cheese mixture using a spatula, taking care to maintain the light, airy texture of the whipped cream while ensuring it is fully blended.

              Spoon the peanut butter cheesecake filling generously over the chocolate crust in each cup, smoothing the tops with the back of a spoon for a neat finish.

                Cover the cups with plastic wrap and refrigerate for a minimum of 4 hours, or until the filling is set and firm to the touch.

                  Prep Time: 20 minutes | Total Time: 4 hours 20 minutes | Servings: 6

                    - Presentation Tips: Arrange the cheesecake cups on a decorative platter. For an eye-catching finishing touch, drizzle each cup with warm peanut butter and rich chocolate sauce, and sprinkle with chocolate shavings or a light dusting of cocoa powder before serving.